With the H700i, NZXT has attempted to offer something more than just what a traditional case would offer. They have stayed true to their minimalist design with some interesting features such as the cable management bar and the quick-release button for the side panel. Cable management looks like it’s on steroids considering the attention to detail put into appropriate cable channels. This is one case where you might not even need to use twisty ties or zip ties to secure the cables since the channels and velcro straps take care of all of them. The case has generous space to support extra fans and radiators on both the front and top panel. However, these aren’t really the major selling point for NZXT. The CAM-powered Smart Device is a unique innovation from them, although it might not seem that useful for its intended purpose. It serves great as a device to connect your fans and LED strips but the machine learning part doesn’t really seem to be beneficial.
Speaking of thermal performance, it’s satisfactory and you don’t have to expand from the pre-installed fans. The case does a great job of cooling even if not the best. If you’re looking for a case upgrade, then this might not be your choice. This is because we can’t seem to recommend the extra cost of the Smart Device. The case also exists in a non-i version without the device and the price is much lower. However, you’ll have to connect all the fans and the RGB LED strip to your motherboard. You will need to make sure your motherboard has enough fan headers and RGB headers as well to support the two RGB LED strips (if you install both of them). We said the H700i might be of someone’s choice because if you want digital control over your fan and lighting strips, then the Smart Device will definitely be useful.
The H-series comes in four variants including H700i, H500i, H400i and H200i. Catering to different form factors, the H700i is a mid-tower ATX case. These four variants are available with and without the ‘Smart’ device. So, the H700i comes with a ‘Smart’ device whereas the H700 doesn’t. All the cases come in four colour variants including white, matte black, matte black blue and matte black red.

Being the flagship of the line-up, the packaging is decent. It comes wrapped inside a plastic bag and protected between styrofoam. The plastic bag prevents scratching whereas the styrofoam takes care of any kind of damage from bumps during delivery.
Speaking of accessories, the box comes with an instruction manual, relevant screws required to assemble your system and an extra RGB LED strip. The case already comes with a pre-installed RGB LED strip on the top. These strips are magnetic so they’re easy to move around the case according to your preferences.
Specifications
Motherboard form factor: Mini-ITX, Micro-ATX, ATX, E-ATX
Power supply standard: ATX standard (max. length of 180mm)
I/O ports: 2x USB 3.1, 2x USB 2.0, 1x microphone, 1x headphone, power
Drive bays: 3 x 3.5-inch HDD, 7 x 2.5-inch SSD
Fan support: 3 x 120mm (front), 2 x 140mm (front), 3 x 120mm (top), 2 x 140mm (top), 1 x 120/140mm (rear)
Radiator support: Up to 280/360mm (front), up to 280/360mm (top), up to 120/140mm (rear)
Clearances: CPU cooler – 185mm, Graphics card – 413mm
Dimensions (H x W x D): 440mm x 220mm x 464mm
Exteriors of the NZXT H700i
As already mentioned, the H700i continues the minimalist design approach on the exteriors with some added flair. The overall size of the case looks quite big but it’s still a mid-tower ATX case. On the front panel, you won’t find anything other than a subtle NZXT logo at the bottom. The panel is removable but it’s difficult to pull out. It felt like it would break the plastic joints with too much effort. However, a strong fit is way better than a loose panel.
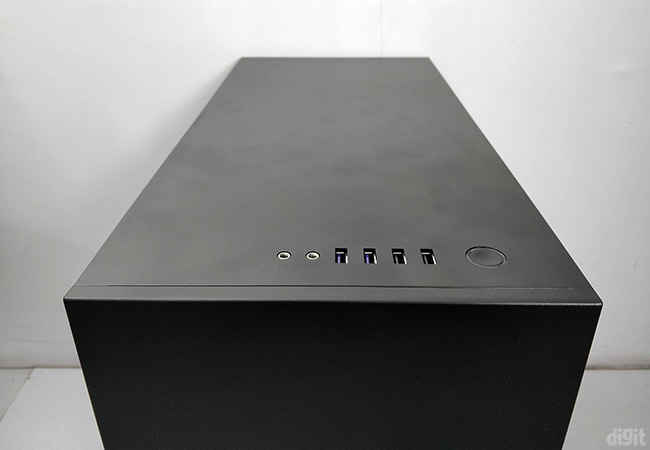
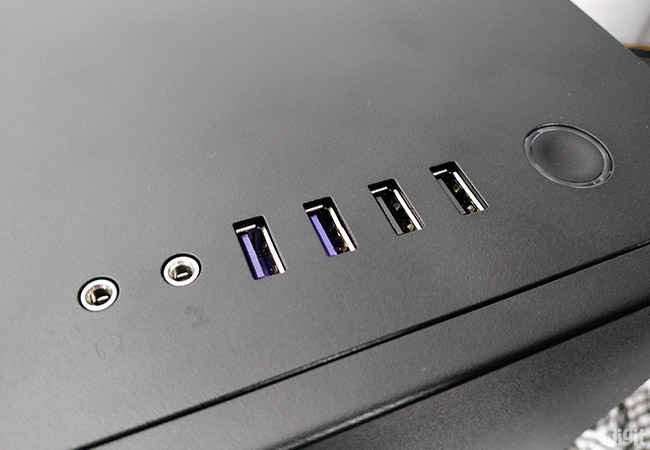
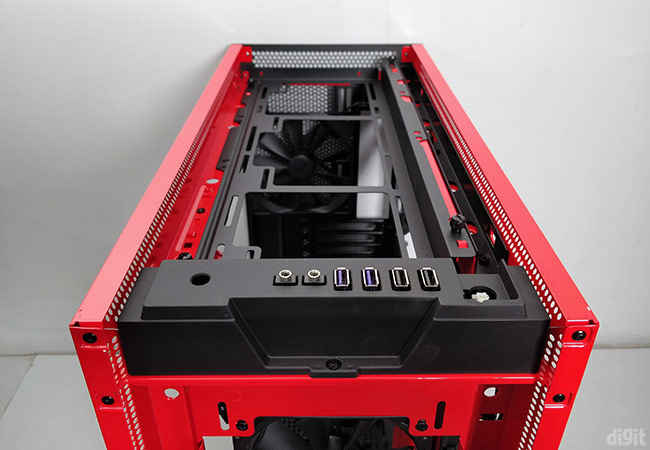
The top panel is also removable and it faces the same problem of being too rigid while removing. However, the front panel took more effort. You will find the two USB 2.0 and USB 3.0 ports each on the top along with the headphone and mic ports, and the power button. Since this is a new case, we expected a USB Type-C port as well. The problem with ports on the top is that they are highly susceptible to collecting dust. However, we understand that placing the IO ports on the front panel would have been a massive design compromise.
In order to remove the top panel the conventional way, you will have to remove the front panel first. Otherwise, you will have to push from inside the case through the fan mount. This would be impossible if you’ve installed fans or radiators on the top. Both the top and front panels are made of steel and they are sturdy enough to not bend when you’re removing them repeatedly.
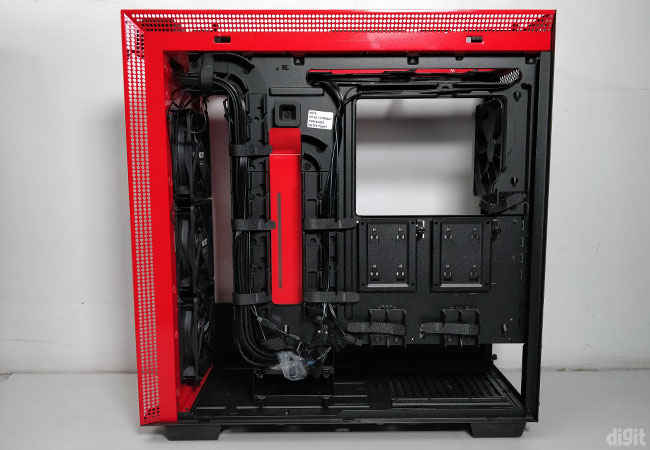
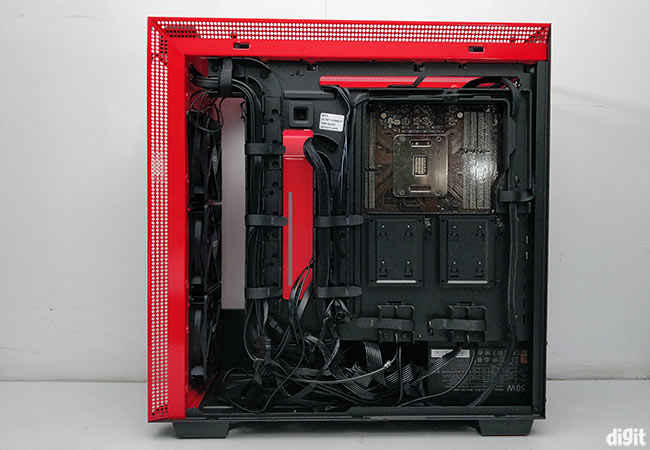
One side of the case has a tempered glass panel mounted with four screws at the corners. This four-screw mounted approach has become like a standard in most PC cases because it’s easy to implement. However, on a top model like this, we would expect an easier mechanism for removals like a hinged-panel or a suspended mechanism as seen on the H500i. The glass panel has a thickness of 4mm and a slight black tint to it. Because of the angled and perforated design all around the edges of the case, the case looks symmetrical even after the glass panel is installed and doesn’t protrude out. This perforation is present along the top and front panel and apart from serving as good design, it also doubles up as vents for airflow.
On the other side, you’d find the steel panel covering all the cables. NZXT has implemented an interesting removal mechanism and they’re calling it the ‘quick release side panel’. With the push of a button on the rear, the side panel simply falls off. It can be reinstalled by aligning the two protruding edges on the bottom with the case and pushing the top part in.
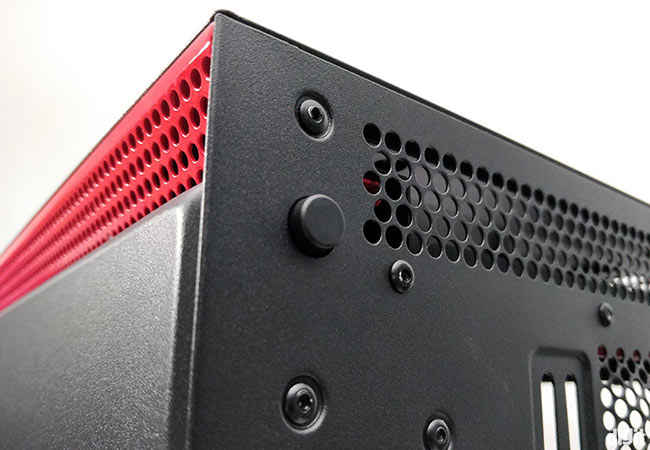
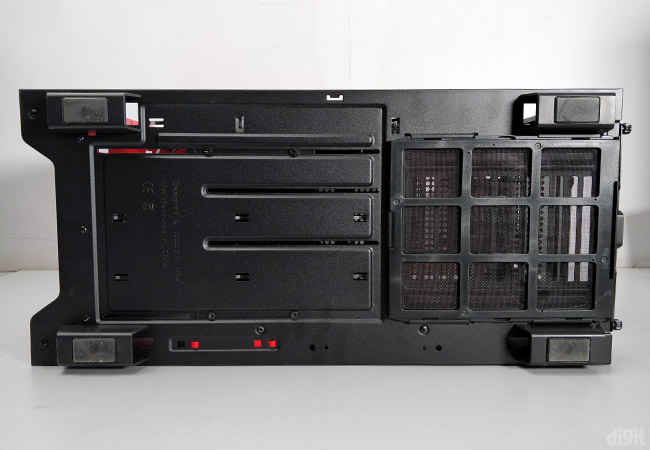
The rear panel has seven expansion slots and the PSU mount at the bottom. On the top corner, you will find the release button for the side panel. There’s a dust filter on the bottom panel near the PSU area. It’s removable and it can be pulled out from the rear. On the bottom panel, you will also find the screws required to remove or move the HDD cage inside.
Inside the NZXT H700i
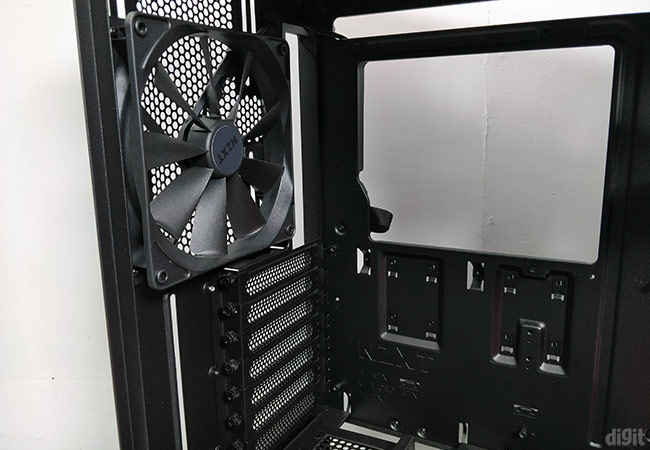
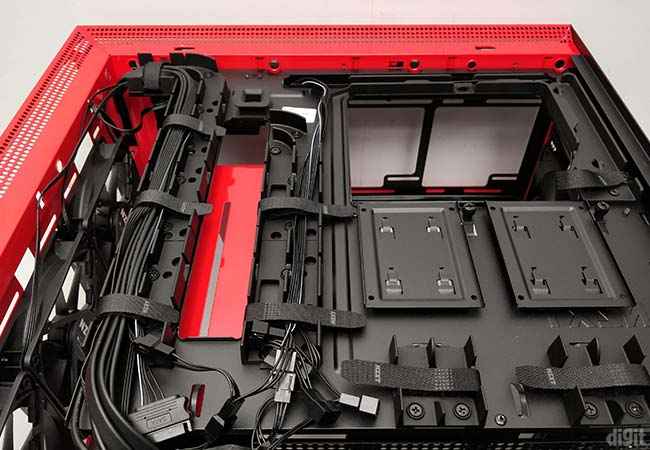
The interior follows the same minimalist approach on the outside. Removing the front panel gives you access to the magnetic dust filter placed in front of the fans. Behind the dust filter, you will get access to the three Aer F120 fans (case version) that are pre-installed in the case. The fans need to be installed from the inside rather than being mounted at the front. There’s a clearance of 2.5 cm between the front panel and the fans. How well this clearance works out is something we’ll explore under thermal performance.
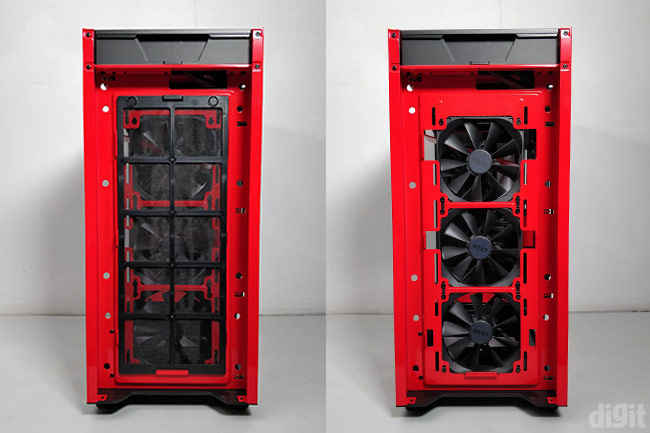
Under the top panel, you will find the exposed IO ports towards the front. The fan and radiator mount is removable which makes things a lot easier. A similar clearance of 2.5 cm is present on the top panel as well with the perforated edges for ventilation. With the four thumbscrews, the fan and radiator can be easily removed. There are extra spaces on the mount below the fan slots to route the fan cables inside the case.
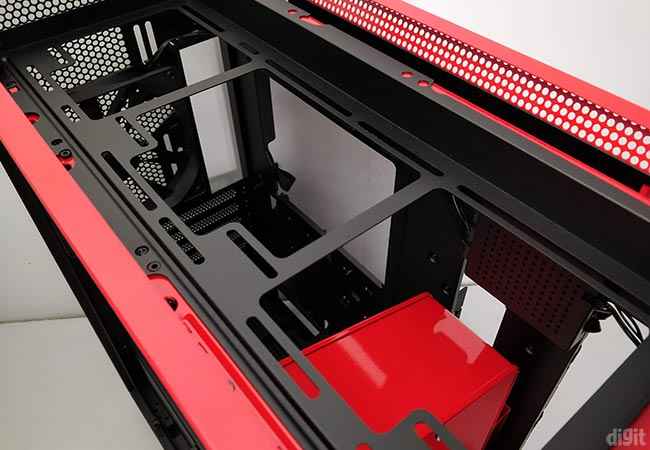
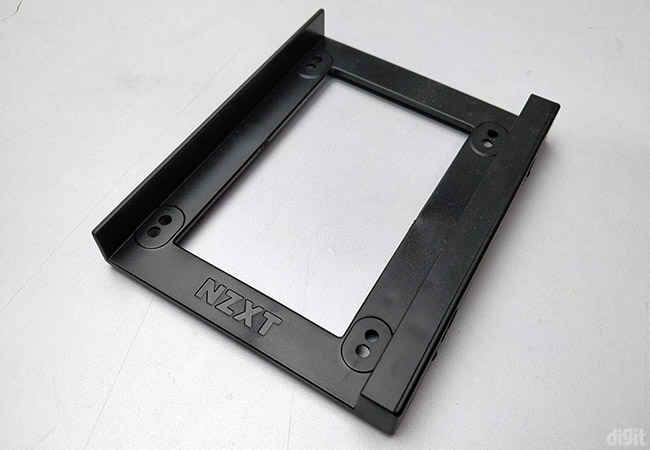
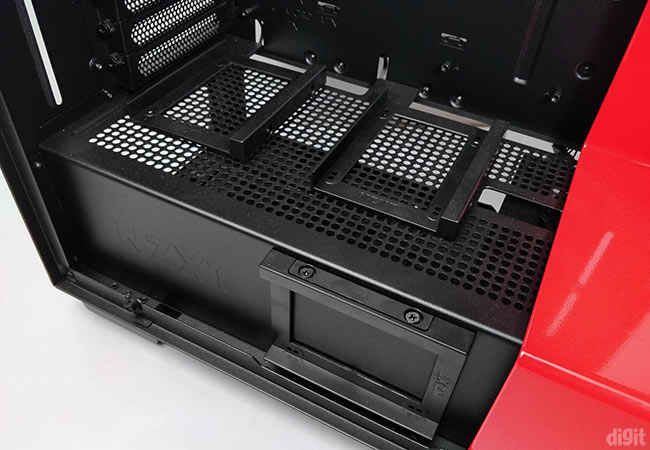
The PSU shroud does a good job of covering the PSU and all the mess created by the extra cables. We found the SSD mounting mechanism over the perforated shroud interesting. The design of the perforation matches with the ones present on the edges of the case. This gives the case a more uniform look. To install the SSD trays, all you need to do is press on the tab of the SSD tray and align it with the holes on the shroud. Since the perforation is present throughout the top of the shroud, you can literally place your SSD anywhere. There are two SSD trays on top of the PSU shroud. You will find an additional tray on the side of the shroud facing the glass side panel. It follows the same mechanism but there’s only one spot where it can be installed. Two more SSD trays can be found on the back of the motherboard plate following the conventional mounting mechanism.
Below the PSU shroud, there’s an HDD cage supporting two hard drives. It’s removable and the position of the cage can also be adjusted along the depth of the case. You might have to adjust its position while routing the GPU power cable towards the graphics card since it gets in the way of the hole on the shroud. For your extra PSU cables, you can store them around the ample amount of space around the cage.
Something that we loved on the H700i is the cable management. Attention has been given to every part of the motherboard plate so that all your cables can be easily routed without looking like a mess. Additionally, there are velcro straps at multiple places. You don’t have to use zip ties or twisty ties to secure the cables. From your motherboard power cable to the CPU power cable, routes have been created to hold and secure the cables without making much of an effort.
However, we had a problem with the fan splitters coming from the Smart Device, bundling together in the middle. After inserting the motherboard power cable, the mess looked uglier. You will have to reroute them or tuck them away from the stock setting for a cleaner build.
The cable management bar inside the case manages to hide few of the cables connected to the motherboard. It does a good job of hiding the SATA cables. However, the angle on the top should have been a bit lower since it gets in the way of the motherboard power cable. So, you’re forced to route this cable slightly from the top. The bar can be removed with the two screws on the top of the case and on the bottom and moved slightly towards the front panel. Behind the bar, you will find the Smart Device attached to the case.
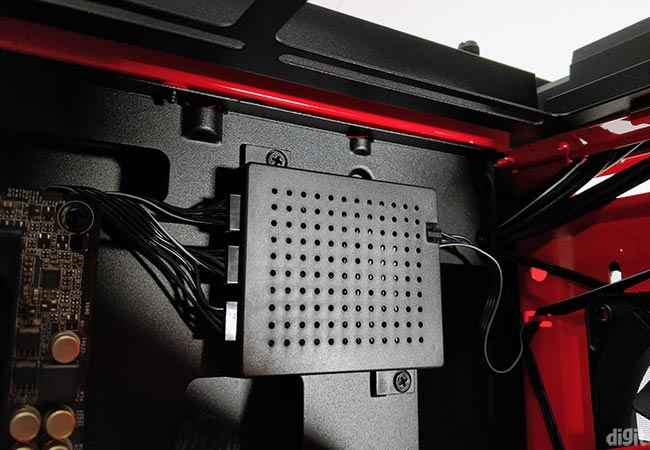
The IO port cables are already routed through the channels and all you need to do is connect them to the motherboard. You will find extra cables coming from the IO ports that you won’t traditionally find in other cases. For instance, the power button, power button LED and HDD LED have a common connector that further connects to a different cable provided in the box. This cable has to be then connected to your motherboard. There’s an additional USB 2.0 connector that actually connects the Smart Device to the motherboard. So, make sure that you’re connecting both the USB 2.0 connectors.
Smart Device
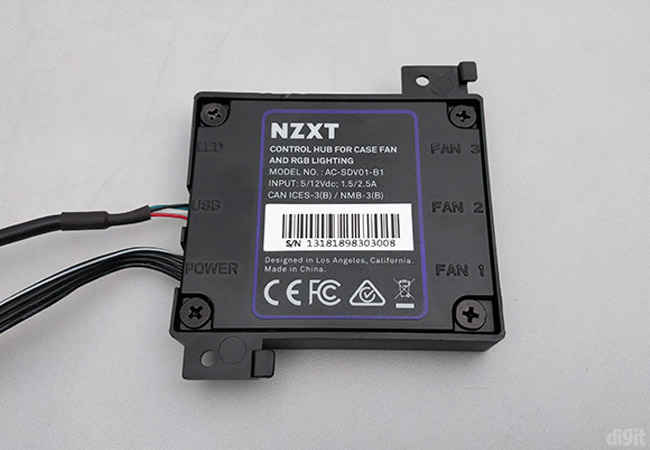
Other than the design changes and internal improvements, NZXT is promoting their ‘Smart Device’ that comes bundled with the ‘i’ versions of the H series. The main objective of the device is to allow you to control the RGB lighting and fan profiles using the CAM software. This is also possible using NZXT’s Grid and Hue line-up of accessories. So, instead of having to buy those accessories separately, NZXT is bundling a single device in the case. The device is called smart because of the machine learning implemented to obtain optimal fan speed settings.
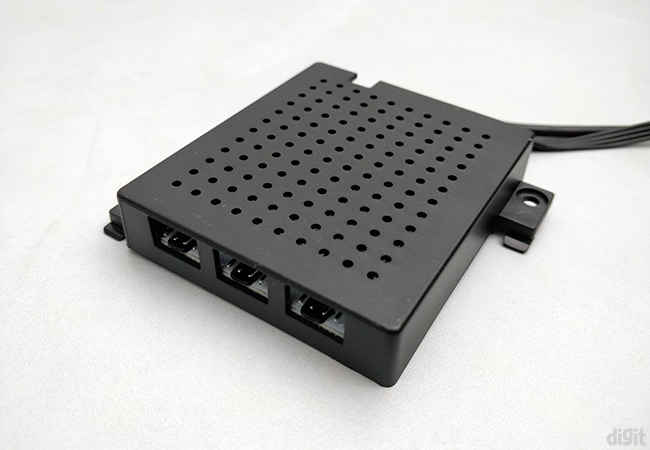
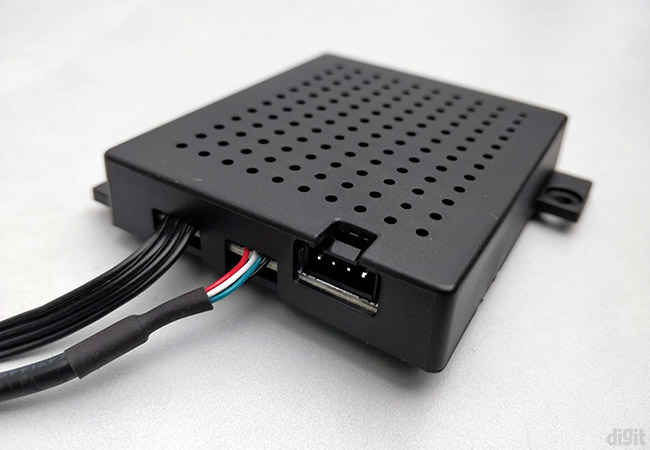
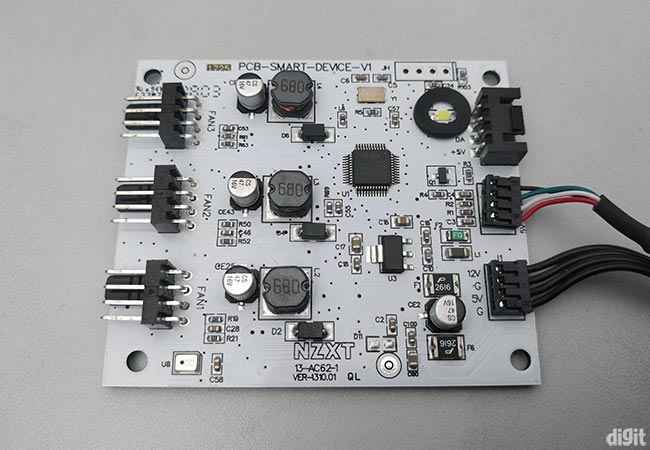
Creatively named as ‘Smart Device’, it has three channels for fans and a single channel for lighting. Every channel has a splitter so that three fans can be installed on a single channel. Removing the device isn’t difficult since it’s held onto the case with two screws while the device’s enclosure has four screws housing the PCB. After removing the enclosure, we got to see the white and clean PCB with all the components soldered. We noticed an LED on the top right which shows the status of the device. At the centre, we see the main component which is a 32-bit ARM controller from STM driving everything. Another important component we spotted was the tiny microphone on the bottom left which is used to record the noise levels inside the case.
When all the fan headers were connected with fans, we found some of the fans not spinning at their full speed. This problem was persistent even when custom fan profiles were created for them to run at 100 per cent at all times. However, you won’t be using all the connectors anyway since there aren’t an equivalent number of fan slots in the case. Fan profiles can be changed and custom ones can also be created from CAM. Lighting control is present for the pre-installed RGB LED strip. You can implement various lighting effects and even sync them to music or games. Every individual LED on the strip can be controlled using the software. That was the useful aspect of the Smart Device that we experienced. The other capability includes a new experimental feature called Adaptive Noise Reduction. This feature is supposed to optimise your system’s acoustics by running its own set of tests to achieve an ideal fan profile. NZXT says that it uses machine learning to understand your system’s configuration and giving you the best fan speed settings to achieve the best acoustics. However, this system still feels like there’s a lot of work left with its implementation.
Starting off with CAM. We had earlier explored CAM, when it came out, for monitoring temperatures but it was insanely buggy. It does offer a beautiful interface to view all your system specifications in detail and monitor the status of your system. For our review of the H700i, we fired up CAM once again and found some of those bugs still present. Sometimes the software would simply freeze when you changed something while sometimes, it wouldn’t even launch. While testing the device, we didn’t fiddle around with the connections between the fans and the splitters of the device. However, when we ran CAM, only two channels were being detected at a time. Switching the fan headers to other connectors would change the channels that were active, but all three channels wouldn’t be active together. After some trial and error, we were able to get all the three channels to be detected. We believe this is more of a software issue rather than a hardware one. Do note, fan profiles can be assigned to a single channel and not to a single fan. So, if you have connected three fans to the first channel, then all the three fans will run on the fan profile of the first channel.
Coming to the highlighted feature, Adaptive Noise Reduction (ADR), it doesn’t really do much. Before you can use this feature, you will have to login with your CAM account. Otherwise, you won’t be given access to this feature and a few others. Once you’re in, it goes through three steps including Preset, Calibration and Adaptive. In the first step, it collects the idle and load data based on your system’s configuration to use it as a reference. This includes your CPU and GPU temperatures, CPU and GPU fans speeds, case fan speeds and noise levels. You will be able to watch the progress of both the tests while monitoring the temperatures and noise levels in real-time. Temperature readings are obviously done using the thermal diodes on the components. However, the noise levels are done using the microphone on the device. Once the idle testing is done, it moves onto load testing by putting your CPU to a 60% load.
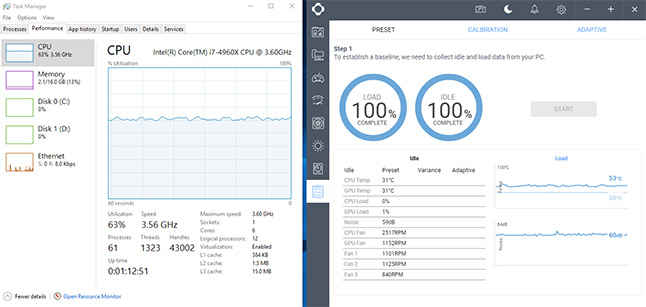
After CAM has recorded a baseline of your system, it then moves to Calibration. Here, it claims to try out various scenarios by running different sets of fans and determining the temperature differences. While this step was running, we saw that certain fans would stop spinning. This step also stated that it’s going to put the system under some serious load. However, it was still running at 60% load. After completion, CAM now has data on how the system performs with the changes made to the fan profiles or speeds.

Moving to the next Adaptive step, this is where the collected information is used and this is where machine learning is applied. CAM will now perform the same tests from the first step but this time, it will run them using the generated adaptive profile. When it’s done, you will be able to see the differences in temperature and noise of your system along with the differences in fan speeds across the stock profile and adaptive profile. If they are labelled green, then it means it’s an improvement. If you’re fine with the adaptive profile then you can apply the new settings for your fans.
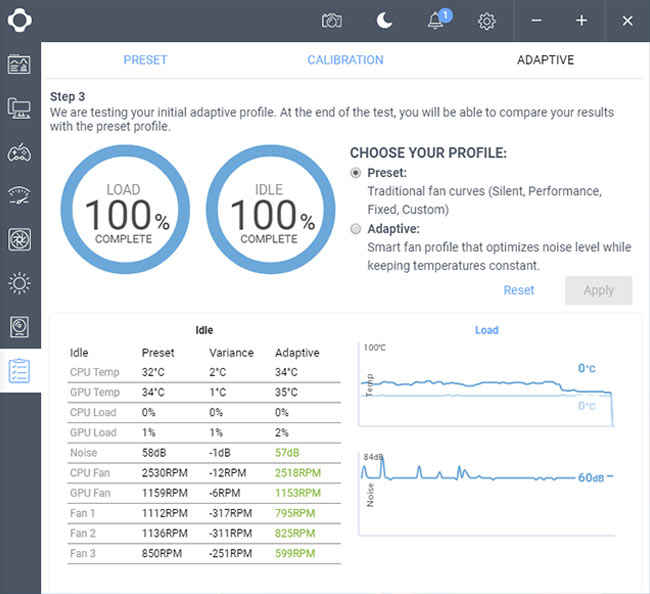
This might seem convenient but with some experience in fiddling around with fan profiles, you will be able to do this on your own by trial and error. ADR isn’t perfect, hence, we called it experimental. CAM would freeze a few times when the load tests were running. It would also stop responding for a few seconds when it’s time to move to the next step. You’ll also have to ensure that your internet connection is stable throughout the process, otherwise, the software just stops working. Although many massive bugs have been removed since it was launched, it still feels like there’s work to be done. Hence, the only useful aspect of the Smart Device we found was the capability to connect and control your fans and lighting.
Testing methodology
Our testing methodology involves running benchmarks in the stock condition of the case being reviewed. In the second part where additional fans are installed, it is ensured that we achieve the closest we can get to a balanced air pressure inside. In its stock condition, the three 120 mm fans on the front are used as intake and the 140 mm fan on the rear is used as exhaust. In the second run, we added three more 120 mm fans on the top panel as exhaust. Essentially, there are three intake fans and four exhaust fans. For a detailed idea on how we conduct our case reviews, you can read it in our review of the Corsair Obsidian 500D. Since the front panel is completely shut off, we also ran the stress tests with the front panel open, followed by removing the top panel as well. Our testing rig is as follows:
CPU: Intel Core i7-4960X
Motherboard: ASRock X79 Extreme9
Graphics card: Sapphire Radeon HD 7790
CPU Cooler: Noctua NH-L9x65
RAM: Corsair Dominator 2x8GB DDR3 (16GB)
HDD: WD Red 2TB
SSD: SanDisk Extreme II (240GB)
Power supply: Cooler Master MasterWatt 750 TUF
Thermal performance
We ran the first set of tests using the pre-installed fans. They were connected to the Smart Device during these tests. However, to avoid CAM from interfering with its fan profiles, we didn’t install the software during any of the tests.
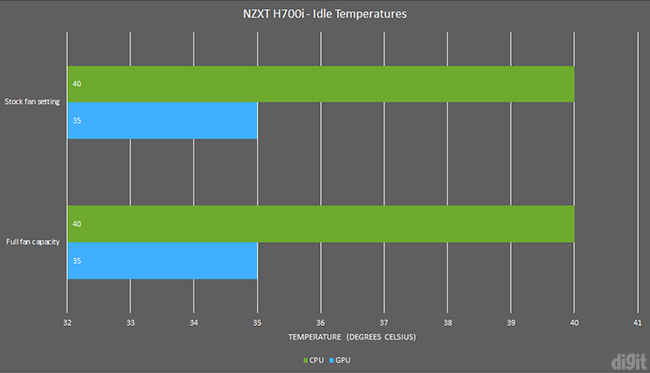
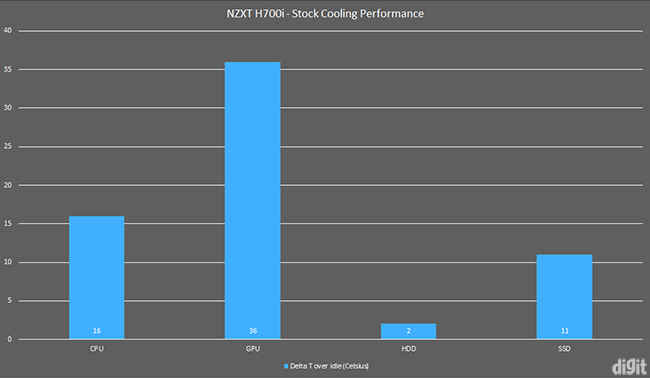
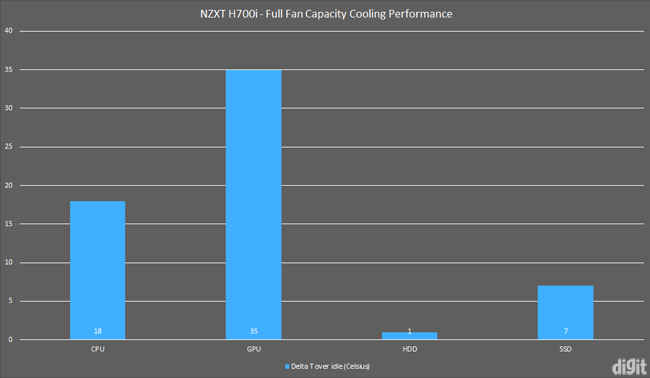
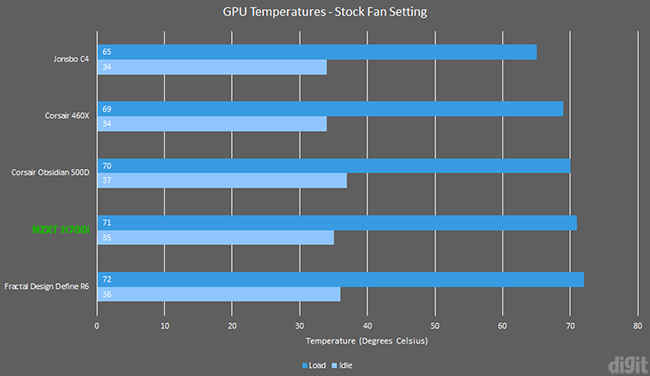
CAM was installed only after the thermal performance testing was completed. In the stock setting, the CPU and graphics card idled at 40 and 35 degrees Celsius. The three intake fans are capable enough to keep the supply of fresh and cool air sufficient inside. Along with the exhaust fan at the rear, the case is able to achieve these average temperatures. After kicking off the stress testing, the CPU temperature touched 56 degrees while the graphics card touched 71 degrees. The temperatures obtained in load testing were satisfactory, even though not the best.
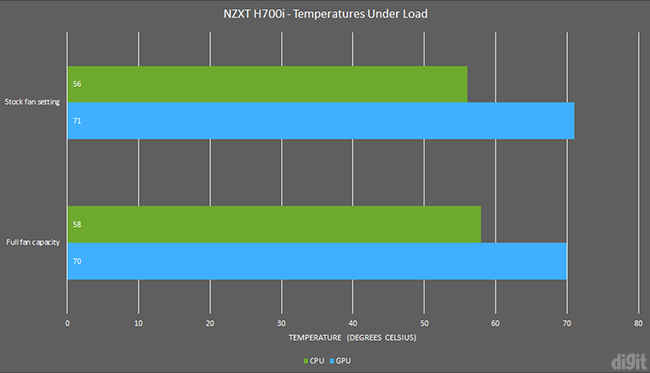
By attaching the additional three fans on the top panel, we would get a better idea whether more exhaust will result in a cooler case. In our testing, we found that it doesn’t. After idling at 40 and 35 degrees, the CPU and graphics card’s temperatures went up to 58 and 70 degrees. Clearly, the extra exhaust isn’t helping with cooling, so you’re better off leaving the top fan mount as it is. Or you could add a radiator.
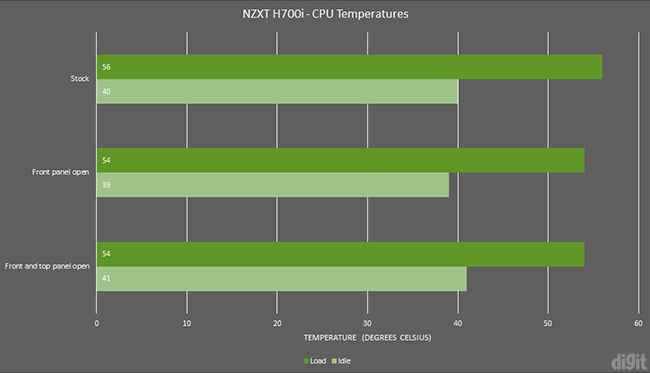
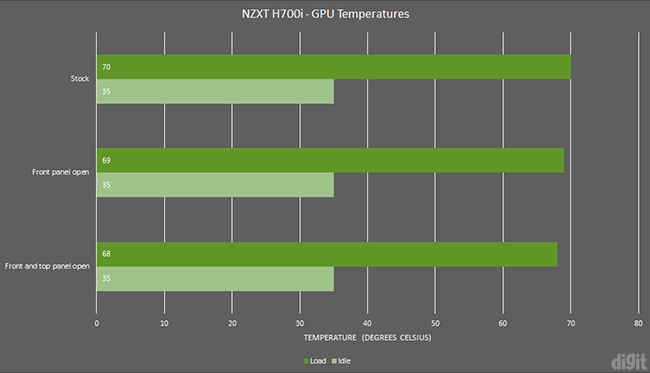
While testing the case with the front panel open, we observed a drop in only two degrees in both the CPU and graphics card temperatures. Since the difference isn’t too much, it’s safe to say that even with the front panel closed, the case is holding up pretty well. This means that the vents on the edges are enough for air intake and they aren’t holding back the case’s thermal performance.
Abhijit Dey
A Star Wars fan and sci-fi enthusiast. When I'm not playing games on my PC, I usually lurk around the Internet, mostly on Reddit. View Full Profile


