How to use new Gmail Inbox to organize mails
HIGHLIGHTS
Our How to guide on the new Gmail Inbox will help you learn about new features and how to make best use of the revamped Gmal Inbox

Google has introduced an easy way to handle your email with a revamped inbox in Gmail. In its new avatar, Gmail inbox provides a hassle-free way to manage, sort and organize your email.
✅ Thank you for completing the survey!
Email inboxes are generally filled with varied email including personal messages, social network updates, newsletters, deals, confirmations, etc. A traditional inbox lists all email together, making it difficult to sort. In the new Gmail inbox, mail is categorised automatically according to type.
This categorisation is done by the addition of various tabs to your inbox. These tabs are: Primary, Social, Promotions and Updates. Your mail, depending on type is automatically added under the respective tabs.
Get the new Gmail Inbox on your desktop
Gmail has already rolled out the new inbox to all its users on all platforms. If you still haven’t got it, you can manually activate it in a few easy steps. When you log in to Gmail, click on the Gear icon > Configure Inbox > Save. That’s it! You’ve got the new inbox.
Getting the new inbox is very simple
Add more tabs
If you’ve got the new inbox, you might see only the three tabs Primary, Social and Promotions. In addition to these there are two more tabs namely ‘Updates’ and ‘Forums’ for better categorisation of mails. To get them in your inbox click on the Gear icon > Configure Inbox > Check ‘Updates’ and ‘Forums’ > Save.
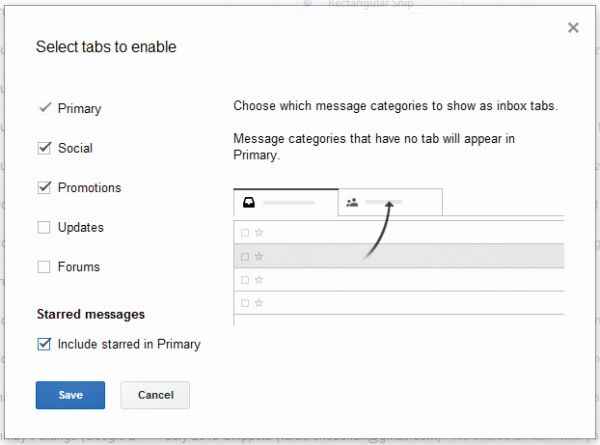
Choose the tabs you want displayed
Suppose you want only selected tabs to appear in the inbox, you can do that as well. The new inbox also allows you to choose tabs selectively. You can select any tab from Primary, Social, Promotions, Updates and Forums to be shown. To do this, click on the Gear icon > Configure Inbox > Check the tab(s) you want > Save.
Move email to a different tab
There are two ways to move an email from one tab to another. Just drag and drop the mail into a different tab or right-click on the mail > Move to tab > Select a tab.
Set certain senders to always appear in a particular tab
Gmail automatically categorises email into their respective tabs, but what if you want to set a certain sender to appear under a particular tab? You can do that. Move an email from that sender to the tab you want it categorized within. A message box will appear asking ‘Do this for future messages from [sender’s address]?’ Hit ‘Yes’ and you’re done! Any email from that sender will always appear in that particular tab.
Include starred mail in Primary
All the starred mails can be made to appear under Primary tab by checking ‘Include starred in primary’ in the box that appears after clicking on the ‘Configure inbox’ option.
Switch back to old inbox
If you didn’t like the new Gmail inbox, you can switch back to old inbox at any instant. Going back to classic view is very easy. Just uncheck all tabs (except Primary) on the box that shows up after clicking the ‘Configure inbox’ option located under the Gear icon .
IOS Move email to a different tab
Gmail’s native app for iOS has received an update which features the new inbox. Gmail settings done on your desktop are reflected on the mobile platform. The Gmail app only allows you to move mail to other tabs. To do this on your iOS device, Open the mail > Tap the downward facing arrow at the top-right corner of the app > Select ‘Move to’ > Select a tab.
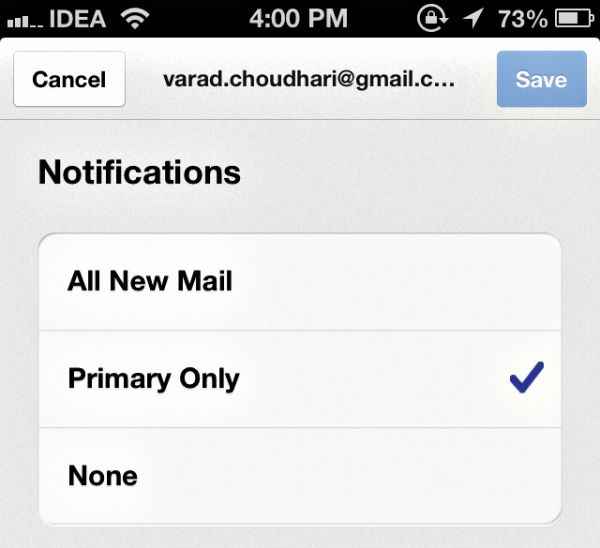
Get selective mail notification on iOS
The new app update allows selective mail notification. That means you can assign the app to notify you about every incoming mail, only important ones or none of them. To do this, go to Menu > Settings > Choose type > Save.
ANDROIDSelect multiple mails
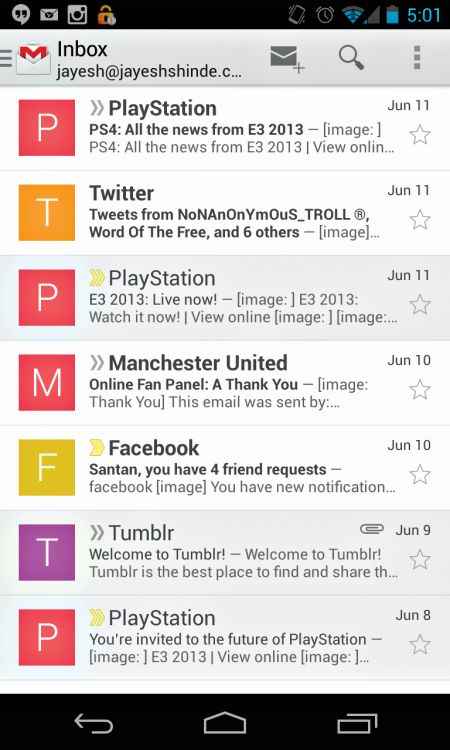
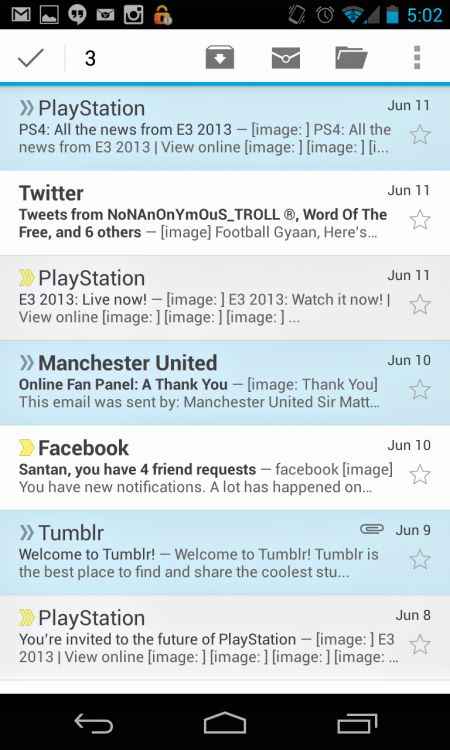
The Gmail app for Android Ice Cream Sandwich received a major update recently, called Gmail 4.5. It introduces a new interface, features and mail categories for a better mobile Gmail experience. As settings are reflected from the web version of Gmail, you’ll not see a tabbed interface unless the new inbox is enabled on your desktop. The redesigned app features contact pictures on the left-hand side of mail from these contacts, a swipe-to-refresh option and an action bar located at the top. The checkbox from old Gmail is replaced with contact images; so to multi-select mail just tap the contact images.
No disturbance by unwanted mails
Turn off contact images for Android
As we mentioned, contact images now appear on the left-hand side of email in your inbox. However, if you want a minimal look, you can turn off contact images. To do this, tap the Menu icon on the action bar located at the top > Navigate to ‘Settings’ > General Settings > Uncheck ‘Sender image’.
Your inbox gets colorful with contact images
Multi-select mail without contact image
On Android, tapping on contact images allows you to multi-select email, but if you’ve turned off the option to display the images, it cannot be done. In such case, long-press on an email to select it; this will bring up the option to delete, mark as read or move the message to other labels. Pick the last option. Then select other mail by again long-pressing on each one and choose the same option for them.
It’s also easy to multiselect without contact images
Get notification for every email on Android
The revamped Gmail app version only notifies you about mail that appears under the Primary tab. All other emails which appear in Social, Promotions, Updates and Forums remain unnotified. This is a neat feature as the emails from these tabs are less important. To get a notification for every email, you’ll have to turn it on manually. Navigate to Menu > Label Settings > Check ‘Label notifications’.
Refresh mail on Android
The refresh button in the action bar has been removed . So if you’re wondering how to refresh, just swipe down (do a pull-down motion) on your inbox. This action will also sync your mail.