
We built a PC that would allow us to enjoy titles like Battlefield V and Metro Exodus at 4K-60 fps, or let us turn the resolution down to 2K in exchange for higher frame rates.
At Digit, if there’s one thing everyone loves, it's gaming. Our team consists of people who are hardcore console lovers, those who proudly claim to belong to the PC Master Race and those who flip-flop between the two platforms. However, when Nvidia announced the new RTX cards, perspectives shifted and we decided to build the best possible gaming PC to understand just how much of a difference does RTX even make, visually. So, we reached out to some of our friends and here is a list of what we used to build the machine.
The Goal
Our goal when we started out was simple. To get the best, 4K HDR, high refresh rate gaming experience possible. As we started to work out the logistics, we decided to forego the HDR part sine HDR standards on PC are still a mess and Microsoft still hasn’t got its Wide-Gamut support in Windows to work properly. Thus, this was going to be all about 4K gaming at the highest refresh rates possible. We also wanted to use components that anyone could buy by literally walking into the popular PC component market, or even order them online. Breaking the bank was definitely an option, but bankrupting our funds wasn’t.
The Gaming Experience
When running Battlefield at 2K, we averaged a frame rate of about 120FPS with all the settings at their highest, and with RTX and Deep Learning Super Sampling (DLSS) turned on. When running at FullHD, we had maxed out our monitor’s 144Hz refresh rate. For Metro Exodus, which seems to be shaping up to be the modern-day Crysis, we averaged 100 fps in 2K with RTX and DLSS on, with the frame rate only occasionally dropping to 90. At 4K, however, Metro Exodus just about managed to play at an average frame rate of 55fps, while battlefield was averaging 70fps. Non-RTX games like Anthem and even Crysis 3 ran at 100+ frames per second at 2K and 1080p, with 4K resolution frame-rates dropping to a very acceptable 80fps. Here’s everything we used to get the desired results.
Processor: Intel Core i9- 9900K
We chose the Intel Core i9-9900K since it offers the highest level of performance, without having to shell out funny money for an X-series CPU. We didn’t want any bottlenecks as we tried to squeeze every last frame of RTX goodness in Battlefield 5. The CPU can be found online for Rs 56000-57000, and you could just as easily choose an Intel i7-9700K or even the i7-8700K for your build and not face any issues. Plus you get to save some money, so that’s good.
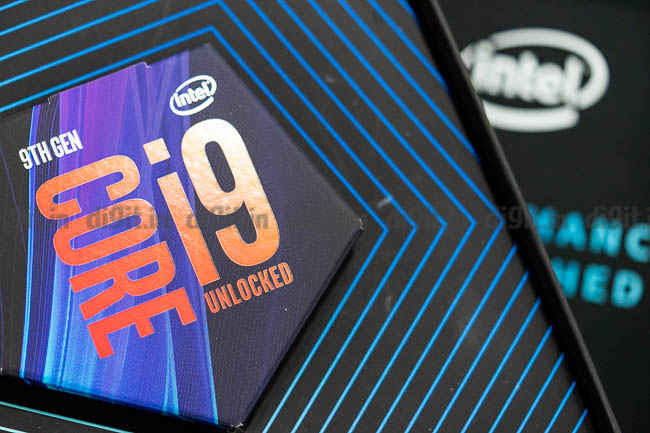
The Intel Core i9-9900k offers great performance even at stock clocks
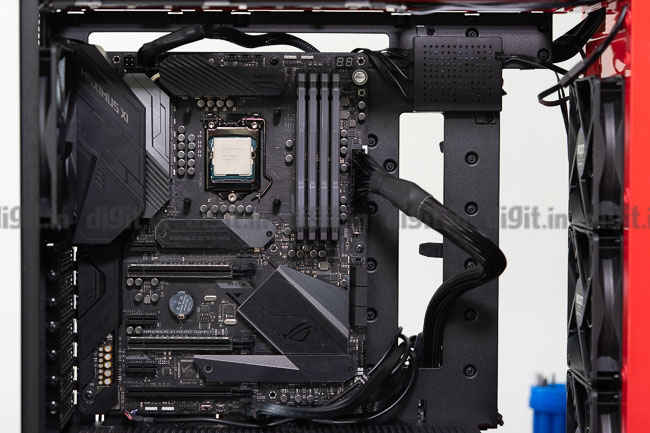
Motherboard: Asus ROG Maximus XI Hero | Gigabyte Aorus Z390 Master
When you’re building a gaming PC, you’re going to be inclined to spend on a “gaming motherboard.” While most people can easily get away with non-gaming boards, we chose to go with the Asus ROG Maximus XI Hero based on the Z390 chipset because over-clocking was definitely on the cards. Gaming boards some with additional heat-sinks and better cooling for VRMs so that when you’re pushing more voltage through the board, the components won’t give up on you. The Maximus XI Hero is one of the best boards from Asus right now and we highly recommend it.
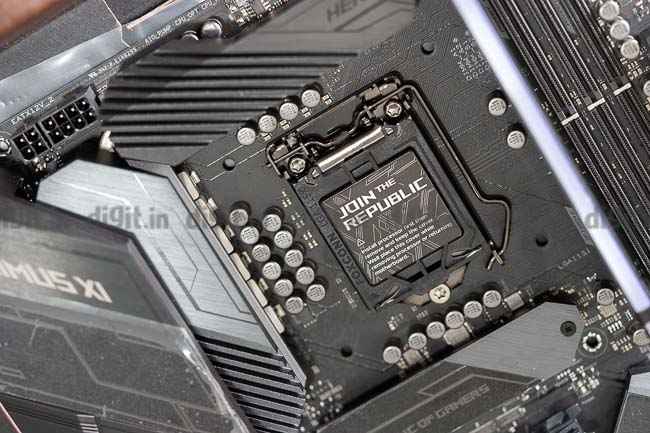
We had the chance to swap out the Asus board for the Gigabyte Aorus Z390 Master, which comes with two additional USB ports on the back and is also Wi-Fi enabled, just like the Hero. Both the boards offer RGB lighting for on-board components and also multiple ARGB headers. If you’re going to go all out on your gaming build, you cannot go wrong with either of the boards.
Graphics Card: Nvidia GeFore RTX2080Ti Founder’s Edition
The source of great gaming is undoubtedly a great graphics card. Nvidia claims to have changed the game with the RTX series of cards, that are capable of real-time ray tracking, allowing for some stunning representation of light, and consequently the game world. Given that our goal was to hit the maximum possible frame rates at the highest possible resolution, we chose to go with the RTX 2080 Ti. In a sea of GPUs from Nvidia’s board partners, we stuck to the Founder’s Edition version of the card as we planned on using two of these with an NVLink. However, there was a problem sourcing the NVLink and hence, we ended up using just one Nvidia RTX 2080 Ti.
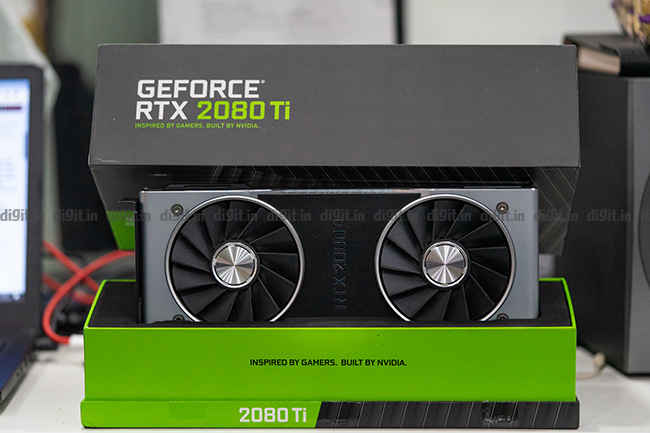
Bringing the best RTX experience you can have
RAM: Corsair Vengeance Pro RGB (4x8GB)
For our RAM, we chose the Corsair Vengeance Pro RGB kit for a total of 32gigs of DDR4 memory. The RAM is clocked at 3200MHz as anything higher typical tends to yield lesser and lesser benefits for the price. While we chose the RGB variant in particular because, well, RGB…you can save a few thousand rupees by choosing the non-RGB modules.
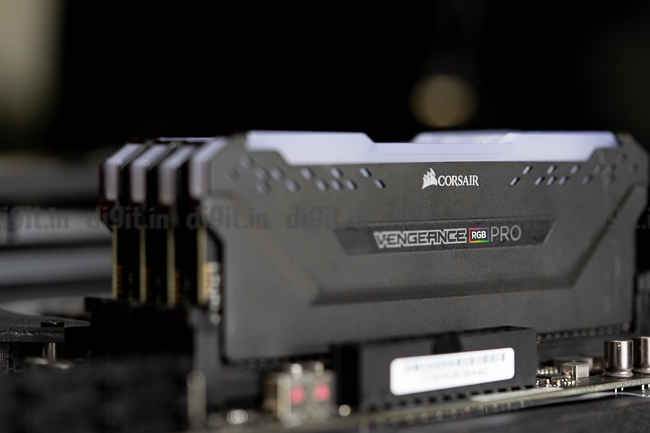
Adding a little colour to our setup
Storage: WD Black NVMe 1TB
This was an easy choice. The Western Digital Black NVMe 1TB drive was our Zero1 winner in the solid-state storage category for its speed. A gaming system has to be fast, so this was an easy choice. We also decided on getting the 1TB capacity because we didn’t want to deal with secondary hard drives, cables or slow load times on games. All our games live on the NVMe drive and load up noticeably faster than when they were stored on a 7200rpm hard drive.
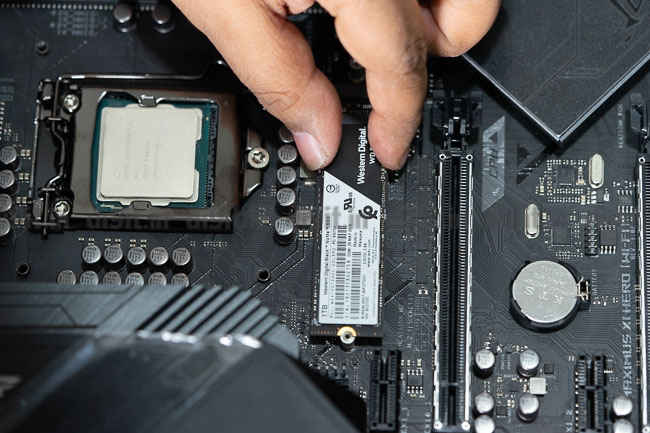
NVMe drives mean blazing fast speeds and no hassle of cables!
CPU Cooler: NZXT Kraken X62
While we had no intentions to overclock the Intel Core i9-9900K at the time we were building the machine, we did, however know that at some point, this would change. Liquid cooling was definitely the way to go, but since our goal was to build a machine not only with practically ‘off-the-shelf’ parts, but also not use products that involve too much work. So we went with an all-in-one liquid cooler from NZXT. The particular model was the Kraken X62 with a 280mm radiator and 2 140mm fans that come in the box. The NZXT Kraken X62 comes with a logo imprinted onto the CPU block, who’s lighting effects you can control using NZXT’s CAM software. The AiO comes with brackets for mounting to Intel’s LGA1151 and AMD’s AM4 brackets.

Reusing an old AiO cooler? Make sure to clean off the old thermal paste residue
The Case: Corsair Obsidian 500D | NZXT H700i
When we started this build, our goal was to pack it into the Corsair Obsidian 500D case. It has three Corsair 120mm LL fans pre-installed on the front (each with 16 addressable RGBs) and offers top mounting of the radiator and great ventilation. Unfortunately, there was a bend on the inside of the case, which prevented us from mounting our motherboard securely. Hence, we swapped it out for the NZXT H700i, which, amongst many other things, comes with a CAM powered smart device into which you plug in the case fans and RGB lights. This hub has temperature and noise sensors built in, and in conjunction with the CAM software, works to ensure minimal noise from the cabinet fans, while ensuring effective cooling.
Besides its minimal and clean looks, the best part about the NZXT H700i is the incredible cable management provisions. There are multiple guides and channels built into the backside of the case for clean cable management even in areas where they are not visible. There are Velcro straps pre-installed which means you don’t really have to worry about bringing your own. Additionally, on the front there is a metal plate that runs from top to bottom, which hides various cables like the 24-pin power connector for the motherboard. Once we had assembled our PC, the only visible cable was the 8-pin connector that was plugged into the GPU. Another great thing about the H700i is the one-button release for the metal panel for the backside. This makes it easier to open, re-organize the cables if needed, and lock back in place. No more struggling with screws.
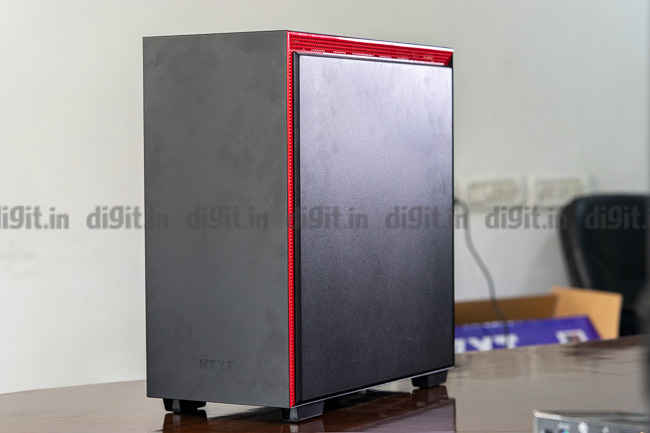
Minimal and elegant design is what the NZXT H700i brings to the table
Oh, and incredible cable management
Power Supply: Corsair RM1000X
If there’s one thing gaming systems produce a lot of (besides frame rates), its heat. You can have many fans, set in the perfect push-pull configuration, but if your cables are a mess, they are going to lead to retention of heat. Cables from the PSU, being as thick as they are (and as many in number), was a concern for us from both a heat and aesthetics perspective. Thus, we decided to go with a fully modular power supply. Additionally, since we had planned to run dual RTX 2080 Ti GPUs in SLI, we opted for a 1000Watt PSU, ensuring there was enough power overhead. In the end, we only ended up using a single GPU, but at least now we have a PSU that will allow us to use two cards together without having to change an otherwise expensive part. The RTX 2080 Ti can suck up 280 Watts of power while gaming and while the Intel Core i9 has a TDP of 95Watts, depending on the number of cores loaded, the power draw can be higher. There’s obviously no way to justify using a 1000Watt PSY for current configuration and a 750Watt would have also sufficed.
Monitor 1: Asus ROG PG27VQ
Interestingly, there aren’t any 4K monitors with 144Hz refresh rate and G-Sync available in India at the moment. Even if there were, they’d be astronomically expensive, given that Asus’s own ROG PG27UQ is a 4K 144Hz monitor with G-Sync, it costs almost $2000. So instead, we settled for the Asus ROG PG27VQ curved monitor, which has a resolution of 2560×1440 and a refresh rate of 144Hz overclockable to 165Hz. This monitor, though using a VA panel, has very impressive visual fidelity once you start gaming on it. Sure, it has a somewhat steep price tag, but damn it is a solid performer! The 1ms response time paired with the high refresh rate really does make a huge difference in the visual experience of the game. When our in-house console gamers played Battlefield V on this monitor, everyone walked away feeling that the console was definitely a less than stellar experience. A win for the PC Master race!
Monitor 2: Acer Predator XB27HK
Since our main goal was 4K gaming, we reached out to Acer to loan us their Predator XB1 monitor, in particular, the XB27HK monitor. This is a 4K monitor with an IPS panel and a 60Hz refresh rate which can be overclocked from within the monitor’s settings themselves. This monitor also doubles up as an excellent photo and video editing screen, given the IPS panel can be colour calibrated to have 100 percent sRGB accuracy.
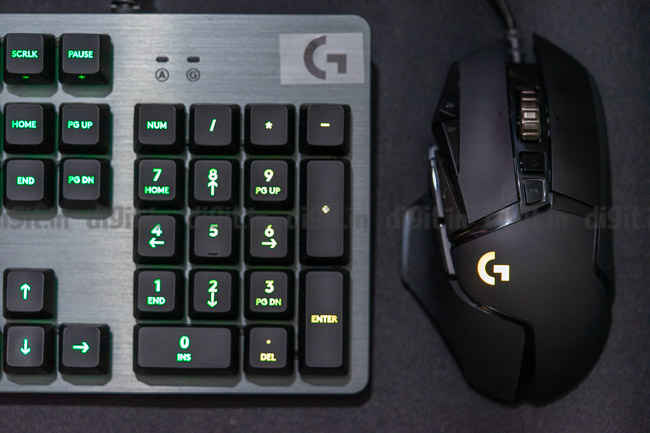
Keyboard: Logitech G512 Carbon
When it comes to keyboard and mice, the choices are extremely personal. However, having been a Logitech G user for a very long time, the G512 Carbon is my go-to keyboard for all gaming purposes. The Romer-G Tactile switches offer great response and are less noisy than traditional mechanical switches. The G-hub software allows macro-binding, custom game profiles and custom lighting profiles based on the game being played. This can be helpful to many who are playing a game for the first time, and just aesthetically pleasing to those who like lighting. If you don’t like it, you can always just turn it off. The keyboard also has a USB-port for passthrough, which will allow you to plug in another device like a mouse, but we don’t do that here.
Mouse: Logitech G502 Hero
The Logitech G502 has been a classic mouse favoured by countless gamers around the world. Logitech updated this classic with the new Hero sensor which goes up to 16,000 dpi and has a crazy polling rate that can go as high as 1000Hz. The mouse offers on-the-fly DPI switching and also has a ‘sniper’ button which when pressed and held, brings the dpi down to a preset number so that you can steady the scope of your sniper rifle. The mouse also comes with weights to help you find the right balance, which I find to be very helpful, because the mouse itself is quiet light and doesn’t really feel “all there” when used without any weights.
Headset: Logitech G Pro
Gaming is a ton of fun on a big, surround sound system (I use a Logitech Z906), but sometimes, you need to really “get in the zone,” especially when you’re in a multi-player match or playing something as intense as Battlefield V or Metro Exodus. There are countless gaming headsets out there, many of whom are designed specifically for a genre of gaming. My choice is the Logitech G Pro headset, for its brilliant sound stage and general effectiveness with any genre of games. Playing Forza Horizon 4 feels incredibly immersive as you hear the environment whiz past in your hears, with almost true-to-life sound simulation. When playing Battlefield V, the headset offered incredible sound reproduction, allowing many of us to hear our enemies before we even saw them.
Our Takeaway
As of now, the convenience of the console is being able to play games at 60Hz at 4K even in HDR. To get that level of performance on a PC, you will really have to shell out some serious cash. However, if you can settle for 2K, there are plenty of configuration you can put together that will give you north of 100fps on the most demanding of shooters. While our build cost close to Rs 4,00,000 for everything listed above, the CPU alone costs Rs 2,86,605. In the next few weeks, we will keep lowering our budget with a bottom line of Rs 50,000 to see just what components we can get and how many frames we can squeeze out of them. Overclocking, will definitely be an option.
Swapnil Mathur
Swapnil was Digit's resident camera nerd, (un)official product photographer and the Reviews Editor. Swapnil has moved-on to newer challenges. For any communication related to his stories, please mail us using the email id given here. View Full Profile


