How to install and run Wan 2.2 locally on your Windows PC: Step-by-step guide
Transform your Windows desktop into a private AI film studio with Wan 2.2
From setup to first render, explore Wan 2.2’s local video magic today
Wan 2.2 proves the future of video AI doesn’t need the cloud

Artificial intelligence has a knack for moving fast, and in 2025, few tools are racing ahead quite like Wan 2.2. Developed by Alibaba’s Institute for Intelligent Computing, Wan is an open-source AI model designed to generate videos directly from text or images. If you’ve scrolled through X (formerly Twitter), Instagram, or Reddit recently, chances are you’ve seen Wan’s creations: neon-soaked cityscapes, surreal dream montages, or futuristic characters moving in ways that look eerily close to professional CGI.
Most users first encounter Wan 2.2 through its cloud demo. It’s convenient, but also limiting – you’re stuck waiting in server queues, capped by usage credits, and reliant on external infrastructure. The real game-changer is running Wan 2.2 locally, right on your Windows PC. That’s what the latest tutorials are showing: you don’t need a Hollywood studio setup to get cinematic results. With the right software, some patience, and a compatible GPU, you can turn your desktop into a personal AI video lab.
Here’s a complete guide to installing and running Wan 2.2 locally, tailored for Windows users, with tips for both high-end and low-VRAM setups.
Also read: What is Wan 2.2: Free AI video generation tool going viral right now
Why run Wan 2.2 locally?
Running AI locally isn’t just about bragging rights. It comes with real benefits:
- No usage limits – Experiment with as many prompts as you like.
- Faster feedback – No waiting for cloud servers to process your clips.
- Privacy – Your prompts and creations stay on your own machine.
- Customization – Modify workflows, plug in community add-ons, and tweak performance settings.
For hobbyists, content creators, and indie filmmakers, that freedom is invaluable.
Step 1: Check your system
Wan 2.2 is demanding software, but thanks to multiple workflow options, it can run on a variety of systems. Here’s the baseline:
- Operating system: Windows 10 or Windows 11 (64-bit
- GPU: NVIDIA with CUDA support
- 8 GB VRAM (RTX 3060 or higher recommended)
- For lower VRAM cards (4–6 GB), use lighter workflows like TI2V-5B
- Memory: 16 GB RAM minimum (32 GB+ preferred for stability)
- Storage: 20–100 GB free space (model weights alone are multiple gigabytes)
- Drivers: Latest NVIDIA GPU drivers and CUDA toolkit installed
Tip: Don’t underestimate VRAM requirements. If you’re running a mid-range card, start small – shorter clips and lower resolutions – and scale up once you know what your GPU can handle.
Step 2: Install ComfyUI
Wan 2.2 isn’t a standalone app, it runs inside ComfyUI, a modular graphical interface built for AI workflows. Think of it as your cockpit.
- Download ComfyUI from its GitHub page or its website.
- Extract and install it on your system.
- Launch ComfyUI in GPU mode (if available; CPU mode is painfully slow).
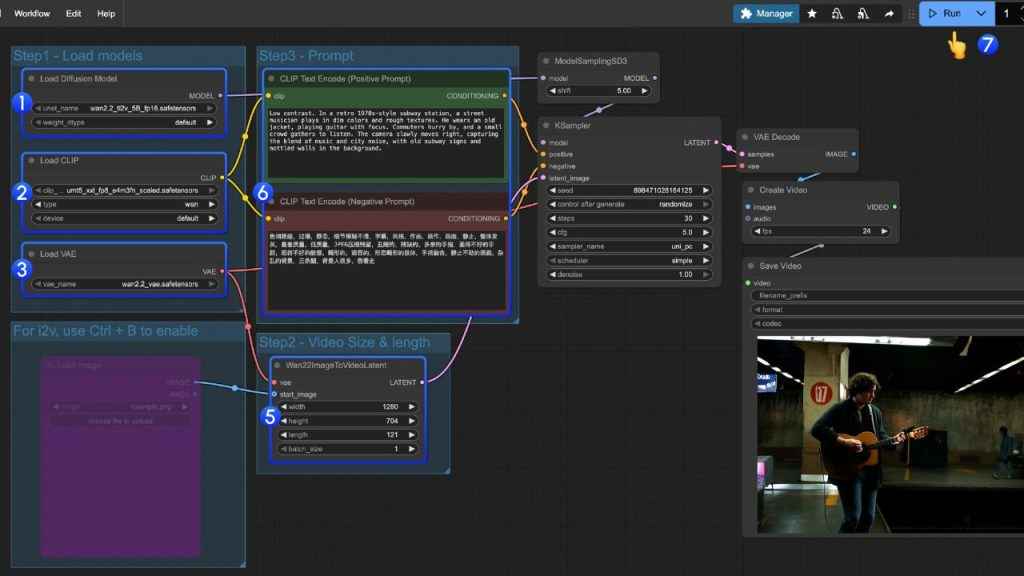
Once you open ComfyUI, you’ll see a drag-and-drop style workspace. This is where Wan 2.2 workflows live.
Step 3: Choose your workflow
In ComfyUI, go to Workflows → Browse Templates → Video. Here you’ll find multiple Wan 2.2 options:
- T2V-A14B – Text-to-video, highest quality, requires serious VRAM.
- I2V-A14B – Image-to-video, great for animating photos or stills.
- TI2V-5B – Lightweight text-to-image-to-video hybrid, designed for mid-range GPUs.
If your graphics card is anything less than a top-tier RTX, start with TI2V-5B. It’s the friendliest to low-VRAM setups while still delivering impressive output.
Step 4: Download and load model weights
The workflows are just blueprints. To run, they need model weights, the massive trained files that power Wan 2.2.
- Follow the tutorial’s links to download the correct weights for your chosen workflow.
- Place these files in the models folder inside ComfyUI.
- Relaunch ComfyUI if needed, then load your workflow again.
At this point, ComfyUI should recognize the model, and you’re ready to generate.
Step 5: Prompt, tweak, and run
Also read: How to install and run GPT-OSS on your Windows laptop
Now comes the creative part.
- Enter your text prompt in the workflow. Be descriptive: “a cinematic shot of a knight riding into a misty forest, 4K film grain”.
- Adjust your settings:
- Resolution (start with 512×512 or 720p; go higher if VRAM allows)
- Frame count (short clips are easier on memory; longer clips require patience)
- Duration and frame rate (e.g., 3 seconds at 24 fps)
- Hit Run.
ComfyUI will display logs as it processes frames. It can take minutes (or longer), but the thrill of seeing your words turn into motion never gets old. Once the render finishes, you can preview the frames and export them into a video file. Congratulations, you’ve created your first AI-generated video locally, powered entirely by your PC.
Troubleshooting: When things go wrong
Even seasoned tinkerers hit roadblocks. Here are common hiccups and fixes:
- CUDA error / driver mismatch – Update your GPU drivers and ensure CUDA toolkit matches your PyTorch build.
- Out of memory (OOM) – Lower resolution, reduce frame count, or switch to TI2V-5B workflow.
- Extremely slow rendering – Use SSD storage, close background apps, or lower parameters
- Blank or broken output – Double-check that weights are in the correct /models folder.
Bonus: SwarmUI for simplicity
If this sounds like too much setup, there’s an alternative. SwarmUI, a community-built wrapper for ComfyUI, turns the entire process into near one-click installation. It automatically downloads models, configures workflows, and lets you prompt and render without worrying about file paths or dependencies. For beginners, it’s a gentler entry point into the Wan 2.2 ecosystem.
Installing Wan 2.2 locally is more than a technical exercise, it’s a creative unlock. You’re no longer waiting for server slots or rationing demo credits. You have an AI video lab running entirely in your own space.
The first clip you render may be short and imperfect, but it’s yours – born from your words, generated by your machine, and limited only by your imagination. As the community experiments with new workflows, optimizations, and hybrid models, the possibilities will only expand.
For now, the takeaway is simple: if you’ve got the hardware and the curiosity, Wan 2.2 can turn your Windows PC into a miniature film studio. The setup requires a little patience, but once it’s running, you’ll wonder why you ever settled for the demo.
Also read: Comet AI browser hacked: How attackers breached Perplexity’s AI agent