How to create your business website with ease
HIGHLIGHTS
Learn how to put up a website for almost any scenario the quick and comprehensive way

Admit it, at some point or the other while visiting the number of websites online, you have wondered about having your own web presence. But WebDesign, HTML, the plethora of options available just muddled your resolve. Fret not, in this workshop we cover how to build your web-presence from scratch without expecting you to be a code ninja.
We’ll begin with covering simpler options and ready to deploy solutions and then we will move on to setting up your own cloud hosted web server for those who have a need for speed.
Quick way to start…
So the quickest way to get on to the information superhighway is via a blog. WordPress and Tumblr are two popular options available; both provide free hosting, free sub-domins, you can also map them to a custom domain name, and wordpress can even be installed on your own server (which we will cover later in this article).
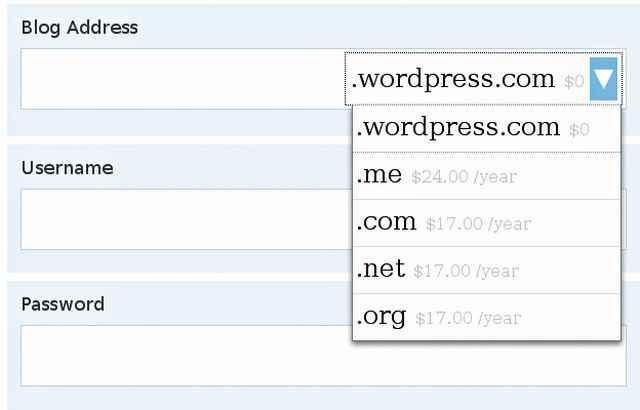
You can start by visiting https://en.wordpress.com/signup/. Here you can choose if you want a custom domain for a price instead of sub-domain which will go something like yourname.wordpress.com To begin choose the ad-supported free hosting, where the wordpress.com will manage the server, bandwidth and hosting for you for free. If you think you require more customisation and zero ads you can choose the paid hosting plan. WordPress provides you with other host options if you want to do it yourself.
WordPress can be customized in aesthetics with the use of themes and skins, there is a large collection of them available which gives you a variety of options in form and factor. No of panels, horizontal scroll; you have got them all, there are free options, and if you fancy there are plenty of advanced paid themes also available. The power and flexibility of WordPress comes in the forms of plugins for various functions. Much like App store downloads for iPhone. If you want to detect spam in your comments, there is a plugin for that. If you want to enable Facebook comments, there is plugin for that, worried about tag cloud, well you got that one too.
Tumblr is widely regarding as the fastest growing blogging platform but it’s more than just blogging. Consider it as an online web storage of everything that interest you, and is publically sharable. You can choose to post a piece of original text, quote someone, post images, video, audio, chat conversation or simply a link to something. It has the usability of twitter (including following people) with the flexibility of Facebook in what you want to post, making it an ideal first landing spot on the web for beginners.
Unlike WordPress, Tumblr doesn’t provide an absolutely simple way of using a custom domain name (say http://www.YourChoiceOfURL.com) but it can be accomplished via the following two stop process none the less as described in the official tumblr blog.
Use this to get a more professional looking URL
As a first step, you should buy a domain (refer to the next section). After that if you are using a subdomain like blog.mywebsite.com, follow the registrar’s instructions to point the CNAME record for the subdomain to domains.tumblr.com OR If you are using a domain that has only two levels, like mywebsite.com (which is most probably your case) follow the registrar’s instructions to point the domain’s A-record (IP address) to 66.6.44.4.
Another thing to note would be that you don’t need to do anything with your nameservers and allow up to 48 hours for the changes to take effect. Once you are done with the above log in to Tumblr, click the name of your blog at the top of the Dashboard and click Blog Settings. Check the “Use a custom domain name” box and enter your subdomain (ie. blog.mywebsite.com) or domain (ie. mywebsite.com). Click the “Test your domain” button. If the test finds any problems, correct them. Keep fixing problems and clicking the “Test your domain” button until the test is successful. Then, click the “Save” button at the bottom of the page. You’re all done!
Buying your own Domain
After a point you would like to own a custom domain name (like yourname.com) instead of using a subdomain (like your_name.some_website.com), the motivation to do this could be because it looks more professional, is shorter and easier to remember, is slightly more credible or simply because it is cooler and you want one, and if that is the case then who are
we to argue.
To accomplish this you can do it with any of the hundreds if not thousands of Domain Name registrars. We will be covering three options, “name.com”, “BigRock.in” and the ‘Google Apps for Domains’ way. name.com is chosen because in our experience it is fast, easy and reasonably priced. BigRock.in because we also wanted to include an Indian provider and the ‘Google App for Domains’ method because of the features it provides including free Gmail inbox/calendar and other services hosted on your domain. So yes you can have a Gmail account with ‘firstname@yourdomain.com’ for free once you register the domain.
Starting with www.name.com, you should check the availability of your desired name through the site. If it is available you can buy it right away. If not the service will automatically suggest and search alternatives like what_you_searched.in or what_you_searched.net or the_what_you_searched.com and so on. Select the one you like and buy it with the standard procedure of buying from an internet store. During checkout you can choose if you want to buy hosting or other services like SEO optimization from name.com, if you think you don’t need them, you are probably right. You would find that the registration (only first year) of “.in” domains would be your cheapest options. It would be worthy to note that only first year registration of .in would be at the discounted price of USD 2 or USD 3, after first year their renewal would be again at the standard price of USD 8-10 depending on the service.
Once you have registered a domain name, you would need to set it up so that it redirects to your hosted content. For name.com go to the home page, at the top menu bar, click on Account. This will list all the domains you own. Select the domain you want to edit or setup. On the right hand side, in the “Control Panel” section click, “DNS Record Management” and edit the entries to reflect your hosted IP. Most importantly you should edit the CNAME records, you might want to edit /create the CNAME entries for both “yourdomain.com” and “www.yourdomain.com” separately.
BigRock.in is another option for you to register a domain. Along side hosting, they also provide a basic site builder for which you don’t need to code a single line. It is a browser based drag and drop tool which looks quite well suited for beginners. They also provide limited but free email accounts with the domain name
you register.
To give website builder a spin go to http://www.bigrock.in/website-design/index.php and select the “Try our Free Demo now” link. You can choose the design, layout, content and to some extent even modify the available design and layouts. It is all graphical and has a drag and drop interface.
If you are in love with Google products such as Gmail, Calendar and Groups, and have wondered if you can get them on your custom domain name, then Google Apps for Domains is for you. Best of all in the first year it is free with Domain registration and has Zero setup.
Start by going to this link https://www.google.com/a/cpanel/standard/new3 which also gives you the option to link up your existing domain if you have any. Otherwise for Rs. 500 (approx 10 USD) you can get a domain, 10 custom Gmail accounts and much more. Definitely a worthy option to explore.
So far we’ve covered regular websites but these days no mention of web-presence can be complete without looking at setting up an e-commerce solution. www.buildabazaar.com is a good zero-setup solution to look at. You will save considerably on time and expense as compared to rolling out your own e-commerce solution or if you lack the expertise then even rolling out an existing open source solution (more on that later).
BuildaBazaar offers good pricing and being associated with infibeam.com, your products can be displayed at infibeam.com website and you can also offer the sell the products of infibeam.com on your site, with both options earning you commission. The Payment Gateway fees are also low as Buildabazaar gives you a group deal. There’s lesser paperwork and technical hassle and instead of five to ten percent they are charging three percent.
Using Google Analytics
So far so good, now that you have got online, the next natural curiosity is to know how many people are seeing your efforts, where are all they are coming from, what time so on and so forth, to accomplish this you should install Google Analytics on your website. To do this, first go to http://www.google.com/analytics/. Over there log in with your current Google account or create one if necessary, once signed in click on the “Admin” link on top left, next click on “New account” fill in the required details, it would be advisable to choose “One domain with multiple sub-domain” when asked.
At this point on the bottom pane it will automatically generate a code for you, the next step is to simply copy paste this code in the head section of each page of your website. No other configuration needed. If you’re site is using a global template, simply add it there. Google Analytics can be integrated with
almost anything on the internet, provided you have the ownership.
After this, once you login, on your Goolge Analytics home, you can see tons and tons of statistics about your users visiting your content, you can generate custom reports, set alerts and satisfy the statistician in you to full extent. As they say enterprise scale reporting, for you, for free.
Setting up your own WebServer from Scratch
What to do if you want to have ultimate control over your hosting environment and do whatever you want with it, without having the hassles of maintaining a computer running all the time and connected to a fat internet pipe. Well cloud hosting is the answer to that solution, and one of the leading providers of cloud computing services is the Amazon Web Service suite. Here we will look at what it takes to set up your own web server and host a blog or a web-app like Instagram.
As the mandatory first step you need to create your AWS account. You can sign up http://aws.amazon.com/ec2/. You’ll have to provide a credit card and a phone number where you will be called as part of the online registration process for verification purposes. If you are uncomfortable with providing your credit card details you can use a virtual/disposable credit card also to authorise your registration. Amazon offers a free usage tier which is great to explore the services and even host real apps without being charged. The complete details of it can be found here http://aws.amazon.com/free/ but to summarize, you get a micro-instance [enough to host a blog or simple web-app with moderate traffic] free for a whole year, including storage, network, hosting and everything. We will now do a walkthrough of setting up a small linux based web server with some standard defaults, you are free to customize it if you want.
No better way to have your free computer
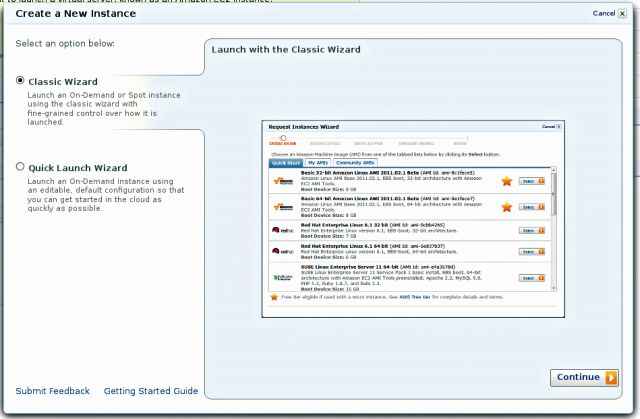
Well once you have signed in and reached your EC2 dashboard, available at https://console.aws.amazon.com/ec2/home you should click on the “Launch Instance” button. Instance is nothing but one computer running in a remote location which over the internet you can control with your keyboard and mouse. A typical set up for any webserver. After that select the “Classic Wizard” and proceed by clicking on “Continue”, In the next screen select the “Amazon Linux AMI 2012.03 “ option. It is an EBS [Elastic block storage, or simply put a hard drive ] based instance so your data isn’t lost every time you restart it and you can swap in swap out the drive, also this AMI [Amazon Machine Image] is optimised and supported by amazon and has a very low memory footprint, which is perfect for micro instances [613 MB of RAM]. Choose the 32 bit option within it.
Next, choose 1 as the number of instances, Micro as the type, with No preference in the availability zone [Do not select Spot Instance]. In the next screen leave everything as it is, except for selecting the checkbox for “Termination Protection”, which will ensure you don’t accidently delete the instance. In the next screen type a Key-Value pair if you want to indentify your instance, for example “Type – WebApp” would be a good option. Then comes the important step of associating a ‘Key Pair’ with your instance, this is basically your authorization rights. If you know what SSH is and have a key Pair ready, then upload your public key, and use your private key to sign in, otherwise click on “Create a new key pair”, give it a name, and then click on “Create and Downoad the new KeyPair” link. Click continue on the next screen of Security group and finally click “Launch” and voila you have your very own free computer running in the cloud. Yes your very own dedicated computer.
Now let us see what we can do with it, after waiting for a minute or so (to let your instance boot up), go to the instances tab, right click on your instance and click connect, a pop-up will come with the instructions. You can either use a standalone SSH client (Window ausers think of PuTTy, Linux users just open your command line and you have one there) or the built-in browser based client (assuming you have Java). In either case the instructions are simple and written there. I personally prefer a standalone client, use the private key (which you created and downloaded above) to authenticate yourself and login.
The final result
If you are a linux user, remember to set the permissions via “chmod 400 path_to_file.pem” as mentioned in the instructions.
Next in your browser, go to “Security Groups” from there select “Default”, in there at the “Inbound” tab in the bottom pane, add 2 new rules “HTTP” and “SSH” leaving the source as default value, if the rules aren’t already there, to allow people anywhere on the internet to access your web server over the HTTP protocol and for you to access it via the SSH protocol.
Next you can follow any guide on setting up environment on EC2 stack for example searching for “Setting up Ruby on Rails on Amazon EC2” or “Setting up Django on Amazon EC2” on Google will provide you many great resources to set up a proper web app for the sake of demonstration let us learn how to set up WordPress
Step 1: would be to install a web server, we will go with Apache [you can pick nginx if you fancy], in the command prompt type
$: sudo yum install httpd
To start the Apache Web Server:
$: service httpd start
It would be a good idea to test your Web Server, to do this open a browser and access your web site by typing in your public DNS entry which you can get from ec2 console, by selecting your instance, and scrolling down in the bottom pane. If you type this entry (or copy paste) in the address bar you should see a test page.
Step 2: would be to install PHP
$: sudo yum install php
php-mysql
Restart the Apache Web Server:
$: sudo service httpd restart
If you wish you can test your PHP installation via the following steps:
$: cd /var/www/html
$: vi test.php
1. Type i to start the insert mode
2. Type <?php phpinfo() ?>
3. Type :wq to write the file and quit vi
Open a browser and access test.php to test your PHP installation: http://your_public_dns_entry/test.php
Step 3: Install MySQL
To install MySQL, type:
$: sudo yum install
mysql-server
Start MySQL:
$: sudo service mysqld start
Create your “blog” database:
$: sudo mysqladmin-
uroot create blog
Secure your database:
$: /usr/bin/mysql_secure_ Installation
Answer the wizard questions
as follows:
1. Enter current password for root: Press return for none
2. Change Root Password: Y
3. New Password: Enter your
new password
4. Remove anonymous user: Y
5. Disallow root login remotely: Y
6. Remove test database and access
to it: Y
7. Reload privilege tables now: Y
Step 4: Install WordPress
To install WordPress, type:
$: cd /var/www/html
$: tar -xzvf latest.tar.gz
renaming the folder
$: mv wordpress blog
The above step will give you the url http://your_public_dns.com/blog if you want something else after the last slash, rename the folder to that.
If anywhere you encounter an error which says permission denied, simply append “sudo” at the beginning of
the command.
Now we are near the end, so simply create the WordPress wp-config.php file:
$: cd blog
$: mv wp-config-
sample.php
wp-config.php
$: vi wp-
config.php
1. Type i to start
insert mode.
2. Modify the database connection parameters as follows:
define(‘DB_NAME’,‘blog’);
define(‘DB_USER’,‘root’);
define(‘DB_PASSWORD’, ‘YOUR_PASSWORD’);
define(‘DB_HOST’, ‘localhost’);
3. Type :wq to write the file
and quit vi
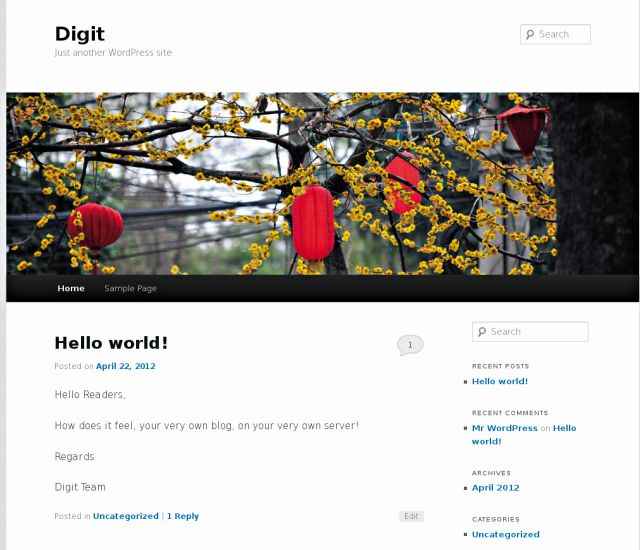
To enjoy the fruits of our labour, open a Browser and access your blog: http://your_public_dns/blog. This should trigger the WordPress configuration process.
As an added bonus, the free tier also gives you 1 free elastic IP, to use it and map it to your custom domain which you would have probably bought do the following
1. In the AWS Management Console, click Elastic IPs (left navigation bar)
2. Click Allocate New Address, and confirm by clicking the “Yes, Allocate” button
3. Right-click the newly allocated IP address and select “Associate” in the popup menu. Select the instance you just created and click “Yes, Associate”
Next, use the IP that you have just associted in the CNAME entry in the control panel from where you have bought the domain as explained above. Similarly, if you want to host your e-commerce store you should look at http://www.opencart.com/ and try installing it in your fresh as mint self built web-server.
We have covered a variety of ways to get yourself on the web, from novice methods to slightly more advanced technique, we are waiting to hear in our online forums about your success in setting up your web-presence.
✅ Thank you for completing the survey!