Turn your regular home into a smart home!
Cool DIY project that saves your electricity bills and breathes new life into your appliances

The idea of controlling your electric appliances from as far as the other end of the earth might sound like a sci-fi plot device straight out of an Isaac Asimov story. But in reality, it’s quite feasible to turn everything – right from your washing machine, toaster, television, and air conditioners to even the lights and fans in your room – on and off from afar, provided there’s an Internet connection on both ends. All you need is a device that is capable of opening a website. So your phone, laptop, tablet or even smart-watch can do the magic!
This whole project is aimed at achieving the aforementioned task at the lowest possible cost by using duplicate-yet-good components and by substituting elements such as wires and Ethernetshields with “jugaad”.
The main component here is an Arduino and a 5-Volt Relay (go through ‘FastTrack: Arduino for Everyone’ if you’re not familiar with it). In a nutshell, Arduino can be described as a microcontroller that acts just like a computer but on a very small scale in terms of power and features. It is palm-sized and can cost anywhere between Rs. 500 and 2000 (Arduino is actually an opensource product which is why the duplicate-yet-workable model goes for `500 while the original one goes for the higher limit). In this project, I’ve used an Arduino ‘Uno’ because it gets the work done (and is more famous) and has got the option to add more sensors given the greater number of I/O pins.
The ‘5 Volt Relay’ is basically a switch that can be controlled through digital signals (i.e via computer). It comes in different ‘channels’ which refers to the number of switches or devices you can control with it. Channels 1, 2, 4, and 8 are the most common types and I’ve used the “4 Channel 5 Volt Relay” but you’re free to use any other relay. The 4-Channel relay will have 4 individual switches, each equipped with 3 connecting ports – Common, Normally Closed (NC) and Normally Open(NO). Don’t make the rookie mistake of confusing these for the traditional positive, negative and the earthing ports that are present in an electric switch that you’d generally find on switch boards.
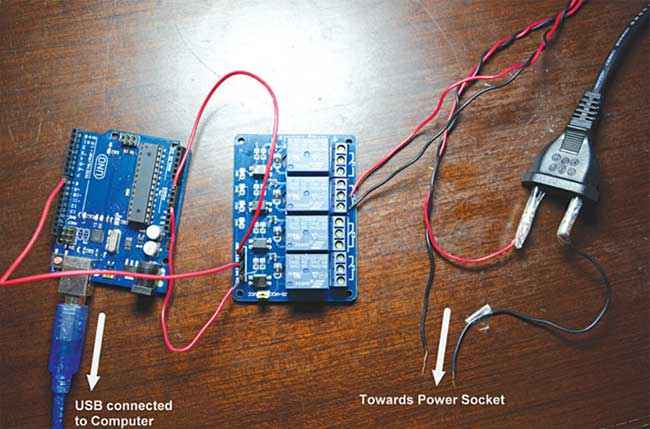
Overview of the whole circuit
Since the objective is to control appliances from anywhere, we would, first and foremost, require a website. So the first step is to acquire a domain name and hosting space. You could either buy them or get them for free. If you are just experimenting, I’d recommend setting up your own local server using XAMPP, (a software which is absolutely free. It’s a cross-platform web server that you can setup within minutes and you can then drop your files into the htdocs folder within the XAMPP installation. Accessing those files is as simple as typing 127.0.0.1 in your web browser. You will need the file to be named as index.php or index.html if you wish to access the site without having to manually type in the entire file name of the html / php file. Read up about it to know more, for you need to have created at least a ‘hello world’ website in the past to proceed with this venture and it’s one of the easiest steps in this project.
In addition, you’d require some jumper wires; however, I wasn’t able to find them anywhere in the cities I reside in – Bareilly and Varanasi. So you could either order them online or make your own, like I did. Same goes for the Arduino and relay, which are hard to find offline, especially when you’re not living in a metro city.
Let’s walk through the whole list of all the required components once again:
- Arduino Uno
- 4 Channel 5 Volt relay
- A computer
- Jumper wires (regular wires would also work)
- Arduino IDE software (get it from here)
- ‘Processing’ software (get it from here)
- Hosting space and a domain name (for the website; however, XAMPP would also work)
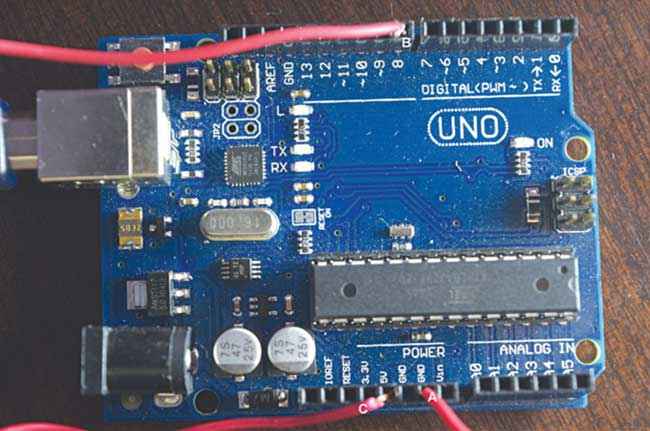
This is how your Arduino after connecting wires (labeled A, B and C in the image) would look like.
This project involves two short programs that will be written in Arduino IDE & ‘Processing’ so it is recommended that you comprehend them well so that you can make your own changes later. Of course, a quick copy-paste job would also get the work done.
Let’s talk about the basic functioning of this project. There would have to be two ends, one from where the appliance is controlled and the other being the website via which you’ll give commands to either turn it on or off. The former would also feature the Arduino, relay and a computer (to receive commands from the website). Here, you could also use an Ethernet-shield instead of a computer on top of the Arduino, but then, why bother buying one, when your computer would work just fine? You would need to install Arduino IDE on the computer, of course – it would help to load the program onto Arduino while ‘processing IDE’ would be used to keep checking the website for the appliance status, i.e. whether to turn it on or off.
The other end is basically a website that we’ll create. Its purpose is to simply display a button, which, on getting clicked, would update a value (‘1’ for on and ‘0’ for off) in a ‘.txt’ file, which in return would be continuously checked by the Processing IDE on the first end. Hopefully, this isn’t the first time you’re coming across 1’s and 0’s since Arduino uses them as flags for the different input / output pins. If it observes a change in value, then the Processing IDE would write the desired value to the Arduino Serial Monitor and upon receiving it, send the appropriate commands to Arduino hardware via USB, which will then control the relay depending upon the command. Thus, the circuit would be made or broken. Sounds confusing? Worry not. Take a quick look at the whole set-up (on the appliance’s end) which explains how the components would be connected.
So, let’s understand the connections. The Digital pin # 8 on the Arduino is connected to the “IN2” pin of the relay(labelled B in Image#3), which is basically used to send commands to the latter. The ‘VCC’ & the ‘GND’ pins of the relay are connected to the ‘5V’ and ‘GND’ ports of the Arduino board respectively and these pins help power up your relay. If you don’t have enough ‘male-to-female’ jumper wires, you could also use a general wire and remove its plastic insulator from both ends – with the help of some duct tape, you’ll be good to go! The wires have been marked to help you identify the connections.
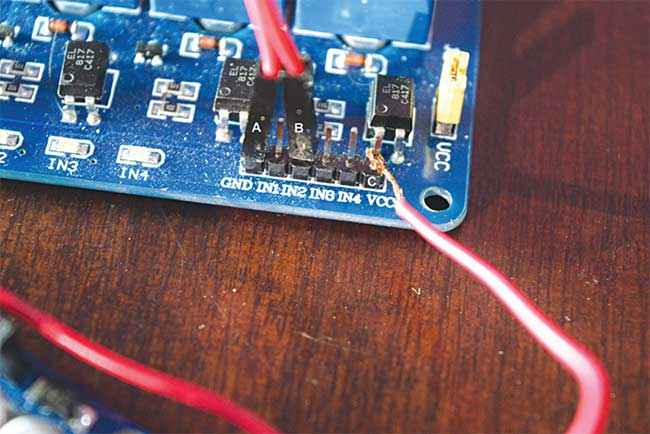
Connecting wires (labeled A, B and C in the image) from Arduino to the relay.
Let’s connect the appliance to the relay. Before we begin, take a look at the connections in the image below. Take the plug of your appliances and use duct tape to attach two wires, red and black in color (i.e D and F marked wires, respectively). The F wire will directly go in the traditional power socket while the D wire will first go into the relay’s 2nd switch’s ‘Common’ port(usually the middle connector of a relay) and a new E wire will be attached onto either the Normally Closed or Normally Open port of the relay, as per your wish. This other end of E wire will then go with the F wire, into the power socket.
Now for the final steps, connect the Arduino with the Computer using a USB and put the E & F wires in the 240 Volt AC power socket. Be extra cautious while handling this part, a slight mistake could even prove fatal.
Now open up your computer and set up the website. If my aim is to control lights from ‘anywhere’, I’d go ahead with a proper hosting and a domain name. You’d need to create a page named “index.html” that will contain the following code: You can obviously add the magic of CSS to create something more interactive like http://www.PraneetSah.com/Arduino/. Finish up the website by creating the final ‘control.php’.
Now upload these two files to your web server, and make sure they are accessible. Open up the website, type http://www.your_website.com/, click on the text: “Click here to turn ON” and then check the directory of these files. You’ll notice that a file called “status.txt” has appeared with its content as a single digit “1” and it would be accessible through http://www.your_website.com/status.txt. You can try again by clicking on the “Click here to turn OFF” text and the ‘status.txt’ file would be updated with its content as ‘0’. And with that, we’re done setting up our website.
The next step is to program our Arduino through ‘Arduino IDE’ and write a code in ‘Processing IDE’ that would check the ‘status.txt’ file continuously for content change. Open up your Arduino IDE and write the following program in it. I’ve used the ‘blink’ example given in the IDE and edited it a little to act as required.
Click on the ‘Upload’ button in the IDE, and open “serial monitor” from the ‘tools’ menu. Here, submit capital ‘H’ or ‘L’ to check whether the appliance does, in fact, turn on or off, as per the instructions, or not. In most cases, it should, and if it doesn’t, check the above steps again. Or if it switches on when “L” is submitted and vice versa, then simply exchange the places of ‘H’ and ‘L’ in the program written above. Make sure to close the serial monitor or else it will cause problem with ‘processing IDE’.
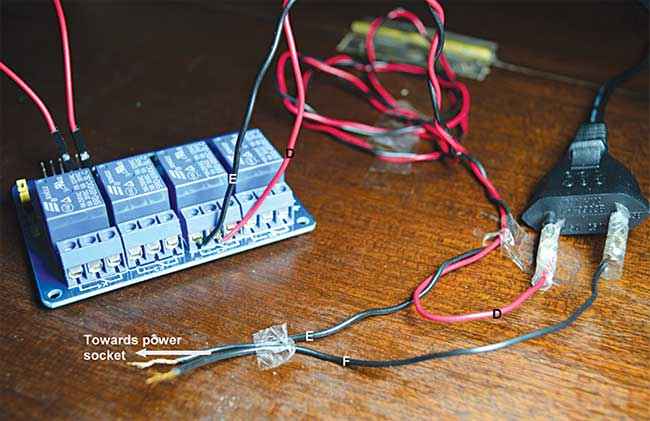
This is how you connect your appliance and the relay to power socket.
Finally, open up the “Processing IDE” and type the following code in it. The entire code can be found at this URL: http://dgit.in/smrthmcode In the above code, you would need to modify two things. Firstly, at the place of “Edit_1”, you’d need to put a single digit numeric character to which the Arduino is connected. It is basically the “COM port” and you can find it in Arduino IDE Tools menu Port. However, if that doesn’t work, try the trial and error method, starting from ‘0’ and going up to 15. Another thing you’d need to change is the correct URL of your ‘status.txt’ file. Now, simply click on the ‘run’ button that looks like ‘play icon’ and you’re ready to roll!
Open up your website and your appliances can now be controlled from anywhere! No better way to impress your friends, methinks. On a side note, if you’re seriously going to put this into regular practice in your house, then make sure you implement some authorization on the website or else your appliances can be controlled by someone else too. Also, for heavy loads like AC or microwave, our 5V relay won’t suffice and will malfunction; therefore, a relay which can handle heavy loads must be used. And lastly, exercise utmost caution in the course of the entire project since you’re dealing with extremely high voltage that can even kill you. Good luck, happy building!
Disclaimer: This project involves working with AC mains power. Unless you have any experience with the same, it is advisable that you only perform the procedures mentioned in the article under supervision of a trained personnel. Improper handling might result in a fatal accident. Digit Magazine and it’s parent company, Nine Dot Nine Media are in no form responsible for any accidents that may occur during the course of this project or otherwise and is not liable for the same. The views expressed in this section are of the respective Digit Squad members. Neither Digit nor 9.9 Media takes responsibility of their claims whatsoever.
This article was first published in the March 2016 issue of Digit magazine. To read Digit's articles first, subscribe here or download the Digit e-magazine app.