How to install Windows 8

Sure, most of the fanfare about Windows 8 has centered on its use in tablets, but the operating system is also designed for laptops and desktops. If you have an old PC knocking around, why not give the latest from Microsoft a look. After all, it’s free—for now. And Windows 8 can be installed only any PC capable of running Windows 7. That means any PC with at least a 1GHz processor, 1GB of RAM, and 16GB of hard disk space (2GB RAM and 20GB storage for the 64-bit version). You’ll also need DirectX 9-capable graphics hardware.
There are two main ways to install Windows 8 on an existing machine: by using the upgrade installer directly on the test PC or by creating a disc or USB key with the OS installer ISO image. If you install it directly as an upgrade, you’ll get the benefit of a system check to see if and how well your computer will be able to run the new operating system.
Remember, though, Windows 8 is still pre-release software, so we strongly advise you not to use it as your main or work computer’s operating system. Such an early version brings the potential for crashes, especially when you consider the vast number of hardware combinations possible with a Windows PC.
A couple of options let you test the Windows 8 waters without losing the current OS on the test machine: You can either install it in a separate partition or in a virtual machine. The Windows 8 installer even includes multi-boot setup that will create a separate partition for you. This way, whenever you start up your machine, you can choose which OS version you want to run. For virtual machine installation, see How to run Windows 8 in VirtualBox.
In general, the installation process for Windows 8 is more streamlined and quicker than that for Windows 7, though it does share some common procedures. It took from 17 to 25 minutes to install on various PC hardware in my testing.
Click Next below to read our step-by-step guide to Windows 8 installation.

Getting Started
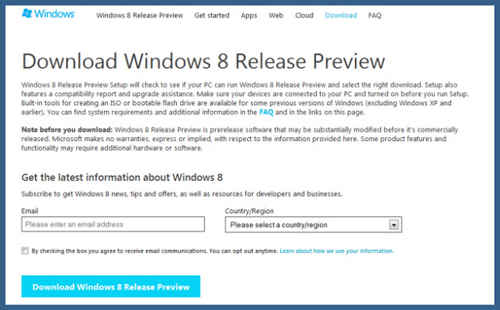
1. The first thing to do, after choosing your victim machine, is to head to preview.windows.com or to http://windows.microsoft.com/en-US/windows-8/iso to get images you can burn to disc. If you’re installing on a new partition or virtual drive, Microsoft recommends the first installer link rather than the ISO image for burning to disk or bootable USB. This is because the installer can burn the disc or create a bootable USB for you, and the downloader is faster (using compression) and more reliable. My contact for Microsoft explains it as follows:
“Microsoft actually invented a new compression algorithm optimized for Windows images which makes the transfer faster, plus unlike an .iso download, they are doing dynamic error correction in the download to deal with dropped packets or bit-flips. This means that at the end of the installer download you will always have a bit-perfect copy, whereas it’s possible you may have to download an .iso more than once if you’re unlucky.”
The Setup is in general a more hand-held process, compared with burning an ISO image and installing with that.
Running the Upgrade Assistant
2. Before starting this process, make sure all your peripherals are connected and powered up so that Windows Setup can download the correct drivers for them.
3. When you first click on the bright blue Download Windows 8 Release Preview button, you’ll actually be downloading the Upgrade Assistant, which checks whether your hardware is compatible. You still have a choice between 32-bit and 64-bit architectures. At this point, I’m surprised the Microsoft hasn’t fully moved to 64-bit, as Mac OS X has. Virtually all new machines are shipped with a 64-bit OS, and PC processors have nearly all been 64-bit-capable since AMD introduced x86-64 in 2003.
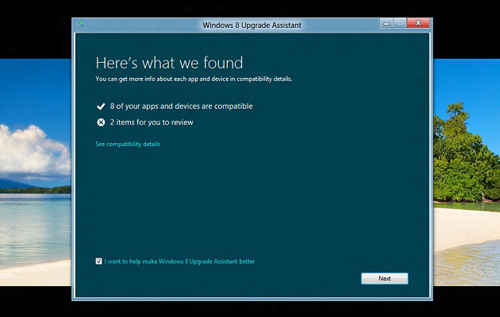
4. The Upgrade Assistant will run through its system checks, and then create a report of what hardware works and what doesn’t. If you’re installing on a touchscreen PC, you may see a warning stating that your touch screen is not “Designed for Windows 8” and indeed, not every touch gesture may work. But on our 2-year-old HP TouchSmart, even though we got this message, the Windows 8 gestures worked surprisingly well. One of my reports on another machine said that I’d need to install an app to play DVDs, and that my hardware wasn’t compatible with the faster Secure Boot feature of Windows 8. I could live with those stipulations.
5. After this, the Upgrade Assistant shows the product key, which you’ll need later. You can cut and paste this to an email for retrieval.
6. Then the assistant will download the actual Windows 8 installer that suits your machine.
Installation Itself
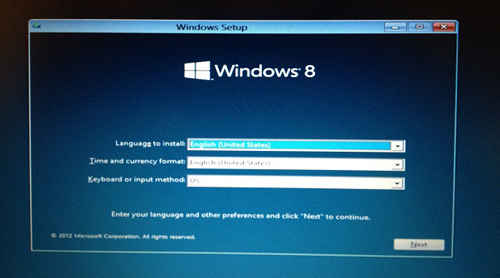
7. After selecting your language, you’ll need to enter the product key provided earlier.
8. Next you agree to the license terms. Note that by installing this pre-release version, you’re consenting to send Microsoft usage data. After all, the point of the free preview is to get testing data and feedback to polish the final software.
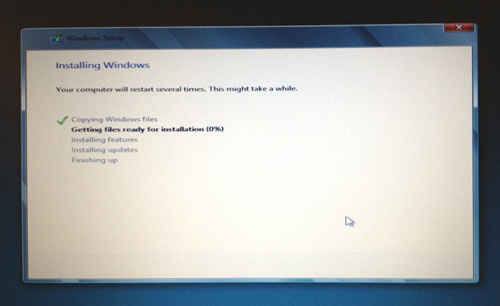
9. You next choice is between Upgrade and Custom. If you’re upgrading from a previous Windows 8 preview, as in Developer or Consumer, you’ll lose your existing files, but if you’re upgrading from Windows 7, you’ll be able to keep files, settings, and applications. It runs from the Desktop, even if you start in Metro. (If you’re upgrading from Windows 8 Developer Preview or Consumer Preview, the next choice is “Choose what to keep,” and the only option was “Nothing.” After this, actual installation took place.)

The Custom choice lets you create a new partition and a multi-boot setup, so you can keep your old version of Windows and choose between it and Windows 8 at system startup. You’ll also need to choose Custom if your PC is running an outdated operating system like Windows XP or if the disk contains no OS at all. Disk options in the Custom install setup path let you delete and format drive partitions.
Pre-First Run Setup
10. After the installer runs, you just have a couple tasks left. You choose a color combination for the start screen, a name for the PC (no spaces or funky characters allowed), and a Wi-Fi network. Of course, you don’t have to log onto a wireless network: There’s a “Connect to a wireless network later” option.

12. Then it’s time to log into a Windows account. This can be a Hotmail or Windows Live Messenger account, or you can create a new one using any email address on the spot. You have the option not to do so, but you’ll definitely want to sign into your Windows 8 PC, since this will enable you to get more apps from the Windows Store and avail you of 7GB of free SkyDrive online storage. It also means you’ll be able to sync settings and apps among multiple Windows 8 devices you log into.
.jpg)
13. You’ll then be asked for a security backup email address or mobile phone number. The setup page says that Microsoft will only use this for password recovery and account security.
14. Next, you’ll see a “creating your account” message, then “finalizing your settings,” then “Your PC will be ready in just a moment.” After this, you’re ready to roll in the Windows Metro Start screen. To get started, remember that the corners of the screen are key for mouse input, and the Windows key on your keyboard is your friend, always taking you back to the Start screen. From here, too, you can just start typing to search for apps to run. There are over a dozen included with Release Preview, so you’ll have plenty to explore, and you can add more from the hundreds of free third-party apps in the Windows Store.
.jpg)
No Turning Back!
One important final note about installing Windows 8 is that you can’t undo it, unless you have recovery media. You can’t even restore from a recovery partition—but you should be able to create recovery media from such partition if you need to. You can then use the Windows 8 installer to recover from the media. This is another reason why it makes sense to install on a separate partition or virtual machine.
What if you Want Media Center, Too?>
What if you Want Media Center, Too?
In Windows 8, Windows Media Center is not included by default, and will be an extra cost item only available with the Pro edition. If you want to add it, you’ll have to type “Add features to Windows 8” from the Start screen, with Settings selected. The choice will be to the right of all the Metro results. This launches the new desktop-based installer. You’ll need the product key, which can be found in Microsoft’s Windows 8 FAQ. For reference, it’s MBFBV-W3DP2-2MVKN-PJCQD-KKTF7.
.jpg)
Then you accept the license terms, and hit “Add features.” After a while of an “Adding features” message with progress animation, your PC restarts. You’ll see the last and newest tile on you Metro Start screen will be for Windows Media Center, and running this opens the desktop app, which is nearly identical to the Windows 7 Media Center.