Sensor to Cloud: Connecting Intel NUC to Amazon Web Services (AWS)
")
Introduction
This paper will show you how to use an Intel® NUC to connect sensors on an Arduino 101* (branded Genuino 101* outside the U.S.) to the Amazon Web Services (AWS)* IoT service. You’ll see how to read real-time sensor data from the Arduino 101, view it locally on the Intel® NUC, and send it to AWS IoT where the data can be stored, visualized and processed in the cloud. We’ll use Node-RED* on theIntel® NUC to create processing flows to perform input, processing and output functions that drive our application.
Setup and Prerequisites:
- Intel® NUC connected to the Internet and applicable software package updates applied
- Arduino 101 connected to Intel® NUC through USB
- Grove* Base Shield attached to Arduino 101 and switched to 3V3 VCC
- Grove sensors connected to base shield: Light on A1, Rotary Encoder on A2, Button on D4, Green LED on D5, Buzzer on D6, Relay on D7
- An active AWS cloud account and familiarity with the AWS IoT service
Read Sensors and Display Data on Intel® IoT Gateway Developer Hub
Log into the Intel® NUC’s IoT Gateway Developer Hub by web browsing to the Intel® NUC’s IP address and using gwuser as the default username and password. You’ll see basic information about theIntel® NUC including model number, version, Ethernet address, and network connectivity status.
Click the Sensors icon and then click the Program Sensors button. This will open the Node-RED canvas where you’ll see Sheet 1 with a default flow for a RH-USB sensor. We won’t be using the RH-USB sensor so you can use your mouse to drag a box around the entire flow and delete it by pressing the Delete key on your keyboard. You’ll be left with a blank canvas.
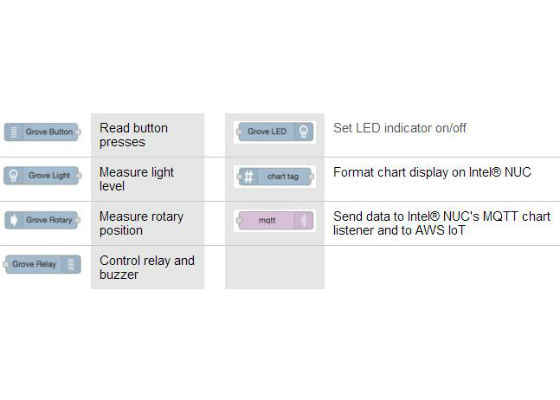
Along the left side of the Node-RED screen you’ll see a series of nodes. These are the building blocks for creating a Node-RED application on the Intel® NUC. We’ll use several nodes in this application:
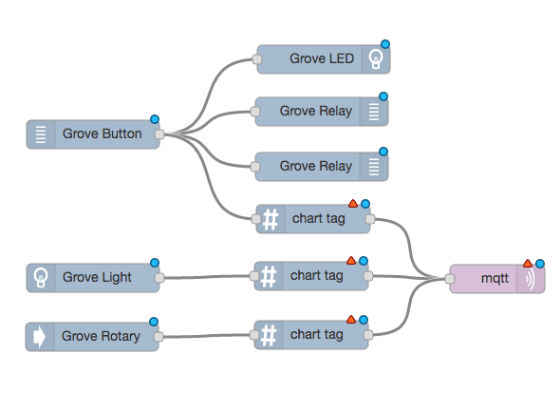
Drag and drop nodes onto the canvas and arrange them as shown below. For some of the nodes we'll need multiple copies. Use your mouse to connect wires between the nodes as shown. We'll make the connection to AWS IoT later so only one MQTT node is needed right now.
When nodes are first placed on the canvas they are in a default state and need to be configured before they'll work. Nodes are configured by double-clicking them and setting parameters in their configuration panels.
Double-click each node on the canvas and set its parameters as shown in the table below. In some cases the Name field is left blank to use the default name of the node. Pin numbers correspond to the Grove Base Shield jack where the sensor or actuator is connected.
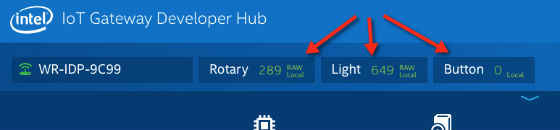
Verify your settings and wiring connections, then click the Deploy button to deploy your changes and make them active on the Intel® NUC. After deploying the flow, you should see a data display towards the top of the Intel® IoT Gateway Developer Hub screen with live values for Rotary, Light and Button. Turning the rotary knob and covering the light sensor should make the numbers change up and down, and pressing the button should turn on the LED, sound the buzzer, and energize the relay.
Configure AWS* IoT and Node-RED*
1. Log into your AWS account and navigate to the AWS IoT console.
2. Create a new device (thing) named Intel_NUC and a Policy named PubSubToAnyTopic that allows publishing and subscribing to any MQTT topic.
3. Create and activate a new Certificate and download the private key file, certificate file, and root CA file (available here) to your computer.
4. Attach the Intel_NUC device and PubSubToAnyTopic policy to the new certificate.
While logged into the Intel® NUC via ssh as gwuser, create the directory /home/gwuser/awsiot and then use SFTP or SCP to copy the downloaded private key file, certificate file and root CA files from your workstation to the /home/gwuser/awsiot directory on the Intel® NUC.
Connect Intel® NUC to AWS* IoT
1. Drag a mqtt output node onto the Node-RED canvas and then double-click it.
2. In the Server pick list select Add new mqtt-broker… and then click the pencil icon to the right.
3. In the Connection tab, set the Server field to your AWS IoT endpoint address which will look something like aaabbbcccddd.iot.us-east-1.amazonaws.com. You can find the endpoint address by using the AWS CLI command aws iot describe-endpoint on your workstation.
4. Set the Port to 8883 and checkmark Enable secure (SSL/TLS) connection, then click the pencil icon to the right of Add new tls-config… In the Certificate field enter the full path and filename to your certificate file, private key file, and root CA file that you copied earlier into the /home/gwuser/awsiot directory. For example, the Certificate path might look like /home/gwuser/awsiot/1112223333-certificate.pem.crt and the Private Key path might look like /home/user/awsiot/1112223333-private.pem.key. The CA Certificate might look like /home/gwuser/awsiot/VeriSign-Class-3-Public-Primary-Certification-Authority-G5.pem.
5. Checkmark Verify server certificate and leave Name empty.
6. Click the Add button and then click the second Add button to return to the main MQTT out node panel.
7. Set the Topic to nuc/arduino101, set QoS to 1, and set Retain to false.
8. Set the Name field to AWS IoT and then click Done.
Send Data to AWS* IoT
Drag a function node onto the Node-RED canvas. Double-click to edit the node and set the Name toFormat JSON. Edit the function code so it looks like this:
msg.payload = {
source: "arduino101",
rotary: Number(msg.payload),
timestamp: Date.now()
};
return msg;
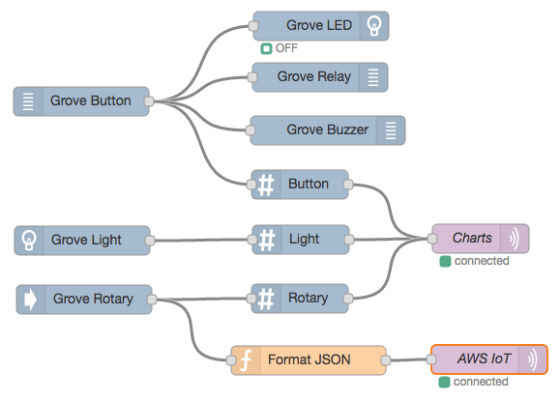
Click Done to save the function changes. Draw a wire from the output of the Grove Rotary node to the input of Format JSON, and another wire from the output of Format JSON to the input of AWS IoT. These changes will convert the rotary angle measurements from the Grove Rotary sensor (connected to the Arduino 101) into a JSON object and send it to AWS IoT via MQTT. Click the Deploy button to deploy and activate the changes. The finished flow should look like this:
Back in the AWS IoT console, start the MQTT Client tool and subscribe to the topic nuc/arduino101. You should see messages arriving once a second containing rotary sensor readings. Rotate the rotary sensor and observe the values changing in near real-time.
When you're done testing this application be sure to stop your Node-RED flow (e.g. by turning off the NUC or removing the wire between Format JSON and AWS IoT and then re-deploying the flow) in order to avoid continuously sending MQTT messages to AWS IoT and consuming AWS IoT processing resources.
Where to Go From Here
This application provides the basic foundation for connecting your Arduino 101 and Intel® NUC to AWS IoT. From here you would typically wire up other sensors and send their data to AWS IoT, then build more complex applications that listen to AWS IoT messages and store, process and/or visualize the sensor data.
For more such intel IoT resources and tools from Intel, please visit the Intel® Developer Zone
Source: https://software.intel.com/en-us/articles/sensor-to-cloud-connecting-intel-nuc-to-amazon-aws