10 tips for troubleshooting your digital camera

Chances are you have a digital camera or two in your arsenal of gadgets, but it's less likely that you're a professional photographer or camera technician. I've been shooting for the better part of a decade and am often approached by friends, family, and the occasional stranger on the street for photographic advice. These tips address some of the more common issues that I've seen over the years—hopefully they'll help you get the most out of your camera, and to tame it when it misbehaves.
 Survey
My Pictures Are Too Dark or Too Light
If you're shooting in Program or Automatic mode, your camera should be able to create a proper exposure—that is, an image that is appropriately bright. But certain scenes can fool your camera and leave you with an image that is too bright or too dark.
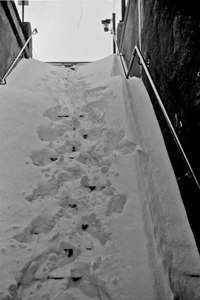
For example, if you're shooting on a snowy scene with default settings you'll likely end up with an underexposed image with gray snow and darkened subjects, like the one to the left. The best way to fix this is to dial in a bit of positive EV Compensation. This setting is represented by a /- button or menu option in your camera. Dial it up 1 and everything should look right—just be sure to set it back to 0 the next time you are out and about shooting or your images may be too bright.
Another common shooting situation: A subject against a strong backlight. The background will look great, but the person or object will be dark. Upping the EV Compensation will wash out the background, so the best approach here is to activate your camera's flash to illuminate your subject. The trickiest part is to get the right distance so that your subject isn't washed out and the right amount of background is shown—experiment a bit and you'll be able to capture natural looking images that are aided by a bit of fill flash.
For more see Get to Know Your Camera: Mastering Exposure Compensation.
My Flash Photos Look Washed Out
The light from a camera flash is bright, and it can be quite harsh. If you're taking a photo of a person and are a bit too close, the flash is likely to wash out their skin tones, or wash out a scene like the one to the right. If you're in a very dark space and the flash is the only illumination, it will unnaturally illuminate your subject and draw the background as a dark, murky void.
You can do some things to combat these effects. Backing up from your subject helps, and using a diffuser like the Gary Fong Puffer will help to soften and spread the light from a pop-up flash. You can also dial down the power of your flash if your camera has a Flash Compensation setting—that will go a long way towards more natural looking flash photos.
I Can't Take Close-Up Photos
Most point-and-shoot cameras are really good for close-up shots—but Macro focusing isn't enabled by default. If your camera has a button with a flower on it, press it to enable close focusing. SLRs and interchangeable lens cameras are a bit trickier. The easiest way to start taking close-up shots is to buy a macro lens—these can be expensive, but will let you fill your frame with tiny objects.
To shoot really small things, like insects and other creepy crawly things, you may add extension tubes, screw-in close-up filters, or other esoteric accessories like reversing rings that mount lenses backwards on your camera. There's a whole world of accessories out there to bring the small world into full view, but beginners are best off starting with a macro lens.
My Pictures Are Blurry
There are two possibilities here—either your photo is out of focus, in which the entire scene will be blurred, or your shutter speed is too slow and your photo is blurred from camera shake and subject motion like the one to the left. The latter is a more common issue, and there are a few ways to address it. If you're shooting in a darker area, try and increase your camera's sensitivity to light—expressed numerically as its ISO setting—this will allow it to grab a photo in a shorter period of time, which will reduce motion blurring.
If your camera has a shutter priority mode you can use that to control the shutter speed—1/125-second will work for most shooting, although you may want to go as high as 1/500 or 1/1000 for sports and wildlife photography. If you still aren't getting the performance you want, consider using your flash. SLR users can help keep the shutter speed down by choosing a lens with a faster f-stop—an f/2.8 lens captures twice the light as an f/4 lens, which lets it use a shutter speed that's twice as fast to capture the same amount of light.
…But I Want a Blurry Background
You've seen photos from pros and friends with SLRs where the background behind a subject is blurry and out of focus. The out of focus area is referred to as bokeh, and it's a neat effect, but sadly one that most point-and-shoot cameras can't accomplish in normal conditions. If you've got a pocket camera you can get a blurrier background by focusing on objects extremely close to the lens in Macro mode, but that won't do for standard shooting.
You really need a camera with a larger image sensor and a wide-aperture lens to accomplish this. An APS-C SLR with a 50mm f/1.8 lens is a great way to go, but at longer focal lengths you can create a nice separation at even modest apertures like f/4 and f/5.6. As a general rule of thumb, the lower the f-stop, the blurrier the background, and the effect is accentuated by getting closer to your subject. The photo of the carved eagle was shot with a 100mm lens at f/2.
I've Got Fingerprints on My Lens
We've all been there. It's easy to accidentally smudge the front element of your lens, and even if it's not enough to effect image quality, you don't want the oils from your skin intermingling with coating that protects your lens for a long period of time. Whatever you do, don't use a napkin, your shirt, or a paper towel to clean the lens.
Keep a microfiber cloth in your camera bag, it's designed so that it won't harm the lens when cleaning. You can also use disposable lens wipes—just make sure they're safe for use on anti-reflective coatings, like these from Zeiss, as they are soaked in a cleaning solution that will speed cleaning. If your lens is just dusty, don't use a cloth to clean it—you're better off just blowing the dust away with an air puffer, as that will get the job done without making unnecessary contact with the lens itself.
There Are Dark Spots on My Photos
If you're shooting with an SLR and you see odd dark spots on your photos like in the image to the left, there's a good chance it's dust on your image sensor. Many cameras have automatic sensor cleaning, but if yours doesn't have it, or it's not up to the task, you'll need to get your sensor cleaned.
You can send it out to a repair shop to have it done professionally, but if you're comfortable with doing it yourself there are some products on the market that will get the job done. Lenspen sells a sensor cleaning kit for $60, and Visible Dust offers a number of swabs and cleaning devices that will remove dust and debris from your image sensor. Remember when you're cleaning that, even though the sensor is protected by a filter, appropriate care should be given not to damage it—if you doubt your abilities, it's best to send the camera out for a professional cleaning.
I Deleted My Photos by Accident
Just because you've deleted a photo from an SD card, or even formatted the card, it doesn't mean that it's gone forever. Much like an undelete utility for your PC, you can use special memory card recovery software to bring deleted photos back from the dead. I've had good luck with CardRescue for OS X, and Windows users can get the same software under the name CardRecovery. Just make sure that you stop shooting photos on the card once you realize that you've deleted photos by accident—you don't want to overwrite the memory that houses the deleted files.
My Camera Battery Dies Quickly
If you find yourself having to recharge your battery too frequently, there are a couple of things you can do. If you've had your camera for some time it might just be time to replace it with a new one—rechargeable batteries simply diminish in capacity over time.
If your brand new battery is still lacking, you should look at the major culprit for battery draw in your camera—its rear LCD. If you have an SLR, you can simply turn it off and use the viewfinder to frame your shots, but point-and-shoot owners don't have that option. It is possible to disable the automatic display of the photo that was just taken, which will help conserve life for users of either style of camera.
Help! I Dropped My Camera in a Puddle!
Don't panic. Turn the camera off and remove its battery immediately. Don't try and turn it back on. Take it home, put it in a plastic container full of uncooked rice and walk away for a couple of days. The rice will act as a desiccant, drawing moisture away from your wet camera. If you're lucky, all will be fine after 48 hours—if not, it's time to find a repair shop or a new camera.
Here's hoping some of these simple tips will help you fix some of the problems you may run into when using your digital camera. If you have any other questions that you'd like to see addressed, please use the comments section to post them.
Copyright © 2010 Ziff Davis Publishing Holdings Inc


