Tips to help you get the best out of Evernote
Evernote is a really helpful tool provided you know how to use it efficiently. In this story we share some basic tips so that Evernote can help you organize your life.

Evernote is one of those tools that everyone’s heard of, want to use but have no idea how to. This is unfortunate since Evernote is a very powerful tool that’s splendid at keeping track of everything you want to remember. It also has vast potential for things as minor as recipes to as important as business contacts. With the help of the following tips, hopefully you’ll be able to make the best use of Evernote on both your PC and your mobile device.
Download the apps
The first thing you should do is to download the Evernote app for smartphones from the respective app stores and the client for your desktop from the Evernote homepage. Alternately, you could just access your Evernote library on the Web, but the desktop client does have a few additional features.

The Evernote iOS app.
Start creating notes
Evernote, at its core, is a note-taking app so if you want to get used to the app quickly, start by creating plenty of notes. Creating a note on all platforms is extremely easy. On the desktop, click the ‘New Note’ button at the top of the Evernote homepage or client, on iOS click the ‘New Note’ icon that appears at the top of the app while on Android, the ‘New Note’ button can be found in the left side panel that’s accessed by swiping right. On desktop and Android, you’ll be able to attach any file to the note, including audio, video and images while on iOS, this is limited to images and recorded audio. In all cases attachments should be below 25 MB. You can also directly capture an image and save it as a note.
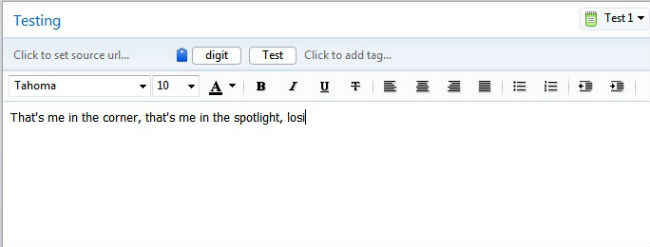
Creating a new note in Evernote
Organize your notes
Once you’ve created a note, you will be able to organize it so that it becomes easier to find individual notes when you have a whole bunch of notes saved. Evernote lets you create Notebooks, which are essentially folders within which you can save notes. If you want to create sub-folders, then you have to create a parent ‘Stack’ under which multiple Notebooks can exist. However, keep in mind that although you can create new notebooks in the mobile apps, you can only create new stacks on the web and desktop client.
After you’ve decided the notebook in which your note will be saved, you can further add ‘tags’ to your notes. This is to make sure that all of your notes can be properly searched for when your notebooks get fatter. You can add as many tags as you want to a note and if the note is a reminder, you can also set it to pop-up at a particular time or day.
Of course, it’s not necessary to create tags or additional notebooks if your library of notes is small. It does help a lot though when your library gets more populated.
‘Clip’ webpages as notes
Evernote also lets you ‘clip’ parts of webpages or an entire webpage as a note. On the desktop, just install the Evernote Web Clipper extension in the browser you’re using. When on a page, select the parts that you want to save and then click the Web Clipper icon that should be present to the right of your browser’s URL bar. Doing so will open a drop box that will let you name the note, tag it and choose the notebook in which the note should be filed. Save the clip as a note by clicking the ‘Clip Selection’ button. You can also choose to save the entire webpage or just the URL, as a note by selecting the option from the dropdown which is visible by clicking the small down-arrow button next to the ‘Clip Selection’ button. Unfortunately, there is no direct way to save a web clip on mobile devices. Android has some third-party apps such as EverClip but their performance is too inconsistent to recommend. You can, however, email anything you want directly to your Evernote library without ever even entering the app.

The Evernote Web Clipper
Email anything directly to your Evernote library
A lot of times you may not have access to your Evernote library and still would like to save a note directly. You can do this by utilising your Evernote email address (you can see your Evernote email address in the profile section of your Evernote account. Keep in mind, this is not the email address that you use to sign in to Evernote) and by utilising this method, you’ll be able to save anything from a webpage address to a wall of text to your library and even add the necessary tags, choose the notebook in which to save or set a reminder.
To do this, add the content you want to save as a note to the body of an email. Add your Evernote email address as the recipient of the mail, add the name you want to give the note as the subject and send the email. You will soon find the note saved in your Evernote library. If you want to save the note in a particular notebook, with particular tags or as a reminder, then add the note title followed by @YourNotebookName, #YourTagName or !Reminder[yyyy/mm/dd] in the subject.
For e.g. your email subject line should read like this: HTC One Review !2013/08/14 @DigitReviews #Smartphones #Android
Link your notes to each other
If you’ve got the Evernote desktop client, you can create links for notes and then add the links to another note. This helps if you want to refer to a previous note in a new one or to create a note that works as a sort of ‘table of contents’ for a notebook. Doing this is quite simple- just right click on a note and select the ‘Copy Note Link’ option. The link for the note will be saved to the clipboard and can be pasted within any other note. Keep in mind though that you can only copy a note’s link in the desktop client of Evernote. It won’t work in the Web client or in any of the apps, although you’ll still be able to use the created links to jump between notes.
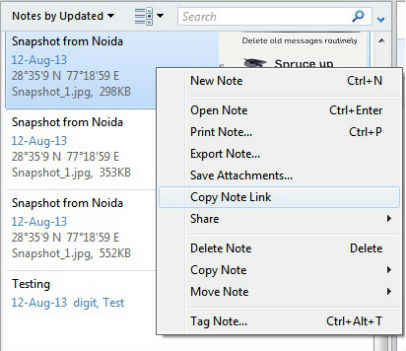
Copying a Note link
Create To-Do lists
Evernote is also very useful if you want to create notes that work as To-Do lists. In order to do so, when creating a note in either the mobile app, desktop or Web client, select the check-box option. You can then add text after each check-box to create a list of things to do that you can mark/unmark with checks. In iOS, when in the text box of a note, clicking on the formatting button at the bottom will reveal the ‘Add Checkbox’ icon. In Android, the checkbox icon is visible immediately when creating or editing a note while in the Web and desktop clients, the check box icon is part of the formatting options above the body text field in a note.
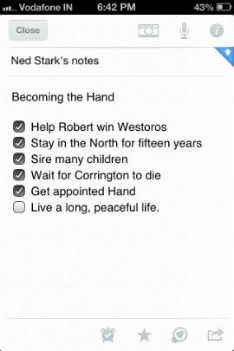
Creating checklists inside a note.
Use Evernote search better
Once your library starts getting filled up with dozens of notes, it’s wiser to rely on Evernote’s built-in search instead of browsing through your lists of stacks and notebooks every single time. Fortunately, like Gmail, Evernote has plenty of ways to make search more specific or comprehensive. By default, if you type a term into Evernote’s search box in either the mobile apps or the desktop/Web clients, it searches for the exact terms included in a note. However, you can use operators to hone your search as well. For instance, if you want to search only within particular tags, type in tag:tagname (for e.g. tag:smartphones will show up only notes that have been tagged ‘smartphones’). If you want to exclude certain tags, type in -tag:tagname (for e.g. -tag:smartphones will show up all notes that haven’t been tagged ‘smartphones’). If you want to see all notes that haven’t been tagged, type in -tag:*. Similarly, to search within a particular notebook, type in notebook:“notebook name” (when searching for a tag or notebook with multiple words in its name, use inverted commas) or if you want to search for notes with specific tags inside a specific notebook, type notebook:“notebook name” tag: “tag name”.
For more search operators and to get a better idea of search in Evernote, refer to this blog post: http://goo.gl/H7JeNV