The 3D Production Pipeline for Games: Getting it There

The Challenge of Animating the Artist's Dream
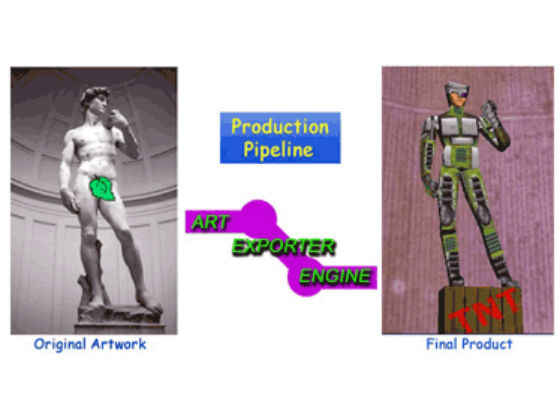
Figure 1 – Artist's lament: "It never looks quite the same in the game…"
Source for Michelangelo's David: Digital Imagery © copyright 2001 PhotoDisc, Inc.
Building and animating a 3D scene is a tough job. Yet it's only part of the whole picture, although not a trivial part by any means. Wouldn't it be great if all you had to think about was making your scene look wonderful in the 3D package you've decided to work in?
But once you've built your model and animated it, how does it get into the actual game? What pieces of it won't make it there at all, and why not? Most importantly, what can you do up front to make sure that what you build is what the end-user sees?
Unfortunately, asset creation and animation happens in the first section of what can be described as a somewhat leaky production pipeline.
- The exporter, which takes the content from your favorite 3D-creation tool in preparation for delivery to the game engine.
- The game engine itself.
In reality, the production pipeline is much more complicated than modeling and animation, export and engine. Before modeling and animation begin, concept art and storyboards are drawn up. Then there is the question of dialogue, sound effects and music. Once animation begins, the pipeline will actually begin to feed back on itself in many places. Problems in modeling and animation often don't show up until export or even later in the pipeline, which means models are sometimes rebuilt, re-textured and even re-animated. The whole process can become a battle for programming and artistic resources. The biggest battle of all is for time. The key to saving time is to take out as much of the guesswork up front, while you're planning and creating your assets.
If you're an animator, new to game animation, especially one coming from digital feature work, this paper will help brace you for what's coming and hopefully, get you past some of the initial heartbreaks.
Animators: Take Heart -There are Solutions
If you're animating for a digital feature, you're lucky. (Granted, you may not feel lucky if you're working without sleep near the end of a tight production schedule.) Your work will go through countless refinements and will generally end up looking much better on screen than it did when you began. The end of your content-creation pipeline is a vast "renderfarm." Ah, the joy of six-to-twelve-machine-hour-per-frame renders! Every rippling muscle and glittering scale, every nuance reflected in each of the dozen or so dripping wet eyeballs your creature was built with will eventually be rendered. Whether or not your scene actually makes it through the final edit is anybody's guess, but if it does-you know it's going to look great!
This is not necessarily the case when modeling and animating for the nonlinear, interactive world of real-time 3D. Frames rendered in one sixtieth of a second or faster won't match the look and feel of those rendered in 12 hours in our immediate fut ure. If you're coming from the world of digital feature animation, you will need to incorporate a few new rules for content creation and rendering. The good news is the line between film animation and game animation is blurring. Although there is still some distance to cross, the progress being made is astounding.
Tips and Tools: I Built It Like This – Why Does it Look Like That?
Figure 2 is a scene I recently created. It's got the look and feel I want. Polygons? Who's counting? And I've used megabytes of textures that I shot at the highest resolution I could. I've got six lights, transparencies and bump maps. Best of all-I've built most of it using non-uniform rational basis spline (NURBS) geometry! Will it get to the game exactly like this? Not likely, but here are some tips and tools for bringing the artist's dream to life, including:
- NURBS
- Inverse kinematics
- Textures Allegorithmics Real Time Graphics Texture Streaming for Games

Figure 2 – Here's the look and feel I want. But will it get to the game exactly like this?
NURBS
Despite some intrinsic problems with using NURBS, mostly of which bite you when you're stitching or blending one piece to the next, NURBS is still my favorite geometry, since it lends itself to the creation of smooth, organic forms. (See: Smoother Animation with Intel® Pentium® III Processors, tips on using NURBS). This article covers my three favorite ways of disguising seams in NURBS models.
NURBS geometry is naturally scalable (it can be made more or less complex on the fly so the same gaming model can be used easily over various bandwidths). But alas, there is a slight problem; most game engines aren't written to handle NURBS. Even if the game engines did support NURBS, exporters built to carry content from your 3D-modeling/animation tool to the game engine most likely won't.
Why don't exporters convey 3D-modeling information to the game engine?
The simple answer is that game engines don't speak the same language as 3D modeling/animation applications, and the exporters are just doing their best to interpret. This stems from a number of factors, not the least of which is that game engines were originally built to do something very different; namely, to deliver interactivity. On the other hand, most 3D applications were written to build anything a film director might dream up. The idea of building those dreams in real time wasn't even a consideration. To make matters
more complicated, while 3D animation packages were originally written to run on industrial-strength workstations, game engines were built to run on PCs and game consoles, putting some technologies (NURBS, for example) out of reach unt il very recently.
As a result, 3D modeling and animation packages can create geometry and images that a lot of existing game hardware can't hope to handle. To feature artists who are used to building and animating heavy models, it becomes a sort of dilution process that can be frustrating to say the least. Sure, you always build models as light as you can for film (with as few polygons or subdivisions as possible).
Yet it's hard to imagine what "light" is until you've built a game character designed to run on a four-year-old desktop machine or, worse yet, over the Internet where bandwidth is an added issue.
There's good news in consumer game hardware
The good news is that game hardware is becoming strong enough and fast enough to handle whatever the 3D tools dish out. Game engines are also getting smarter and more powerful. To make things even better, companies like AutoDesk Discreet*, AutoDesk Alias Studio* and AVID|Softimage*, are seeing the game industry for what it is-the film industry's younger brother, who might just grow up to be bigger than his sibling someday. As a result, AutoDesk 3ds Max* is opening up its source code to game developers. AutoDesk Maya* and Softimage* both have game-developer toolkits, which bring the language gap between application and engine closer to being bridged.
Hold on-we're not there yet…
The game-development pipeline is still somewhat of a two-headed monster, with 3D applications and game engines fighting for control on either end, often with a cobbled-together, in-house exporter between them to sort things out. Usually, sorting things out means keeping it simple. Keeping it simple means that geometry like NURBS, with all of its seam-blending problems, may not make it into your game. At least, not yet.
Working around NURBS
I still begin many of my models as NURBS and convert them to a polygon mesh when it's time to meld their various bits together. The conversion involves deciding the kind of polygons you want. Usually it's quads or triangles. Base your decision on the needs of your engine (which is determined by the manufacturer) and just how closely you want your polygonal model to match the NURBS model. After that, line up your various parts, meld or use Boolean operations to combine them into one, then add and move polygons as needed. It's not a trivial undertaking, by any means, but you do end up with a seamless model – a breath of fresh air for NURBS users. Since NURBS geometry gives you a very organic and detailed model, starting with NURBS works very well for creating polygonal models for export as a multi-resolution mesh (MRM). MRM allows detailed polygon models to automatically lower their complexity as factor s such as the model's distance from the camera change. You can find more information on Multi Resolution Mesh at /en us/sites/college/coursedisplay.php .
Whatever geometry type you end up using, you generally have a better chance of exporting all of it if your exporter "thinks" there's less than there is. How do you trick it? Place it in a hierarchy, meaning a parent group, and merge together as many objects as possible before exporting it.
Complex Character Setups with Inverse Kinematics
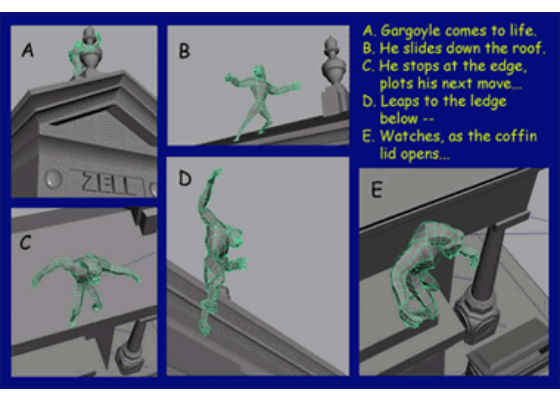
Figure 3 – A storyboard showing the main shots, poses and actions of my sequence
Sloping ground planes, weight shifts and movement from ground plane to ground plane usually require complex character setups and constraint hierarchies to avoid slippage and penetration issues. Will your exporter handle these setups? Probably not without some tweaking. One of the more challenging parts of animation is, of course, character work. Unfortunately, this is where more leakage occurs in the pipeline. Whether or not you'll be using Inverse kinematics, keyframed rotations or motion capture (MoCap) to add character movement to your models, chances are you'll be employing a skeletal system of some sort to do it. If you're using motion capture for the bulk of your work, my advice is to find out as much as possible about the source of that movement. In particular, know exactly what sort of skeleton your motion capture data is expecting to see BEFORE you build the skeleton for your model. Certainly before you bind your model and adjust vertex weights! Some systems require the use of "dummy" objects between the bones to correctly achieve rotations; others don't support dummy objects. Still others are built on a "left-handed" rotational scheme with the z-axis pointing back into the workspace, not forward.
Even if you're keyframing your motion from scratch, you'll find you still need a fairly complex setup if your character does things like hopping from ground plane to ground plane, walking up or down an uneven or slanted ground plane or flipping or shifting weight. Take the sequence in Figure 3 as an example. This particular character needs to do all these things. He also needs to plant his feet, walk without appearing to slide and to move in whatever direction a joystick, keyboard command or mouse happens to take him.
I won't go into exactly what this particular setup involves. It's covered, in part, in an earlier paper, Character Animation, Skeletons and Inverse Kinematics. However, take a look at Figure 4 (below). The main feature of this setup is a box as a parent object, which is translated but never rotated. Rotations and offsetting translations (such as weight shifts) are carried out by hierarchies of constraints inside the box. I've used a spline in the shape of a box rather than an actual cube for the parent, so I won't have to remember to hide it later.
Is a complex setup like this really necessary to move a character? Maybe not, but it certainly makes i t easier once you begin adding the little secondary movements that make a character's movement more convincing. The real question is whether your exporter and engine will support a setup like this. Will it understand bones? Dummy objects? Constraints? What if you've scaled your bones to fit your model? You may need to "freeze" the scaling of those bones (set their scaling value to 1) to avoid dismembering your character at export time. In other words, if you haven't had a serious talk with your exporter engineers, now is a good time.
Tools
Take advantage of a 3D-animation package that has a very good developer toolkit with a compatible exporter. AutoDesk Maya* and 3ds Max, and Softimage* all make such toolkits or open-source code available to programmers, but they are not the only packages on the market.
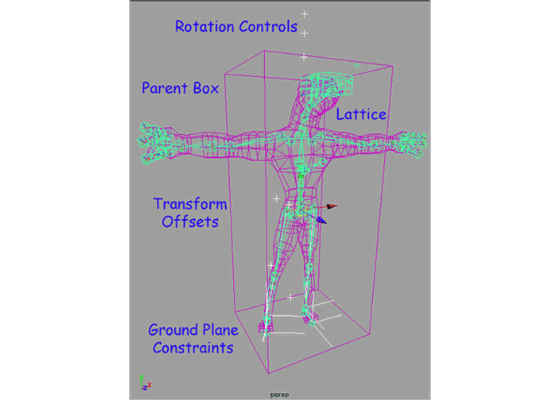
Figure 4 – A setup consisting of a parent (the box), which is translated up, down, right, left, forward and back but never rotated. All rotation, (and offsets from the parent's translation) are carried out through manipulation of a hierarchy of constraints. It seems complicated, but setups more complex than this are not uncommon. Will your exporter support them? Maybe not without a plug-in tool.
Third-party solutions like those by Rad Game Tools* with products such as Granny* are built to plug into your exporter and engine, which understand bone setups from many popular 3D applications. Check outDigimation* as well. You can find more information on 3D plug-ins and tools (as well as information on 3D forums and expositions) at 3Dgate*.
Textures
Outside of interesting game-play and convincing character movement, probably nothing sells a title better than well chosen, nicely rendered textures. But getting them from artwork to engine can be one of the toughest challenges of all.
Textures and Lighting
Before we go there, let's talk a little about lighting, which has a lot to do with how textures ultimately look. Sadly, the truth is, most exporters won't even export the lights (and settings) from your favorite 3D applications. Often the best you'll be able to do is parent or constrain your lights to polygonal cubes or some other piece of dummy geometry and export the cubes along with whatever animation you've given them. Some packages allow you to add user-defined attributes to your objects, which the exporter can be trained to read.
(You'll need to work with your programmers to understand the limits up front.) This is where you can plug in RGB and intensity values. The same generally goes for cameras, which also rarely export. Again, they can be handled pretty much the same way as lights-with dummy objects for both the camera body and its focal point. Common settings (like field of view, for instance) are largely lost, although they can sometimes be included as use r-defined attributes the same way light attributes can be handled. It's not a perfect solution. For that reason (and to cut down on lights during game-play), many lighting effects are rendered right into the textures themselves. For example, instead of an actual light in a hallway, a phony light source is painted on the wall, and a "real" light is used to illuminate the walls and floor in the 3D package. Those walls are rendered as picture files, which are then re-mapped onto the original wall geometry.
Getting Textures into the Game Engine
So, you now have textures. How do you get them into the game? Well, you may not be able to get them in exactly the way you want them. It would be nice to use several square feet of high-resolution bitmapped textures and never repeat anything, but the truth is all those high-resolution bitmaps take up a whole lot of memory. There are other considerations, as well. Some graphics cards don't know what to do with anything but a perfectly square texture map. If you're working on a title likely to be seen on a wide variety of graphics cards, your best bet is to keep your texture maps square with a resolution that is a power of 2 (128 X 128, or 256 x 256, etc.), unless your engine-design team tells you otherwise. You're often better off putting as many different textures as possible into one square file (hopefully as small as possible). The advantage to having one file to texture many objects is that the engine can read in the file once, and simply use it over and over as necessary. Figure 5 shows a typical multi-use texture. The important point is to keep it as small as possible.
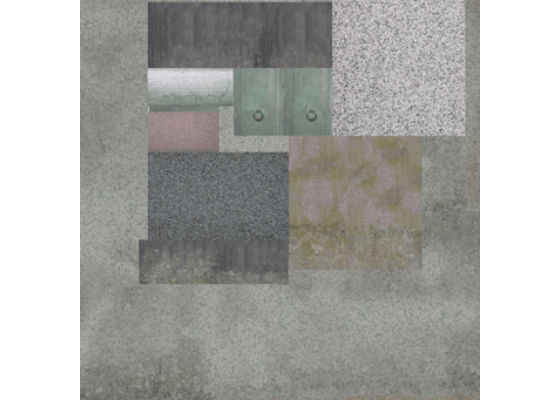
Figure 5 – A good way to avoid texture problems at game time is to place as many texture pieces as possible on one perfectly square map. A common resolution for Web-based games is 256 x 256 pixels.
It's also important to recognize other possible limitations of your exporter and engine and to know the range of power for the target hardware. For instance, the specularity of Phong, anisotropic and Blinn materials may produce unwanted artifacts when rendered on some hardware.
Procedural Textures
Another possibility is to bypass bitmapped textures, and use procedural textures instead. This can be particularly good for building games that are scalable over a wide range of processors, for cutting down on the memory drain of bitmaps. Using procedural textures can also decrease the bandwidth necessary for running Web applications. Procedural textures can be truly 3D as well; meaning objects textured this way appear to have been carved from the material they represent. For example, if a 3D procedural marble texture is used on a model, the veins run through the object and change appearance based on the cut angle, just as it would had it been carved from a real block of marble. Procedural methods can also be used to generate terrain and even vegetation in real time.
This isn't to say that your engine will instantly know how to handle procedural methods of content creation. Nor are procedural assets always easy to work with. Objects that move, for instance, can be a challenge with procedur al textures. This is because procedural textures are generally built in "world" rather than in "object" space. A procedurally textured object may appear to "swim" through its material as it moves through space (the stripes on a fish actually travel from one end of the fish to the other as it swims, for example).
Some great papers written on procedurals (and links to others) can be found right here on the Intel® Developer Zone Web site. Be sure to read Generating Procedural Clouds in Real Time on 3D Hardware.
Lights! Camera! Communicate!
What is the key to a great game delivered on time? Probably the single most important part of the mix is communication. The artist's vision needs to be clearly stated and any ambiguous terms need to be spelled out and understood by everyone. As crazy as it sounds, programmers and artists need to work very closely for all this to happen. The ideal is a production house where the lead animator and lead programmer sit right next to each other. In one of my earlier jobs, our programming team was located some 30 miles away from the animators and art director, which was not an optimal situation.
Conclusion
Obviously, I haven't touched every possible issue involved in getting artwork through the pipeline to game-play, but I've gone over some of the more common issues. Hopefully I've covered those that might be giving you headaches right now. Meanwhile, keep pushing the limits. You can bring the artist's dream to life-going from creation to exporter to game engine with a variety of techniques, including using NURBS, inverse kinematics and textures. With a growing wealth of third-party tools and plug-ins coupled with more robust technology, animation is only getting better. Remember to keep the lines of communication open, and keep on animating!
For more such intel resources and tools from Intel on Game, please visit the Intel® Game Developer Zone
Source:https://software.intel.com/en-us/articles/the-3d-production-pipeline-for-games-getting-it-there