Android app development: Getting Real
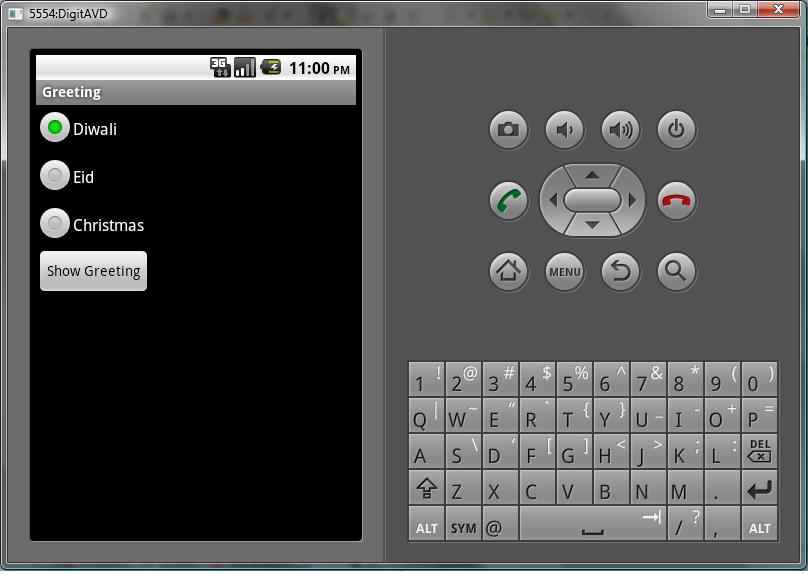
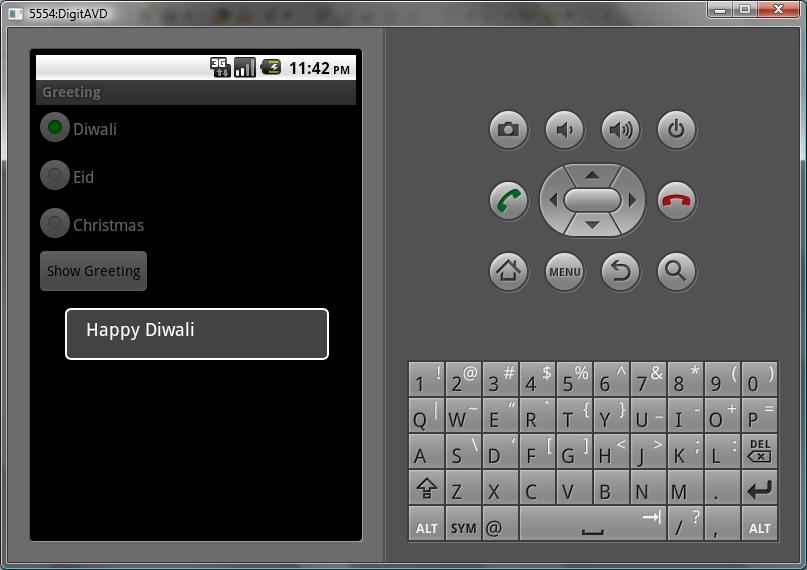
Here’s hoping you enjoyed running your first Android application. If you missed out, you can do that by going here. I'll now look at creating interfaces and a really basic application that'll let you choose a festival, and then show you a greeting in the dialog box when you click the Show Greeting button. I've assumed you're familiar with Java and are ready to move on to building such applications as a natural progression from my previous article that focussed on the essential steps in building a specific app for Android.
 Survey
The three steps
There are three main aspects to creating your greeting application – the Greeting Activity which is the main activity, the main.xml file for layout, and the strings.xml file for strings to be used in the layout. We will take a look at each of them. You will notice how the Eclipse ADT plugin aids us in writing each of them. Also, it is worth noting that the Android platform SDK version used here is 2.2, so there might minor changes in the code depending on the version of SDK you're using.
Creating the layout
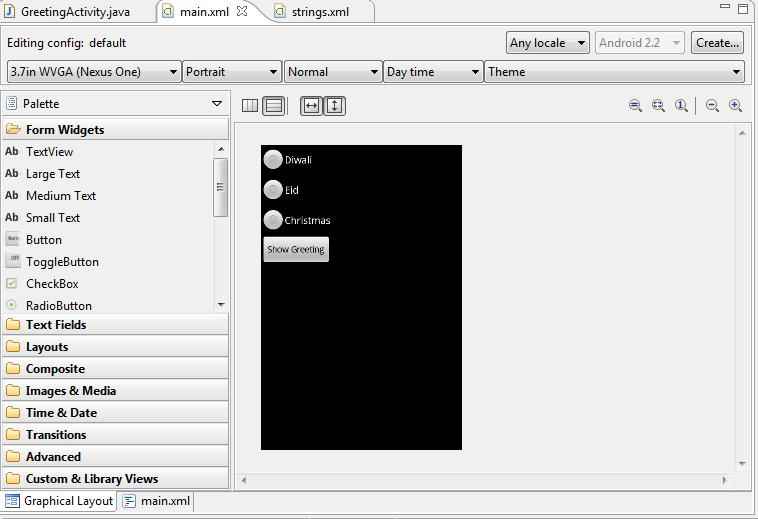
To begin building the application, create a new Android project with the name “Greeting”, and appropriate package. This will create a default directory structure, out of which the file called main.xml in the res/layout directory of the project folder is relevant to us. When you open this file, Eclipse will open the Graphical layout view, which shows a list of various components to use on the left and a graphical view of the screen in the center. The layout can be generated by dragging various components onto the screen and resizing them accordingly. This will generate the relevant XML needed, which can be viewed in the XML source view of the file. Android uses several layouts such as LinearLayout, RelativeLayout, FrameLayout and TableLayout for laying out components. You might already have an idea of what these are if you have developed GUI applications in frameworks such as Swing. Nevertheless, these are fairly easy to understand once you start using them.
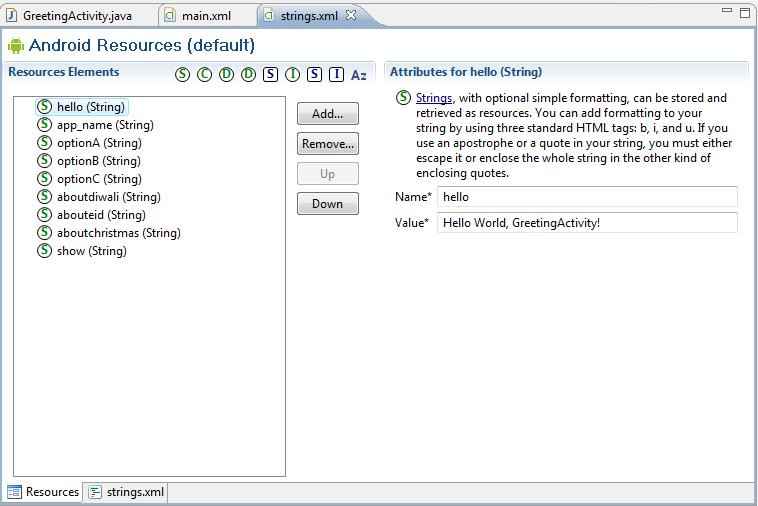
In my application, I've used LinearLayout, which simply places components next to each other, either horizontally or vertically. So, drag the RadioGroup component into the interface from the Form Widgets section of components and add the relevant Radio Buttons to it. To change the text associated with each radio button, right-click and select Edit Text. Now, under the Project Resources, you can create a new string by providing its name and value. The name is like an id for a string, which should be unique, so that it can be accessed wherever needed with the help of this id. After you add the string text for each radio button, the relevant entries for each string will be updated in the strings.xml file. Finally, you can drag the Button component below the radio buttons and update its display string similarly by adding an entry in the strings.xml file.
The XML generated for the layout of our application should look like:
<?xml version="1.0" encoding="utf-8"?><LinearLayout xmlns:android="http://schemas.android.com/apk/res/android"android:orientation="vertical"android:layout_width="fill_parent"android:layout_height="fill_parent"android:weightSum="1"> <RadioGroup android:id="@ id/radioGroup1"android:layout_width="wrap_content"android:layout_height="wrap_content"> <RadioButton android:layout_height="wrap_content" android:layout_width="wrap_content"android:id="@ id/radio0"android:text="@string/optionA" /> <RadioButton android:layout_height="wrap_content" android:layout_width="wrap_content"android:id="@ id/radio1"android:text="@string/optionB" /> <RadioButton android:layout_height="wrap_content" android:layout_width="wrap_content"android:id="@ id/radio2"android:text="@string/optionC" /></RadioGroup><Button android:text="@string/show"android:id="@ id/button1"android:layout_width="wrap_content"android:layout_height="wrap_content" /> </LinearLayout>
We can see that each XML element representing a component is located within a LinearLayout element, whereas each of these have several properties, with important ones like android:id and android:text. Apart from this, we also need to add the strings that we are going to display in the dialog boxes, to the strings.xml file. This can be done by adding the following elements:
<string name="aboutdiwali">Happy Diwali</string><string name="abouteid">Eid Mubarak</string><string name="aboutchristmas">Merry Christmas</string>
This can also be conveniently done by adding the strings through the String resources editor which asks for the name and value of the string once we click the add button.
Making it work
Now we have the task of giving life to our application. This is done with the help of Activities. Eclipse should have created a structure of the main activity associated with your project. The task of our activity is to populate components and handle listeners for each component. This is done by over-riding the onCreate method of the Activity class. This method is called whenever the activity is started:
@Overrideprotected void onCreate(Bundle savedInstanceState) { super.onCreate(savedInstanceState); setContentView(R.layout.main); RadioGroup RadioGrp = (RadioGroup) findViewById(R.id.radioGroup1); RadioButton Rbutton1 = (RadioButton) findViewById(R.id.radio0); RadioButton Rbutton2 = (RadioButton) findViewById(R.id.radio1); Radiobutton Rbutton3 = (RadioButton) findViewById(R.id.radio2); Button btn = (Button) findViewById(R.id.button1); btn.setOnClickListener(new View.OnClickListener() { public void onClick(View v) { int rpressed = RadioGrp.getCheckedRadioButtonId(); if(rpressed==2131034113){ showDialog(0); }else if(rpressed==2131034114){ showDialog(1); }else if(rpressed==2131034115){ showDialog(2); } } }); }
Recall that the Android framework automatically generates the R.java class according to the contents of the strings.xml and main.xml. We will be referring to this class from our Java code in order to access the components and strings declared in the XML files. Further, we have registered a ClickListener to the button, so that we can capture the click event on the button and perform the processing in the onClick method defined in our Anonymous class. Basically, the onClick method checks for the id of the radiobutton pressed and calls the appropriate dialog by passing the dialog's id in the showDialog method of the Activity class. We also need to over-ride the onCreateDialog method that will populate the dialogs once they are called. The parameter, id needs to be passed to this method in order to determine which dialog is to be created:
@Overrideprotected Dialog onCreateDialog(int id) { AlertDialog.Builder builder = new AlertDialog.Builder(this); if(id==0) { builder.setMessage(getString(R.string.aboutdiwali)); builder.setCancelable(true); AlertDialog dialog = builder.create(); return dialog; }else if(id==1){ builder.setMessage(getString(R.string.abouteid)); builder.setCancelable(true); AlertDialog dialog = builder.create(); return dialog; }else if (id==2) { builder.setMessage(getString(R.string.aboutchristmas)); builder.setCancelable(true); AlertDialog dialog = builder.create(); return dialog; } return null;}
We are using the AlertDialog Builder to add properties like message etc. to the AlertDialog and then the calling the create method that actually returns the AlertDialog object. The AlertDialog class can be used to build user defined layouts in dialogs. We are only setting the message and the cancelable property, which will allow the user to remove the dialog by pushing the back button.
Writing an Android application does not need much of a learning curve if you have prior experience in GUI development. We have quickly been able to code a basic greeting application which leverages the well-known constructs such as Event Listeners to create a basic android experience. If you need the source code of the application I have created in this tutorial, click here.
Please leave your comments, so we can shape the series in a better way. Follow us on Twitter (@devworx) and visit our Facebook page here!
function path() { var args = arguments, result = []; for(var i = 0; i < args.length; i ){ result.push(args[i].replace('@', 'http://alexgorbatchev.com/pub/sh/current/scripts/')); } return result }; SyntaxHighlighter.autoloader.apply(null, path( 'applescript @shBrushAppleScript.js', 'actionscript3 as3 @shBrushAS3.js', 'bash shell @shBrushBash.js', 'coldfusion cf @shBrushColdFusion.js', 'cpp c @shBrushCpp.js', 'c# c-sharp csharp @shBrushCSharp.js', 'css @shBrushCss.js', 'delphi pascal @shBrushDelphi.js', 'diff patch pas @shBrushDiff.js', 'erl erlang @shBrushErlang.js', 'groovy @shBrushGroovy.js', 'java @shBrushJava.js', 'jfx javafx @shBrushJavaFX.js', 'js jscript javascript @shBrushJScript.js', 'perl pl @shBrushPerl.js', 'php @shBrushPhp.js', 'text plain @shBrushPlain.js', 'py python @shBrushPython.js', 'ruby rails ror rb @shBrushRuby.js', 'sass scss @shBrushSass.js', 'scala @shBrushScala.js', 'sql @shBrushSql.js', 'vb vbnet @shBrushVb.js', 'xml xhtml xslt html @shBrushXml.js' )); SyntaxHighlighter.config.stripBrs=true; SyntaxHighlighter.all();
