QNAP – Third Advertorial – Installation guide and UI features

By Team Digit
On our quest for setting up a powerful NAS solution mainly for video editing purposes, we selected the ready-to-use QNAP TVS-471 Turbo vNAS from QNAP’s TVS-x71 range and spoke about its capabilities in depth. After setting up this system, we realised that it offered quite a lot of potential. The kind of features that it comes with makes it a great choice for video editors, home users, and SMBs alike. Firstly we started off with looking at and deciding how you can get the right storage for your video editing needs where we also talked what kind of storage drives you should use and more. You can read all about it here. Whereas, our main focus for the second article was on the QNAP TVS-471 which included in-depth features and specifications of the system. We also touched upon how the TVS-471 is a NAS solution that can fit plenty of other roles apart from being a system focused on video editing needs. You can also find a side-by-side performance comparison between the TVS-471 and a local PC that we performed right here.
This time we’ll take you through the entire installation process for this NAS solution starting off all the way from its unboxing and finishing up with final software installation and setup so that the TVS-471 is good to go.
Unboxing the QNAP TVS-471:
Stuff required:
Selecting and buying a new NAS solution for your home or office needs is a step in the right direction and since you’re going ahead with it, you need to keep a few things in mind moving forward. Whatever your requirements may be, there are a few important things that you need to make sure before you go about buying a new NAS solution. Such as:
- A reliable network: It’s a no brainer that a good network setup is required in order to get the best out of your connected devices especially a NAS. You can make sure of this by investing in decent network hardware depending upon your requirements and Internet connection like network adapters (including Network Interface Cards, hubs and switches), critically rated access points or routers (wired or wireless), modems (depending on your ISP), connectivity cables (Ethernet cable, phone-line cables etc. Quantity depends upon the number of wired clients your network has or will have later on).

- Clients: If you’re setting up a high-end NAS like the QNAP TVS-471, you definitely should have one or more working PC’s or laptops connected to your network so that you can access the NAS and make full use of its capabilities. If you’ve selected the TVS-471 solely for your video editing storage needs, then we must say that using a powerful multi-core PC or Mac is the best way to go to get your work done seamlessly. So if you currently don’t have a good setup for video editing but a budget for one, we highly recommend building or buying a powerful rig. Multiple clients can use the TVS-471 NAS simultaneously as a scratch disk during video editing or even during regular data operations, so having a healthy number of clients won’t hurt you in any way.
- Safeguards: Anything related to data including its storage, retrieval and management especially a NAS is something that you always need to keep safe from potential threats, be it physical or digital. Speaking of physical threats, prevention is better than cure which is why you should invest in power safety equipment like surge protectors along with power inverters. Sudden power failures can harm your storage solution as they can cause hard drive failure or even data corruption. As for digital threats, you all know the importance of network security which is precisely why employing safeguard measures such as Firewalls, Antivirus systems, Intrusion-detection systems, Network sniffers and vulnerability scanners are important.
- Drives for the NAS: Most NAS solutions including the QNAP TVS-471 don’t come bundled with storage drives. This is mainly because of the fact that everyone has different storage requirements depending upon which they decide to buy drives for NAS solutions. Some might go for regular hard drives, some go for NAS specific drives and then there is also the option of selecting SSDs. This is why, once you have the NAS system of your choice, the TVS-471 in this case, then make sure you buy new drives depending upon the kind of setup that you want to do on the NAS.

Caption: We used four WD Red 5TB drives for our setup
Deciding which RAID to setup on the NAS:
When you’re setting up a NAS system such as the TVS-471, it’s easy to get carried away or confused about what sort of RAID configuration you should opt for. Here, we must say that it all boils down to your use-case scenario. When you’re selecting a RAID configuration, there are few things that you need to analyse:
- What is the kind of software that you’ll be using: There are millions of software available for various usage scenarios and the kind of resources each one consumes depends on what work each of them does. Some software require heavy Input/Output operations on a continuous basis while some are considerably light. This is why selecting a RAID type should be done after analysing the kind of pressure that it’ll put on the storage setup.
- Capacity: Capacity is of course one of the main reasons for opting a NAS in the first place. But you must know that every RAID setup is different and thus the amount of usable disk space that you’ll get varies with each RAID setup. This is why once you select a RAID setup for your NAS, get drives accordingly especially if capacity is the the driving factor for your setup.
- Cost: Money acts as a deciding factor for many choices in life. Similarly, both capacity and performance cost money which is why you need to look at striking the right balance between performance and capacity as far as costs are concerned.
Available RAID options:
The QNAP TVS-471 NAS solution supports Single Disk, JBOD, RAID 0, 1, 5, 6, 10, 5 + hot spare RAID configurations which are all the options that you’ll ever need to set up a NAS for any kind of requirement. If you don’t know which RAID to select, read the following:
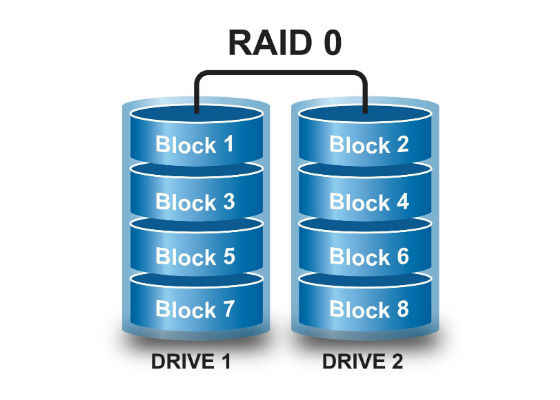
Caption: Representation of a RAID 0 configuration
RAID 0: This configuration is a combination of two or more drives to increase performance but it must be noted that it provides no fault tolerance whatsoever as a failure will result in data loss. Select this purely for performance.
RAID 1: Select this configuration for critical systems where you want to safeguard your data against losses. RAID 1 mirrors data on the drives thus providing fault tolerance. You’ll see an increase in read performance but write performance will remain standard.
RAID 5: You require a minimum of three hard drives to set up RAID 5. This configuration provides safety as it can sustain the loss of one drive from amongst the configuration in case of a hard drive failure. This configuration is best suited for a scenario where capacity and cost hold much more importance as compared to performance.
RAID 6: Quite similar to RAID 5, RAID 6 provides the capability to sustain the failure of two drives which is excellent for critical applications but it must be noted that this extra fault tolerance affects performance which is why RAID 5 is faster than RAID 6.
RAID 10: To get the best of both RAID 0 and RAID 1, use RAID 10 but note that disk space which you’ll receive will be half of the total space available. Also, you’ll need a minimum of four hard drives to set up RAID 10. RAID 10 is a pricey option but it’s worth it considering you get great performance coupled with some fault tolerance as well.
Since the QNAP TVS-471 also supports SSD Cache acceleration technology, you can use a SSD for caching and increase or boost input output operations for increasing performance. We spoke about it in the previous article as well.
The RAID setup that we used:
Right after we received our QNAP TVS-471 NAS solution, we selected four Western Digital Red drives (made for NAS) to use on the device. Each of the drives that we selected offered 5 TB of storage thus making it a total of 20 TB. As for the RAID setup that we used, after contemplating a bit we decided to opt for RAID 0 as we looked at it only from a performance based perspective. This is why we striped the disk array accordingly and were left with a high-performing configuration, capable of providing blazing fast speeds that were required for our video-editing tests for demonstration.
Standard Installation process: (with screenshots – Use camera)
Setting up the QNAP TVS-471 is a pretty straightforward process and in order to make things easy for users, QNAP provides a quick installation guide with the boxed contents. This guide features illustrations along with instructions that you need to follow to setup your NAS device. Let’s go through the standard installation process for the QNAP TVS-471, shall we:
- Unbox the NAS system and make all the wired connections that are required to use the NAS i.e., power connection to the socket, lan connection.
- If you’ll be using the NAS as a PC as well then you can use a monitor with an HDMI port for the display and a USB keyboard and mouse for inputting. If you want to set it up without using a screen but using a client PC connected to your network, you can do that too.
- Now get a hold of the storage drives that you will be using inside the TVS-471 and install each drive into each of the drive caddies. Once you’re done securing the drives in the caddies, just take the caddies and slide them inside the drive bay of the TVS-471 and push them in to secure them while also using the lock at the front of the drive caddy.
- Once your drives are installed and all the connections are made, it’s time to power up the NAS server. Wait for it to light up and you’ll see that the screen on the TVS-471 shows a message saying: “System Booting”. Let it progress.
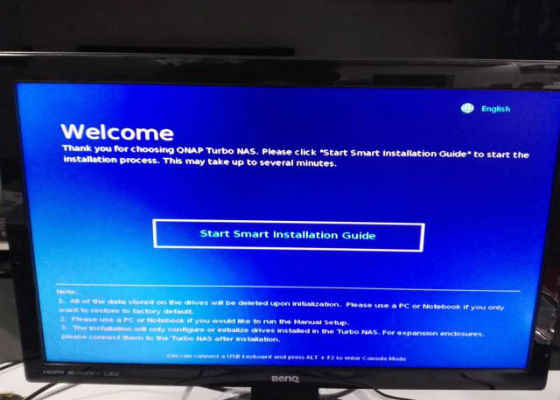
- Now the screen will display a welcome message and ask you to start the smart installation process. Press Enter on the “Next” button.
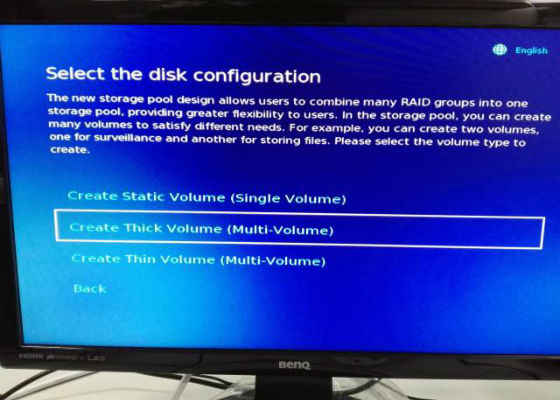
- This is where you’ll get to select the disk configuration that you want to have on the NAS. You have the option of choosing from among Static (single volume), Thick (multi-volume) and Thin (multi-volume). Select an option depending upon the number of drives that you’re using and whether you’ll be creating multiple volumes within the configuration later on. Once you’ve made your selection, go ahead by pressing Enter on the “Next” button.
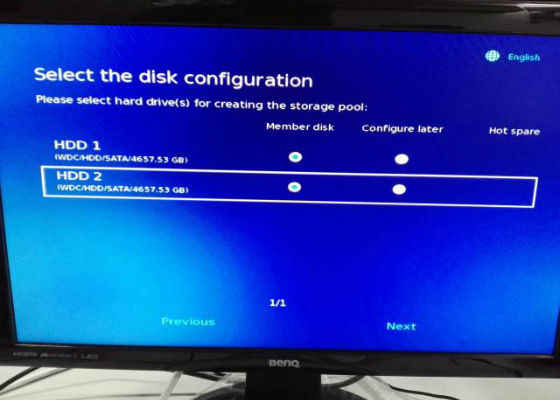
- Now you’ll be given the option of selecting the hard drives for your storage pool, you can choose to configure them now or you can even do it later. Select and press Enter on the “Next” button.
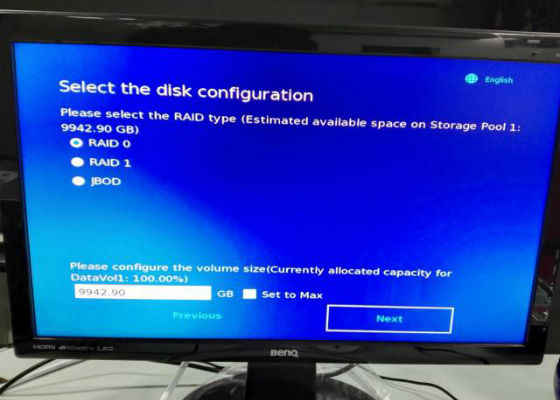
- Finally you will see a screen that asks you to select the RAID configuration that you want to go for. Select one as per your requirement, set the size for the volume and press Enter on the “Next” button.
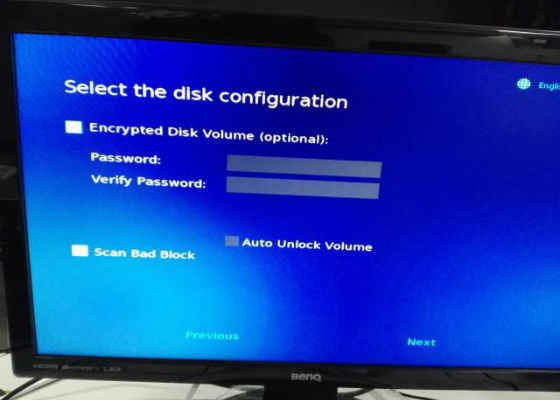
- If you want to encrypt the storage volume using a password, that can be done through this screen. You can also check the box that says “Scan Bad Block” to scan the drives for bad blocks. Now press Enter on the “Next” button.
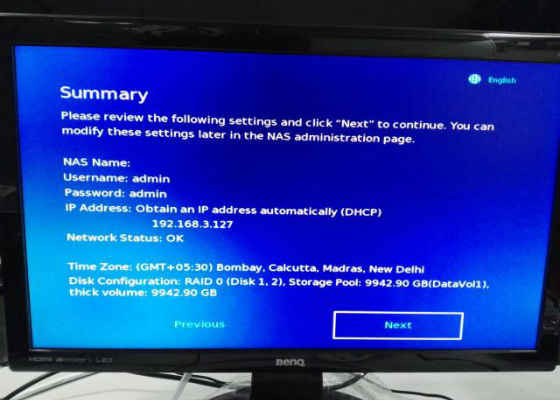
- A summary screen will show up displaying a summary of the selections that you’ve made during the installation process. If you find anything that isn’t right, you can go back and change it or else just move forward by pressing Enter on the “Next” button.
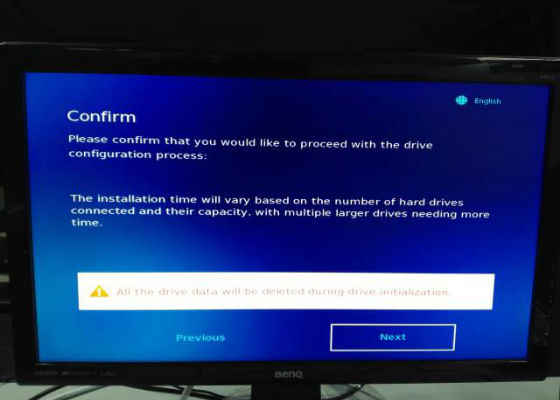
- The next will be a confirmation screen displaying a warning message saying that data on the drives will be deleted if you go ahead. Press Enter on the “Next” button to continue.
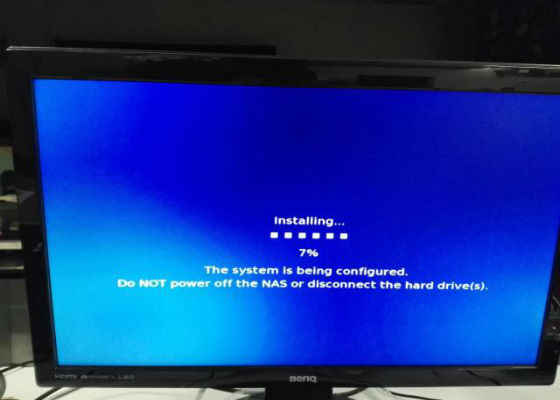
- After you go ahead, you’ll see that the NAS will start installing the drives as per the configuration and you’ll have to wait for it to finish.
- Once the installation is complete, you’ll see a greeting on the screen and you can now start using the QNAP TVS-471 Turbo vNAS solution.
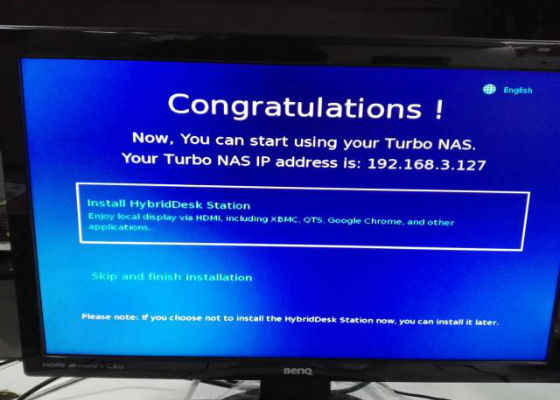
- Once you’re done with the installation, you can install other software. But you’re good to go ahead and use the device.
Plex Media Server:
Plex is an amazing centralised system designed for media playback that uses the Plex Media Server at the back-end, responsible for streaming media content like videos or movies to the connected clients or devices using Plex. The best thing about Plex is the fact that it supports almost every major platform like Windows, many Linux distros, Mac OS X, and is also available for NAS solutions. Plex also has apps for your portable smart devices like smartphones and tablets that let you access your media library on the Plex Media Server thus providing a rich media experience.
It’s fairly easy to setup Plex Media Server on the QNAP TVS-471, as the TVS-471 supports Plex Media Server by default and provides ways in which you can set up Plex easily.
This is how you can go about setting up a Plex Media Server on the QNAP TVS-471:
- Once you’re done with the standard installation of the TVS-471 NAS solution and you’ve configured it according to your network as shown above, you just have to power on the NAS device first.
- After the TVS-471 boots up and you log in with your administrative credentials to the QTS Desktop, just Click on App Center > Entertainment Section > Plex Media Server
- Now, click on the button “Add to QTS” which starts the Plex Media Server downloading process. Once it’s done downloading, the app starts installing and you’ll be able to see the installation progress.
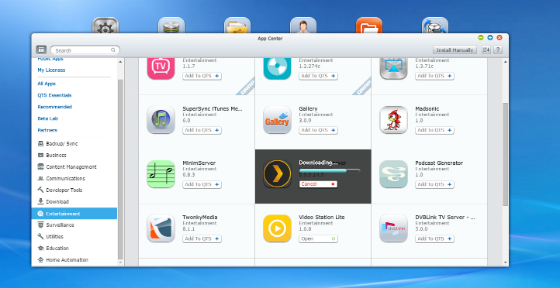
Caption: Click on “Add to QTS” button on the Plex Media Server icon to start downloading it through the App center.
- After Plex Media Server is installed, you just have to launch it to get started with setting up Plex Media Server.
- Once launched, the window will display an End User License Agreement (EULA). To move forward, click on “Agree”.
- Now head over to the settings page > Server inside Plex Media Server to configure Plex.
- Select QNAP NAS as the server of your choice. You even get to name the server from this place.
- Click on the + icon next to the QNAP server name to start adding a library. Now select the type and click “Next”
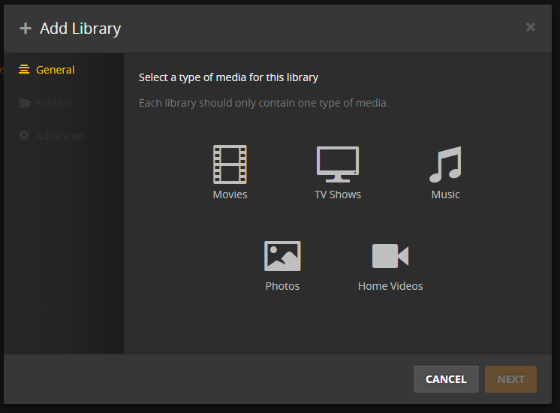
Caption: Start the process of adding content to your Plex Media Library through this menu
- Give a name to the folder and select a language. Click next to move forward. Then you’ll have to click on “Add folder” to give a path.
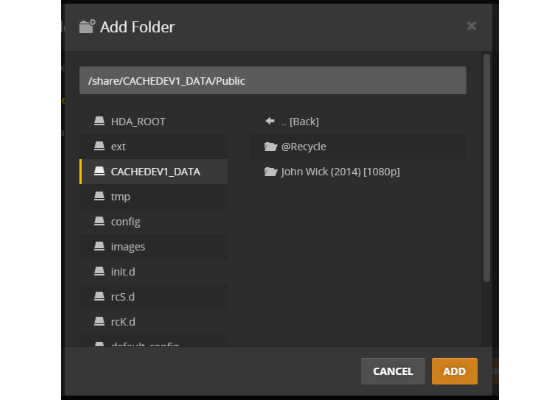
Caption: You can select your content path from this menu for your new section on the Plex Media Server
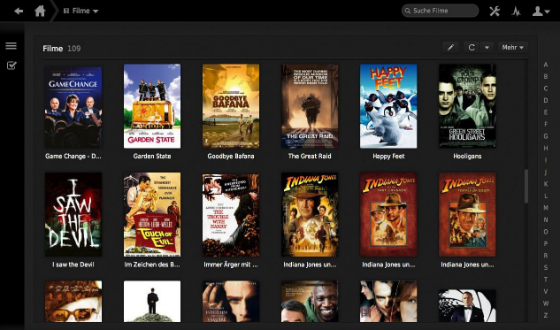
- After you provide a path to your Plex Media Server for your content, the server will then populate files and also try to find metadata about the content online.Once that’s done you can easily play what you like from the window.

Caption: Content inside your library on the Plex Media Server will be visible here
- Now you can easily stream your media content from your Plex Media Server to other devices connected to your network including Smart TVs, and portable devices seamlessly.
- Once the Plex Media Server is up and running, you can then access your content stored on the NAS without breaking a sweat. The QNAP TVS-471 makes it so easy.
- If you have a Plex account, you can even login to that account through the settings menu and then you’ll be able to stream your local content to your portable smart devices anywhere you are. Isn’t that neat? So go ahead and create a Plex account if you don’t have one.
Installing and setting up video editing software and configuring it to use with the QNAP TVS-471:
Once you’re done with setting up your NAS device and have configured it to your network, the next course of action is to install the required software on your client system(s) that you’ll be using for video editing purposes. So get a hold of your original copy of the software that you prefer and install it. We prefer the popular and powerful Adobe Premiere Pro CS6 which is why we selected it and installed it on our local system. Once the installation was done, it was time to configure Premiere Pro to use with the TVS-471. Also, you’ll need to map the NAS as a network drive through the explorer so that you can access it easily anytime.
Configuring Premiere Pro to use QNAP TVS-471 as a scratch disk:
One of the best things about Adobe’s Premiere Pro is the amount of features that it puts in the hands of video editors. This is why, you can easily configure Premiere Pro to use the NAS as a Scratch Disk for your projects. It’s very easy to configure this and you can do that by simply opening Premiere Pro, clicking on “Project” from the menu bar at the top > Project Settings > Scratch Disks…
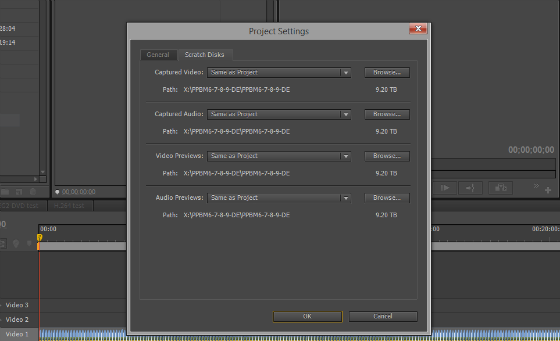
Here, you can browse and select the QNAP TVS-471 as your scratch disk for captured video, captured audio, video previews and audio previews individually thus offering choice and flexibility. Selecting the RAID 0 configured drives from the NAS system will allow you to work on and encode high-quality video content. Since the RAID volume on the NAS has a lot of capacity, you can rest easy about generating huge project files as the solution will handle them with ease while also providing high performance.
QNAP Utilities and Mobile Apps:
Buying a QNAP NAS gets you a host of amazingly useful features that provide you with a ton of possibilities. Apart from the regular hardware and software features that it provides, you also have the option of using QNAP utilities and QNAP mobile apps to further improve your experience of working with your TVS-471.
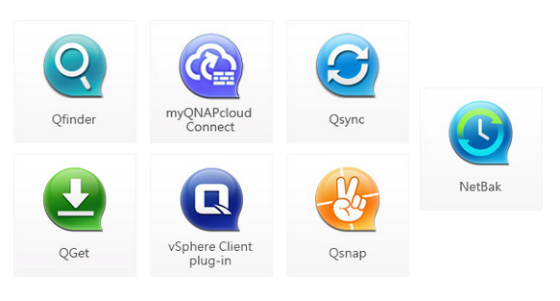
Caption: These are some of the QNAP utilities that are available for you to download and use with your NAS and they are compatible with various popular operating systems
QNAP utilities such as Qfinder, Qsync, myQNAPcloud Connect, NetBak, QGet are available for download and they each serve a different purpose to meet everyone’s requirements.
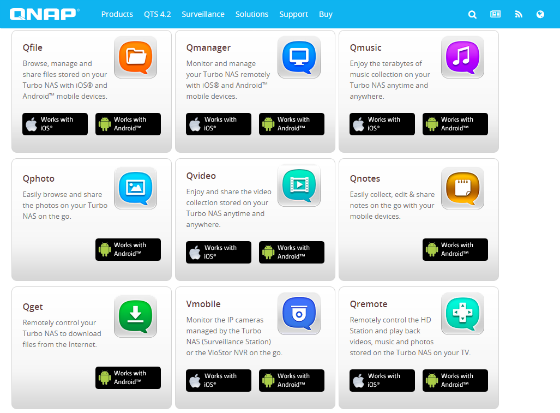
Caption: These are the different mobile apps that are available for QNAP NAS devices.
You also have an option to download mobile apps for your smartphones and tablets running Android or iOS. Apps like Qfile, Qmusic, Qmanager, Qvideo, Qnotes and more let you control, manage, work, and do plenty of other useful things with your QNAP NAS device. Download the app that you feel is right for you and immerse yourself in the QNAP NAS experience.