How to recover lost data from a damaged disk
Here are some tips on how to try and recover data from a damaged disk.

Imagine, all your photographs, the painstakingly compiled multimedia collection – music, videos and music, important files and documents gone in the blink of an eye. It’s like your worst nightmare coming alive. The reason could be anything from a corrupt file system, a diabolical virus, carelessness or just a cosmic roll of dice.
Though all is not lost, the data is recoverable because the information isn’t immediately removed from the disk. If you’re careful; then you can recover some or most of the data (depends on the severity of the reason that caused the data to go AWOL). Here are some tips on how to try and recover data from a damaged disk.
A word of caution
You should NOT write to afailed device, as it can worsen a hardware failure, and overwrite existent data in case of lost files. Shut down the affected machine as soon as possible. For recovering you can either use a LiveCD or LiveUSB in case you prefer to use Linux for data recovery. If you prefer Windows you’ll have to remove the disk physically and attach to another computer and attempt
to recover data.
Make an image of the lost drive/partition
One thing that is a hallmark of data recovery is the excitement, you feel as if you’re Sherlock Holmes, and all that is missing is a pipe. We’ll start off buy making an image of the device/drive and work on the image file for data recovery. Though this is not mandatory, if hardware failure is not the problem, you can recover data directly from the device. Despite this it is generally considered to be a good practice to first create an image the device and run recovery software on that image. Keep in mind that if the image size is greater than 4GB you’ll not be able to use an FAT32 filesystem (usually found on USB drives) to store the image, since there is a 4GB limit to the maximum size of a file on the FAT32 filesystem. Hence you should use NTFS or Ext4 file systems that can handle such file size.
We’ll be using a program called GNU ddrescue, this is primarly made for Linux, but is also available on Windows through cygwin. Go to bit.ly/tXPZy7 for instructions on how to install and use cygwin ddrescue for Windows. It’s present on most of the Linux distros, and is a part of System Rescue Disk that has been bundled in this month’s Alpha DVD.
First identify the disk or partition that is giving problems using the command sudo fdisk -l. Say, if /dev/sda contains data to be recovered, you’ll need to acquire another disk (or other media) onto which to save the output image. If it’s only a partition of that particular drive, the path would look something like this /dev/sda1.
The following command illustrates how to image partition.
.jpg)
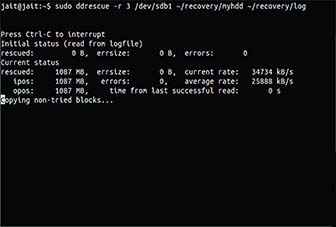
sudo ddrescue -r 3 /dev/sda1 <image> <log>
You can run successive passes like this:
sudo ddrescue -r 3 -C /dev/sda1 <image> <log>
GNU ddrescue will use the log file to only read the gaps with errors. In both cases, the -r option determines the number of times gddrescue will try to read when it encounters an error (-1 = infinity). Another way to do this will be to copy as much data as possible, without retrying or splitting sectors:
sudo ddrescue –no-split /dev/sda1 <image> <log>
Following this let it retry previous errors thrice, using uncached reads:
sudo ddrescue –direct –max-retries=3 /dev/hda1 <image> <log>
If that fails, you can try again but re-trimmed, so it tries to reread full sectors:
sudo ddrescue –direct –retrim –max-retries=3 /dev/hda1 <image> <log>
The second method will be redundant in case the device is not physically damaged. If you’ve just unknowingly deleted the files, then no need to run these commands, you can directly use the recovery programs. In case your media is corrupted and may contain hardware defects, try making images by both the methods, run recovery on both the images. The data recovered may not be mutually exclusive, but will surely increase the number of files recovered. Now on to the actual recovery, you can use the programs that follow in any order you want or even all of them if you want.
Foremost
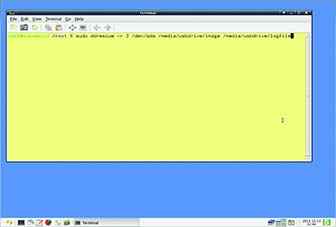
Foremost is a command-line tool which can recover files from a number of filesystems, including FAT, Ext4 and NTFS. This tool works only in Linux. Foremost can recover files from an image of the drive, or from the drive directly. Consider the situation where an external hard disk at /dev/sdb1 is damaged. To attempt an recovery from the hard drive, use the following commands:
mkdir ~/recovery
sudo foremost -i /dev/sdb1 -o ~/recovery/
To run Foremost on an image, just substitute the filename for the device
sudo foremost -i <image> -o ~/recovery/
The recovered files will then be owned by root. Change their ownership so that you can use them:
sudo chown -R youruser:youruser ~/recovery
Use the -w switch to obtain only an audit of recoverable files:
sudo foremost -w -i /dev/sdb1 -o ~/recovery
To recover only specific file types, use the -t switch:
sudo foremost -t jpg -i /dev/sdb1 -o ~/recovery
Scalpel
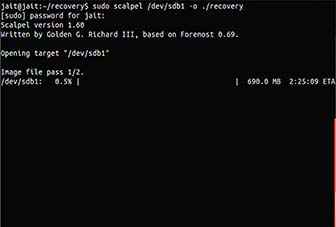
Scalpel is a fast file carver that reads a database of header and footer definitions and extracts matching files from a set of image files or raw device files. Based on Foremost, it’s actually much more efficient. It’s available for both Linux and Windows. For running it on Windows, you’ll need “mingw” (MINimalist Gnu for Windows) installed. You can get scalpel from bit.ly/vnn9o7, once it is downloaded extract it, head over to the src directory and use the command to install it.
mingw32-make -f Makefile.win
Once done, you’ll also need to copy the pthreads and tre regular expression library dlls into the same directory as “scalpel.exe”. The default configuration file, “scalpel.conf”, has all supported file patterns commented out, you must edit this file before running Scalpel to activate some patterns. Resist the urge to simply uncomment all file carving patterns; this wastes time and will generate a huge number of false positives. Instead, uncomment only the patterns for the file types you need. To run scalpel use the following command.
sudo scalpel FILE -o DIRECTORY
Where FILE is the image file (or device) and Directory is the output directory. Here the configuration file in the current directory is used. In case your configuration file resides somewhere else use the -c switch to specify the location of the configuration file.
PhotoRec
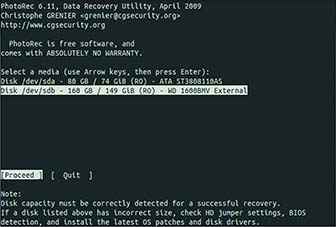
PhotoRec is a data recovery software designed to recover lost files including video, documents and archives from hard disks, CD-ROMs, and lost pictures (thus the Photo Recovery name) from digital camera memory. PhotoRec ignores the file system and goes after the underlying data, so it’ll still work even if your media’s file system has been severely
damaged or formatted.
PhotoRec is bundled in this month’s Alpha DVD. There is no need for installation, extract the downloaded zip file and just run photorec_win.exe as an Administator.
.jpg)
.jpg)
If you want to run PhotoRec on a disk image you’ll have to specify which image file to use. In case you run PhotoRec directly you’ll get prompt which asks for which device to use. Select the device on which you’d like to attempt recovery. Followed by the partition table type, in most cases it’s Intel, unless you have changed your partition table type. After this you’ll be asked to select the partition on which you’d like to run PhotoRec. Select the filesystem type when asked. This is followed by a prompt which asks you whether to search for files in free space only or the whole disk. After this you’ll be asked for the output directory where you want the recovered files to be places. Thats it PhotoRec will have started running and copying recovered files to the
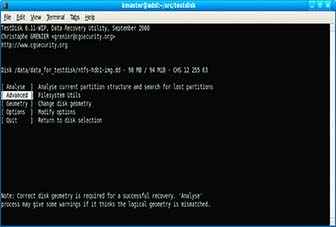
Test Disk
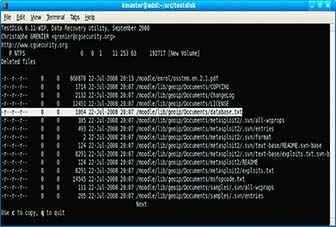
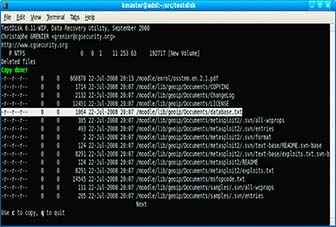
TestDisk is primarily designed to help recover lost partitions and/or make non-booting disks bootable. It also has an option to recover files. The interface is much like Photorec. They’re a part of the same package, TestDisk is also bundled with this months Alpha DVD. Select the appropriate hard disk, partition table type, partition and file system. This will bring you to the main menu. In the menu go to ‘Advanced’, select the partition that was holding the lost files and choose ‘Undelete’. After this TestDisk scans MFT entries for deleted files. Go throught the files that Test Disk just found out select the files you want by pressing c. Once done proceed to select the output folder and you’re done, TestDisk will copy those recovered file to the destination.
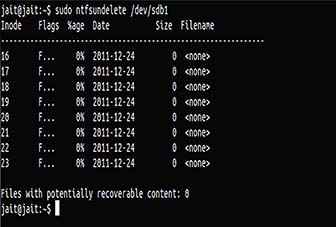
NTFSUndelete
Windows 7 and Vista both routinely put a “recovery partition” at the front of drives now even as fresh installs from their installer CD/DVD. The idea seems to be that you can make a fresh installer CD tailored to your particular machine.
Anyway, the important result for us is that a lot of documentation assumes Windows will be on sda1 but in fact nowadays the important stuff, your stuff, is likely to be (or have been) on sda2. Of course it could easily be somewhere completely different but this is the general case, and in most cases this is the default layout of the new breed of systems.
Look for deleted files on /dev/sda2 using the command ntfsundelete /dev/sda2
To look for deleted documents on /dev/sda2 use
ntfsundelete /dev/sda2 -s -m ‘*.doc’
To look for deleted files between 5000 and 6000000 bytes, with at least 90 per cent of the data recoverable, on /dev/sda2 use
ntfsundelete /dev/sda2 -S 5k-6m -p 90
And if you’re looking for deleted files altered in the last two days
ntfsundelete /dev/sda2 -t 2d
Sleuth Kit and Autopsy
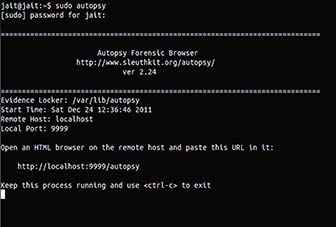
As the names themselves suggest, these are tools used by professional forensic experts to snoop out data from hard disks. You can also use these tools to recover data as well. Mindwell they are available only for Linux and not Windows. You can use System Rescue Disc or any other Linux LiveCD/LiveUSB to use both these software. In this case we’re doing it using Ubuntu. First off create a disk image of the disk or partition using ddrescue as shown earlier. Now start Autopsy from the command line using the following command sudo autopsy.
.jpg)
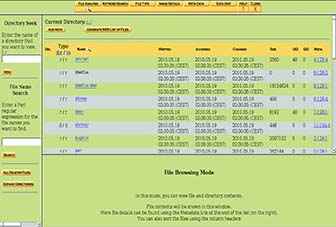
Now open a web browser and go to the page http://localhost:9999/autopsy. In the graphic interface that follows choose “New case” and follow the questions that the wizard asks you. When prompted for the location of the disk image enter select the disk image that you’ve created. After Sluethkit analyzes the disk image it will display a listing of the disk’s partitions. Choose the partition where you deleted file was saved and click Analyze -> File Analysis. Along the left hand side of the screen you will see a search box where you can search for the deleted file by name. Enter the file name and click Search. A list of the files matching your search text will appear. Browse the list of files and click on the hyperlink name of the file that you would like to recover. Once the file finishes loading click the Export hyperlink and wait for your web browser to prompt you to save the file. Test to make sure your “deleted”
file opens correctly.
.jpg)