How to overclock your PC
HIGHLIGHTS
Everything you need to know to overclock your PC including component requirements, clock speeds and voltages explained

Scared of overclocking your PC or don’t know how to do it? Then don’t worry as we’ll walk you down this narrow and seemingly dangerous path via this workshop. This Overclocking guide is not platform specific and is meant to be generic to any CPU (be it Intel or AMD) as everyone has different computer components from various part manufacturers. This guide will provide you an idea about Overclocking.
✅ Thank you for completing the survey!
It will not only cover CPU Overclocking but also include pointers for tweaking your RAM.
Components required
Before you start Overclocking, there are a couple of things that you will absolutely need. The first is a motherboard that supports overclocking. The second most important thing you need is a good CPU which can be overclocked. Overclocking heats up components so you need an aftermarket air or water cooler or even LN2 (Liquid Nitrogen) based cooling for extreme Overclocking. To know more about components required for overclocking, check out this month’s Agent 001.
Utilities required
You can’t just overclock your PC and start using it right away without checking its stability. We use Prime95 and OCCT for stress testing and monitoring programs used by us are CPU-Z and Real Temp.
Important terminologies
Clocks:
Intel CPU’s use something called as Base Clock and AMD CPU’s use Front Side Bus, but both of them are very similar. We’ll refer to this as BCLK. Your CPU speed is a multiple of this so, for example, If a CPU runs at a 22x multiplier then that essentially means 22x BCLK. So if your CPU has a 133 mHz base clock then your CPU speed is 22×133= 2.9gHz. For RAM it goes like: 10×133=1333mHz. AMD’s Front Side Bus or FSB works in the same way but instead of having multipliers, they have ratios. When we say here “change the multiplier” consider this to also mean the ratio if you have an AMD rig.
Voltages:
Your CPU needs stable power and the settings related to increasing or decreasing the amount of voltage to be supplied to the CPU resides under the Vcore label (core voltage). Keep in mind that all CPU manufacturers provide specification sheets that mention the highest Vcore a CPU can handle, so you need to make sure to check that for your particular CPU before touching the Vcore settings. Intel also has voltage settings for IMCs (Integrated Memory Controller), sometimes VTT and also QPI (QuickPath Interconnect). AMD on the other hand has NB voltage (Northbridge Voltage) which is similar to IMC and also to QPI. Increasing the NB voltage along with the Vcore helps keep stability.
Others
Load Line Calibration (or LLC) in the BIOS is how the motherboard will try to contravene the drop in Vcore once load is applied to the CPU. Intel calls this drop “VDroop”. When running an Intel CPU with Turbo Boost, VDroop can change or shift it’s multiplier automatically based on how many cores are needed. If only two cores out of four are required, the CPU will run at a higher frequency. This can also require a higher voltage, so with LLC off (VDroop on) the voltage will naturally be a bit higher because there is a smaller load as two cores require lower power than four. However, during overclocking, it is better to disable Turbo Boost as when this is done, enabling LLC can be beneficial for getting a stable overclock. But this isn’t necessary if you’re not planning to cross 4GHz.
You can decrease the multiplier and keep it very low on most CPUs these days but their highest limit depends on the CPU itself. Intel as well as AMD, both have a series of “unlocked” CPUs. Intel has the “K” series moniker to signify an unlocked CPU and AMD on the other hand has the “Black Edition” series. Unlocked CPU’s basically provide an ability to raise the multiplier to a certain high level which makes overclocking that CPU easy as we don’t need to change the base clock or interfere with the RAM or QPI, if that’s the case.
Note: Remember that the IMC/VTT/QPI voltage must be kept within 0.5V of DRAM voltage. DRAM Voltage is directly related to your RAM. RAM should always be set to the recommended manufacturer speeds. If for example, you might have bought a 2x 2GB 1600 MHz CL9 1.5V RAM kit. The 1.5V symbolises the DRAM voltage needed for that speed of 1600 MHz and timings of CL9.
Overclocking
Now starting up, enter your BIOS >Load defaults > Save and Exit. Then when the POST screen shows up, enter the BIOS again. Change or set your RAM settings to match the manufacturer specifications. This is easy as you just need to go to your RAM settings Menu in the BIOS and set values as shown on the RAM specification documentation (but don’t try to increase the voltage). It is important to do so in order to check whether the RAM is alright. Save and Exit your settings and if the system boots up properly, you should run at least 3 passes of Memtest86 . If everything seems fine then you can start with overclocking your CPU.
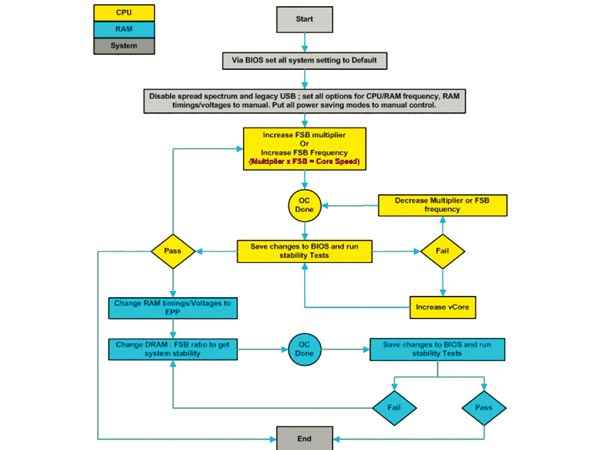
A chart for reference during Overclocking
Start by increasing your CPU multiplier or ratio in small steps. You should only add 200-400 mHz at a time and not make increments above 400mHz when you are gunning for a 4gHz overclock, and not more than small increments of 100 mHz after that. Once done, check all the changed settings, note them down, then hit Save and Exit. Once you boot in properly, run some tests and check the stability. If somehow your PC displays a BSOD (Blue Screen Of Death) don’t worry as you can clear your CMOS and try again with different settings. Overclocking gets more complex when you have a locked CPU and you need to change the BCLK/FSB. The thing to check here is that the speed of your RAM is affected by BCLK which makes things problematic and this is why enthusiasts as well as good overclockers insist on buying faster RAM with 1600 MHz speeds. You can set a lower than rated speed for the RAM to ensure stability while you overclock the CPU. Often, between a range of 100-200 BCLK or less is easily achievable, so note down and shift the values you can use to eventually run your RAM to 1400, 1600, or much higher speed if the RAM has been rated for that. You will sometimes also need to change the command rate for the RAM to work at rated speeds. Once done, always check RAM stability by running Memtest86 .
Now for the CPU, increase the Vcore by one or two increments at a time (the minimum that your motherboard supports, usually 0.05V). If you face failure, you can change Vcore again to a certain extent or increase VTT by some amount. Test again. If it fails, change Vcore again or increase VTT by the same amount.
The motherboards BIOS usually has the Vcore set to Auto by default. You can usually set the voltage to “manual” or “offset” where manual shows you the complete voltage reading and offset just shows the amount above or below the stock voltage the CPU is rated at.
If and when you reach a high overclock for your CPU say greater than or equal to 4.0 gHz, chances are that you may not be able to increase CPU multiplier/ratio and get better results. To counter this, you will now have to start increasing voltage step by step and only then you may see some difference in performance or clock speed but eventually, the CPU will need more voltage to be stable. Note that you may need to apply more voltage to get a small increase in CPU clock. Be very wary when increasing voltage as raising the voltage haphazardly can and will result in a fried CPU or worse. The increments need to be tiny, in the order of 0.05V or less, and you need to stress test after every increment If you are satisfied with the current speeds or your cooling can’t take any more, then stop right there and check for stability and tweak the settings so that you can run your computer at the overclocked speed for a long time without running into trouble. Do note that some motherboards come bundled with software that will certainly ease your overclocking process. The same warnings apply though.
For higher overclocks pertaining to benchmarking you may need to disable Cool N Quiet (for AMD CPU’s), C States and EIST/Speedstep to achieve higher clocks. We wish you stable and good clock speeds with minimum loss of limbs and/or components in the process.