How to build cool devices using open source computing hardware
Do you love gadgets and gizmos? Ever dreamt of creating your own gadgets? Or maybe you’re just an electronics enthusiast who likes to rip everything apart and learn how things work inside circuits. Well, look no further because here’s a way you can really hack into stuff and experiment and build cool devices.

So now before we start, we’ll just give an introduction to what we’re going to talk about. Ever heard of ‘Open Source Software’? If you haven’t, it’s just software that you get the full source code to so that you can tweak it the way you want and it’s for free and there’s no paid license to it so you can really play around with it to suit your needs. The only condition is that you need to give away whatever changes you’ve made to the source code. An example is the Linux operating system.
Now there’s something called ‘open source hardware’. It’s similar to open source software in that you can alter it the way you want and build something cool and the circuit diagrams like the source code are available to you. We’ll give an example of PhoneBloks. It’s a smartphone that you can ‘edit’ the way you want. If you want a better camera for your phone, instead of purchasing a new phone with a much more superior camera quality, you can just purchase a block that contains the camera and fit it into your pre-existing phone using PhoneBloks.
How do I build my own stuff?
By using Open Source Computing Hardware!
There’s this little kid called the Arduino. Well, get him home first. You can either purchase an Arduino starter kit or buy the parts separately. We bought a set with an Arduino Uno, a keypad and an LCD display with a USB cable to connect the Uno to our laptop, from Amazon, and it worked out for quite cheap. We had other electronic stuff that we had already purchased when this hobby idea came up.
But how do you build stuff with it? Before we say that, we’ll explain to you what an Arduino board is. It’s just a small circuit board with a built-in microcontroller (MC) by Atmel that’s either 8, 16 or 32-bit (currently all models are the latter version) and contains memory and digital pins to control the MC chip. There’s a USB cable to connect the board to your computer. You have to download an IDE (Integrated Development Environment) to be able to code and upload the program you have written into your board. For this, Atmel is providing its own IDE but the preferred and most used one is the Arduino IDE that’s freely downloadable.
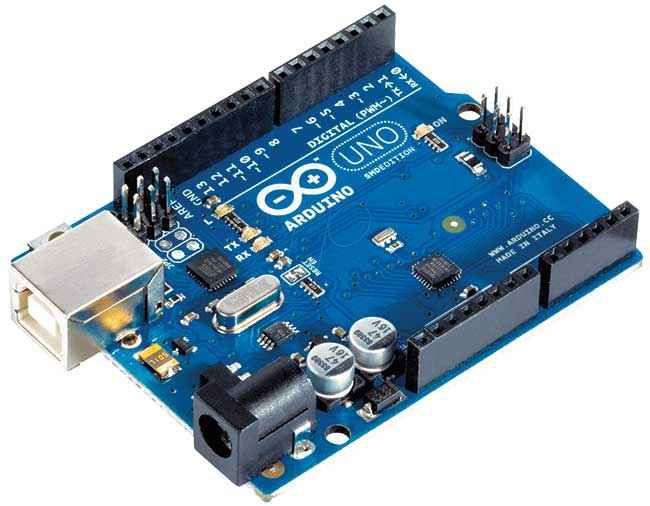
Now purchase or just download the eBook required for building stuff with your Arduino. We suggest ‘Beginning Arduino’ by Michael McRoberts and ‘Programming Arduino-Getting Started with Sketches’ by Simon Monk. There’s also this cool book called ‘Getting Started with Arduino’ by Massimo Banzi who is the co-founder of Arduino. He really teaches you how ‘everything electronics’ works and reignites the tech enthusiast in you who might have one day or the other dissected an old gadget at home.
What can I build?
To start off with, you’ll learn how to blink an LED first that is built into the board. It’s like a ‘Hello World’ program that you write when you’re starting out on learning a new programming language. You can also try attaching your own LED to the board and make that blink. Then you move onto creating an SOS signal. Then traffic lights. Then making a keypad work. An LCD screen displaying your messages. An alarm system. And lots more! As you progress, you’ll learn how to build a water level detector, a temperature sensor and the project that we would love to build soon, your very own pet robot!
We also managed to build a distance sensor that displays warning LEDs and produces various sounds using a buzzer to indicate how far you are from an obstacle when you’re reversing your car. Did I mention you can control the lights, ventilator fans, irrigation system and even sun shades by just using the Bluetooth feature of your phone? Just buy a small Bluetooth module and connect it to your circuit and it will do all the work for you controlled by an app on your smartphone.
Open source computing hardware…Where’s the computer?
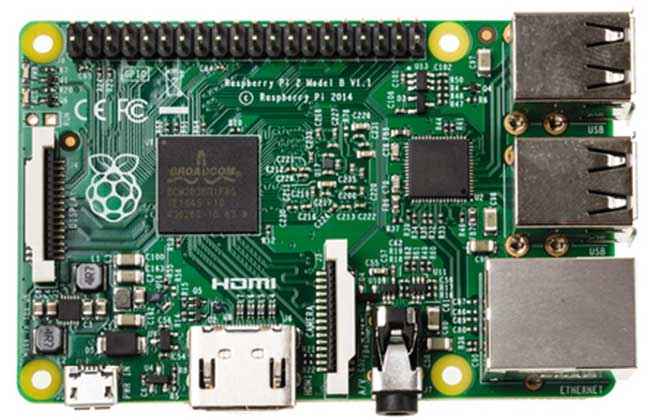
This is where we’ll introduce you to the Raspberry Pi. It’s similar to the Arduino except that it’s not just a MC and memory. It’s an entire computer CPU! But how can it be when it’s also just a credit-card sized board like an Arduino? Nano technology is the new thing though I would just call this board micro technology. The ARM processor, RAM and GPU are all built into a single spot in the board called an SoC or System On Chip. The extra features of the RPi are that, it has USB ports (4 in the latest model), where you can connect a keyboard, mouse, other peripherals and even a Wi-Fi adapter to, an Ethernet port to let your board have access to the internet and an HDMI port to connect it to a monitor so that you can views its contents and do actions as a normal desktop interface.
Now where is the OS and hard drive? That is for you to install by inserting an SD card (a micro SD in the newer version) in which you have to burn an OS onto the card and the rest of the memory in the card is used as a hard drive. The OSes are freely available on the RPi website and you can choose which suits you best. Yes, you can change it later if you don’t like the one you’re using right now. It’s just a matter of burning the new image file onto the SD card. See those pins sticking out? Those are the 40 pins of the GPIO header to which you can connect LEDs and sensors to. If your parents are worried about you destroying their home PC by hacking into it and experimenting, RPi is your saviour. The main cost is for the peripherals. The RPi 2 costs just Rs. 2500. And you have to purchase a memory card too for it. The OS as we mentioned, is freely available on their site. To start off with, refer the book Raspberry Pi User Guide by Eben Upton (co founder of RPi) and Gareth Halfacree.
You get cool software in the RPi OS like Scratch which you can use to make games and needs only minimal and even no knowledge of programming. You just need common sense for it and a bit of logic to figure out where things go wrong. It’s just dragging and dropping program blocks as your code. There’s also a software for the game Minecraft known in the RPi as Minecraft Pi in which you play the game by coding and also another software called Sonic Pi with which you can edit music and make some groovy tunes. There’s even a feature in the RPi that lets you play music in the console while you’re coding if your media player starts acting funny. So you can use your RPi like a normal Linux computer and code your homework java programs too. Basically, it’s just like any other computer except for the RAM and storage capacity which is sadly, less.
Arduino or Raspberry pi?
If you just have some hardware projects using sensors and stuff, Arduino would be better to use. Helps to run a bot or a drone easily as the code is easy to write and debug. Do remember that the RPi is a computer. So you can do everything that you want to experiment with a normal computer using the RPi. It has network connectivity too. Arduino is best for simple codes and works only when you plug it into your computer while an RPi needs a constant 5V external power supply. You can give an external supply to your Arduino board using a 5V adapter too. Both have their own uses. It’s good to have both of them around. I would suggest the Arduino board to start off with. There is an online community for both the boards. You can post all your queries there and also get answers from already posted stuff on the forums there.
Future of single board computers
Inspired by the Raspberry Pi, new single board computers are being manufactured by various companies and some of the upcoming ones are the Lattepanda which uses an Intel Atom processor and is the first single board computer running Windows 10 OS. Then there’s Chip that is smaller than all of these boards and can be put inside a Chip computer and used from anywhere like a Personal Digital Assistant except that it has all the functions of a normal PC. One of Apple’s earliest employees and Steve Jobs’ close friend in college, Daniel Kottke along with some enterprising individuals are coming out with the all new Pine 64, a credit-card sized computer that supports a 64-bit quad core processor. Happy hacking and building! Let the inventor in you, arise.
Disclaimer: The views expressed in this section are of the respective Digit Squad members. Neither Digit nor 9.9 Media takes responsibility of their claims whatsoever.
This article was first published in the March 2016 issue of Digit magazine. To read Digit's articles first, subscribe here or download the Digit e-magazine app.