Easy Video Transcoding

It is often necessary to change the encoding of a video to make it suitable for a particular purpose. This is known as transcoding. Aneesoft HD Video Converter is a software to transcode video for use on your PMPs, or for some basic editing before uploading on YouTube, social networking sites or a blog.
Installation and Registration.
For Digit readers, a licensed version can be found in the ByDemand DVD of the December Issue. To register the software, after installation, go to Help>Enter Keycode. The installation directory has a .txt file with the license key. Copy paste the license key into the Key Code field, and click on Register.
.jpg)
Queues and Profiles
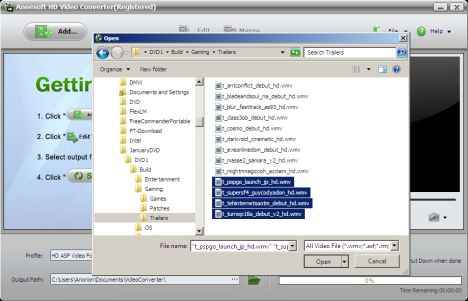
To add videos to the project, click on Add… a file manager opens up, and you can add as many videos as you want. We will be using some HD trailers of games.
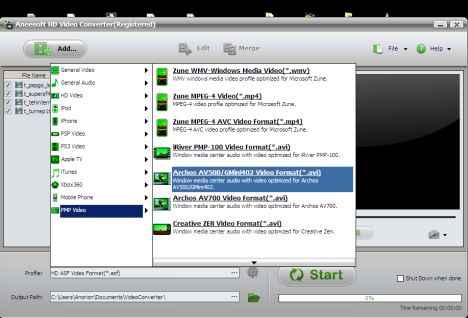
The next step is to choose a profile for transcoding your video. There are a number of default profiles available, which are basically settings for transcoding a video for different purposes. There are broad, general profiles, such as DVD video, HD Video for web streaming (which is the default profile). There are also highly specific profiles, for the iPod, Zune, PSP, common mobile platforms, and other PMPs as well. Many of these profiles are further optimised according to quality and size. Profiles include the format settings as well, so a profile for a mobile phone will use a .3gp format, and conversion for use on PSP will use the .mp4 format. If a particular device handles multiple video formats, each of these formats will be listed. Additionally, there are global libraries of profiles for audio and video, that converts the source for general purpose use, not optimised for a particular device. You can use the audio libraries to convert to .mp3, .ogg or .wmv format, among other available options. Change the default output path, and click on Start to begin the transcoding process. This is a time consuming process, depending on the length of the video. Note that any profile selection affects a particular video in the queue, and not all the videos. It is possible to encode each video to a different profile. Make sure to select all the videos before selecting the profile options.
Advanced Options
A useful little feature is to merge videos. Select multiple video files, and click on merge. They will show up as a folder, with the items to be merged. The original videos will not be removed from the queue automatically, so you will have to uncheck the videos so that you don’t end up encoding the same videos twice over.
There are some rudimentary editing options also available. You can add a watermark, change the aspect ratio of the video, an add basic effects such as adjustments to the brightness and contrast. Click on Edit. There are three tabs in the Edit window.
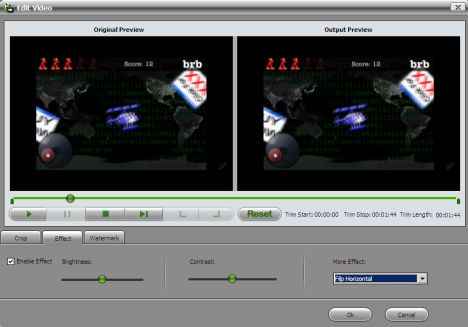
Before changing any of the settings, be sure to check the enable option under each tab. If this is unchecked the changes will not affect the video. The Crop option lets you remove a part of the video, and change the aspect ratio. The Effect tab lets you adjust the brightness and contrast, as well as a list of common presets such as solarize, monotone and halftone. The Watermark option lets you either add a text watermark, or an image watermark, but not both. You cannot drag and resize the image watermark with a cursor, you will have to manually tweak the options using the values on the bottom right corner.
The software simplifies a fairly complicated process, and gives clear directions on what kind of transcoding is necessary. A free alternative like Handbrake would mire you in a whole load of options even advanced users have trouble making sense of. The software is pretty fast on the job too.