Supercharge your Amazon Alexa experience with these hacks

So now you have an Amazon Echo, and have been interacting with it. At this point, it is more or less a glorified bluetooth speaker. There are still a number of things that you can do with the device to improve your experience. We start with relatively simple workshops that add a few functionalities, and move on to more advanced tasks such as creating your own custom skills. While we have chosen very particular end goals for each of these workshops, the same approaches and techniques can be used for a wide number of ideas, or tasks to totally customise and improve the user experience that you have with Alexa on an Echo speaker. These workshops work with any Alexa-enabled speaker.
Pair supported streaming services
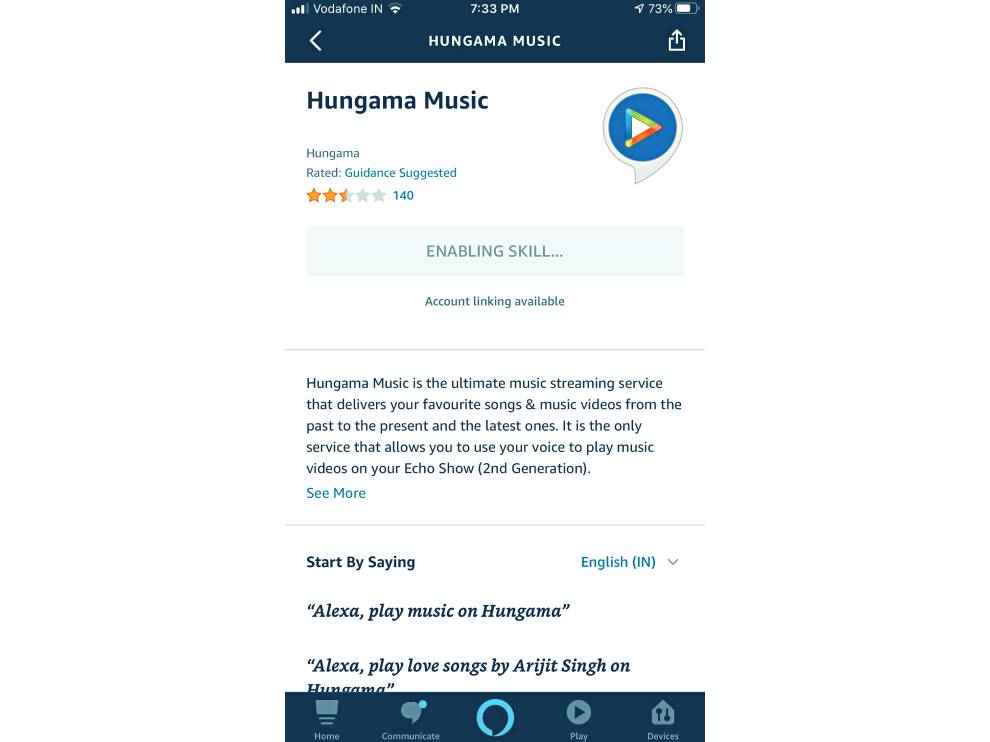
Alexa treats the music services available as a “skill”, and you have to enable the skill once to use the particular streaming service at any time. On the Alexa app, go to Settings > Music > Link New Service > JioSaavn > Enable to Use. You will then need to login in to JioSaavn and Authorize Alexa. Now go to Settings > Music > Default Services and change Default Music Library to JioSaavn. Note that there is no option to change the Default Station in the India region to JioSaavn, and no Artists and Genre Stations option that is available in the US region. According to Amazon, support for custom playlists on JioSaavn is coming soon, but it is possible to request particular artists, genres or tracks. A bonus feature that seems to be made for local consumption is the ability to request songs featuring a particular actor. The same approach can be used to add Hungama or Gaana as default services on Alexa. Alexa does support playback of custom playlists on Hungama, but not on Gaana.
Pair Spotify
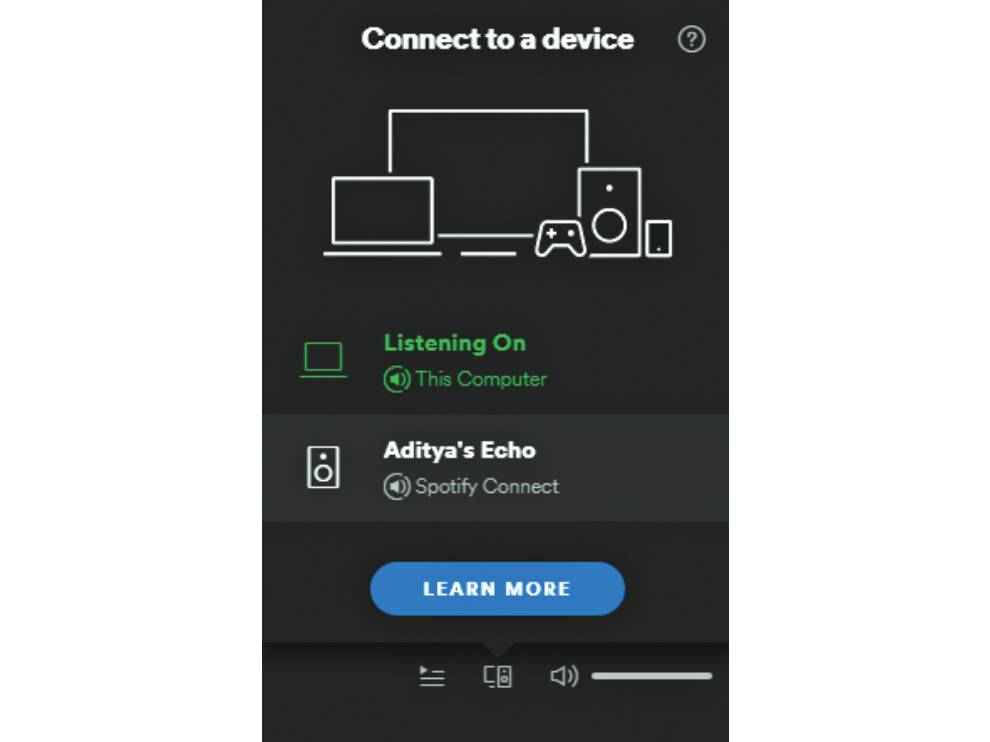
Unfortunately, Spotify does not support integration with Amazon Alexa in India yet. It is just simpler to use the Echo as a bluetooth speaker and control the playback from the Spotify app. However, there is a rather painful work around if you really want to do it. On a web browser, go to Amazon.in > Settings > Your Account > Content & Devices > Preferences > Country / Region Settings and change the country from India to US. You will be required to provide a US street address for doing the same. Note that your Kindle account will be transferred to Amazon.com, you will get a prompt that says you have to make future purchases in USD. Don’t worry about this for now. Fire up the Alexa app, go to Settings > Music & Podcasts > Link New Service and select Spotify. Now you have to login to Spotify. Go to Settings > Default Services and change Music and Artists and Genre Stations to Spotify. Now you are all good to go, just say “Spotify play xyz playlist”, and Spotify will start playing the playlist from your library. Make sure to give your playlists easy to understand names for Alexa, so something like “fantasy” works better than “npr 2012”. We would not recommend this approach for getting Spotify to work with Alexa though, because although you can easily switch back to India region, it messes up other integrations and custom skills. However, once you have switched back and forth between countries, Amazon saves the address information, so moving between regions is just a matter of a few clicks. Do remember though, you have to use the .com domain to switch to .in and the .in domain to switch to .com. If you actually go through the trouble of switching regions to US, integrating Spotify, and switching back to India region, the Echo remains an option as an available device on the Spotify apps across smartphones, desktop and web, which means there is no need to play via Bluetooth, the device connects to Spotify through WiFi. But, at this point, Alexa still won’t play a playlist from Spotify on command. If you are a Spotify subscriber, and want to ask Spotify to support Alexa integration in India, follow this link (https://dgit.in/alxsptfy) and click on Me Too.
Pair calendar with Alexa
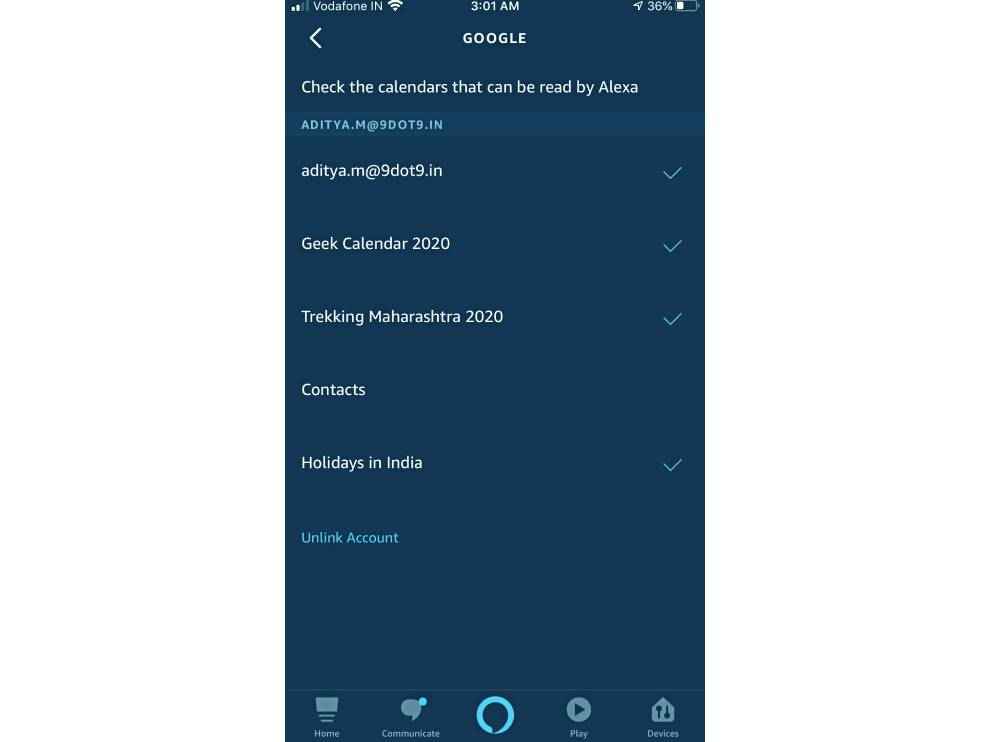
Go to Settings > Calendars > Google. Next, sign in with your Google account and you should be done. If you have multiple calendars on the same account, tap on the Google icon again and you will get a list of all available calendars. Uncheck the ones that you do not want Alexa to access. You can ask Alexa to read out upcoming events, or add events to the calendar. Note that any events added to the calendar will be in Alexa’s copy of the calendar, and will not be added to the Google Calendar, and will not be accessible in the web or app versions of Google Calendar.
A similar procedure can be used to link Microsoft and Apple calendars as well. Note that anyone else who has access to the Echo will also have access to any linked calendars. If multiple people link their calendars to Echo, then Alexa will read out upcoming events from all linked calendars when prompted. Also, Amazon stores a copy of the linked calendar on its own servers, instead of pulling the information from the linked service on demand.
Create your own routine
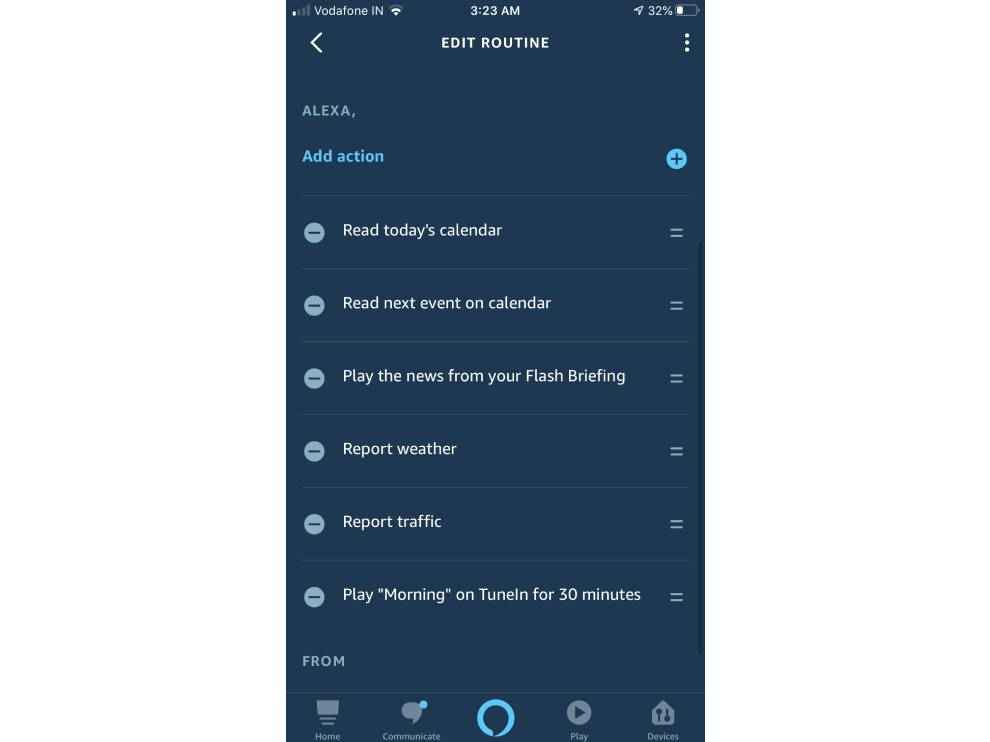
Creating a routine is the first step towards customising your Alexa experience, and allows you to perform a series of tasks given a particular trigger. Essentially, it is a version of IFTTT for capabilities of the Echo. Go to Settings > Routines. Tap on the + sign and enter a routine name. Let’s go with morning briefing. Then tap the + sign next to When this happens, tap on Voice and enter a phrase. Let’s go with good morning. Now, tap the + sign next to Add action and select Calendar then Today’s Calendar. Add another action, tap on Calendar and select Next Event. Then, add the Weather, News and Traffic options. We suggest you skip the News here because the anchors in most local providers tend to yell at you, which is not really the first tone of voice you want to hear in the morning. Flash Briefing can be customised in the global settings, where you can pick and chain multiple providers depending on your interest areas. So you can add Economic Times, MajorGeeks, and SpeakingTree to the Flash Briefing. You can then drag and drop to reorder all these actions according to your preferences. If you want to start your day with some music, you can add the Music action. Select Morning in the play section, as most services have a morning playlist. Tap on the Timer button and select 30 minutes. Now, choose the device, and tap on Save. Note that the Traffic option will only work if you have set your home and office location in the app. If you have not previously set your home and office addresses, you will get a notification on your Alexa app that allows you to put in these locations. You have successfully configured Alexa for a great way to start off your day. Now, let us create another routine, just for fun, called intruder alert. Tap on When this happens, then on Voice and key in, intruder alert. Now tap on Add action, go to Sounds, then go to Sci-Fi and tap on Red alert. Now choose the device and tap on Save.
Use an IFTTT applet
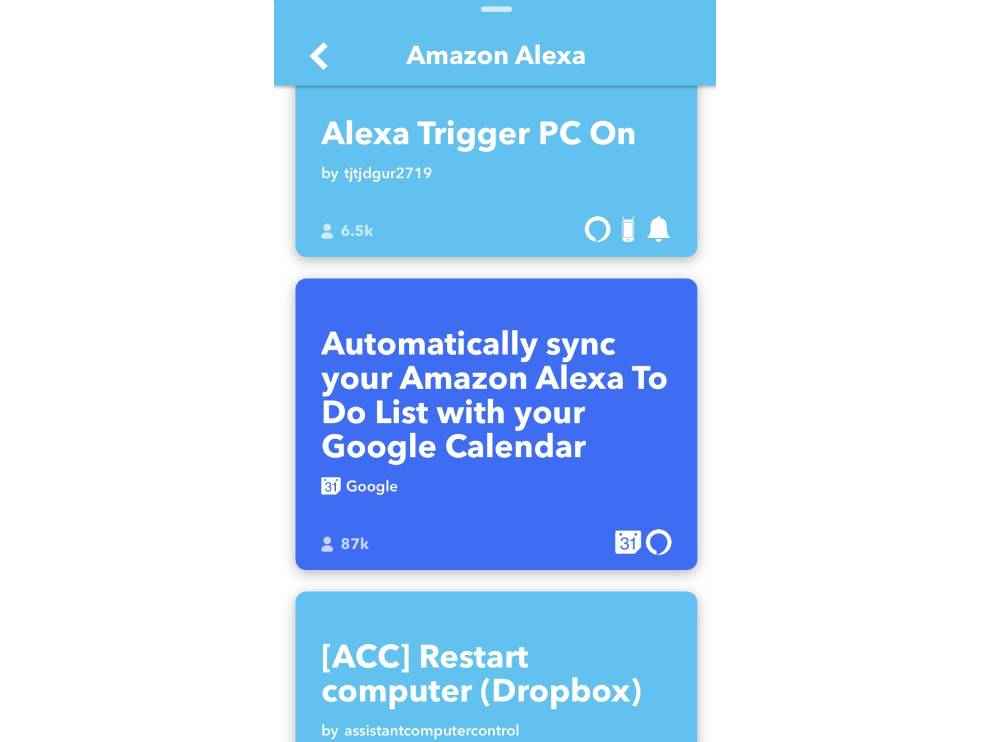
While skills are one way to increase the capabilities of your Echo, another way is to connect to IFTTT applets. We will be using one here known as call my device, which can be very helpful if you don’t know where your phone is. Go to IFTTT on a web browser or the smartphone app, and login. In either case, you need to install the IFTTT app on your smartphone, and login to that as well. If you do not have an account, you can instantly create one using a Facebook or Google account. Search for Alexa and you should see a number of applets. If you are iffy about security, look for the applets officially published by IFTTT. Now, Select Hey Alexa, call my device. Here, you can specify the phrase you want to use for Alexa to trigger the call. This uses two services on IFTTT, Amazon Alexa as well as VoIP Calls. Click on Save. You will be redirected to your Amazon account where you will have to confirm the integration. Once that is done, IFTTT will send a confirmation to your smartphone. You are all done now. Just say “Alexa, call my device”, and your phone should start ringing. The home screen of the IFTTT app has all the connected services, and you can remove any services that you don’t want or are no longer using. Tap on the services, tap on the gear icon, and tap on remove to do so. IFTTT applets can be used to get around all kinds of limitations of Alexa, such as syncing Alexa to-do lists with your device, or adding events to the calendar.
Make your own IFTTT applet
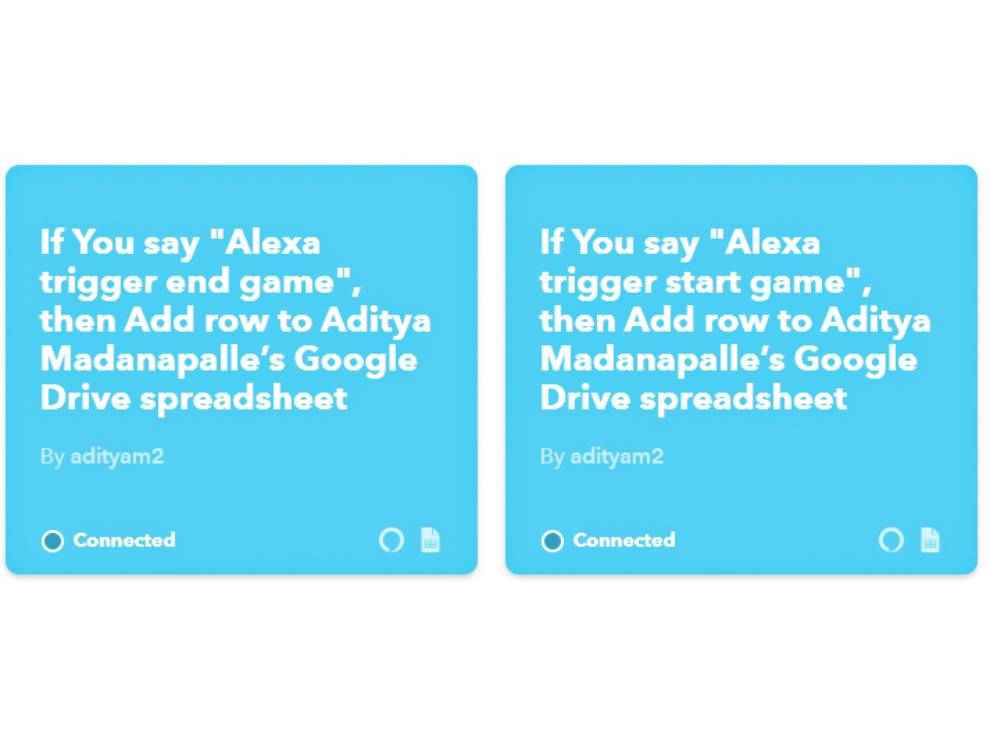
This is a simple applet that we made where you can use a custom phrase to note down the current time in a Google Sheets document. The date and time are added sequentially. Such a setup can be used to track the start and finish timings of gaming sessions, workouts, or just about anything else. Fire up the IFTTT app, and tap on the + icon next to Make your own Applets from Scratch. Now go to This > Say a specific phrase. Enter a phrase, we are going to go with start game. Then tap on Create trigger, and then tap on That. Search for and select Google Sheets and then Add row to spreadsheet. Select the Spreadsheet name. If a spreadsheet of the same name does not exist, a new one will get created. Now note that the formatted row has a TriggeredAt element followed by |||. The TriggeredAt is an ingredient that notes down the current time, and the ||| provides a cell separation. For the purpose of this workshop, we will be adding Start DnD session next to the |||. Now tap on Create Action. A preview of your applet will appear, but you are not done yet. Depending on the screen size of your phone, you may need to scroll down to tap on Finish. Now, repeat the process with another trigger phrase, end game, and add End DnD session after the |||. Now tap on Create Action > Finish. The applet is all set, and you can vocally track the timings of DnD sessions in Google Sheets with a custom voice command to Alexa. A similar approach can be used to create other IFTTT applets. Note that Alexa offers a rather limited set of “ingredients”, which are variables that can be specified at the time of triggering an action. Google Home supports many more. You can also chain IFTTT triggers, for example, adding a new row to a Google Sheets document can be the if this for another then that. Now let us do something a little more complicated. For the If trigger, select Amazon Alexa and New song played. Then, go to That and select Spotify then tap on Add track to a playlist. In the Artist name field, add ArtistName as an ingredient. Then tap on Create action, and then Finish. Now, every time a track is played on Alexa, through any streaming service, that track is added to a playlist on Spotify.
Change an Alexa response with Blueprints
We are now going to use blueprints.amazon.in to replace particular questions with custom answers. You can set the trigger phrase, as well as the response, and this supersedes all other programming, routines, and skills that Alexa may have. Note that blueprints.amazon.com will allow you to make the skills just as well, but you will frustratingly be unable to use them as long as you are in India. To use custom skills made through blueprints in India, you have to go to the .in address. Essentially, when fiddling around with Alexa, you need to be hyper aware of the domain that you are working on, and the region settings for Alexa. Click on Custom Q&A, from the Featured Blueprints section. Click on Make your Own. Now, just type out the text in the When you say: Alexa, field, as well as the Alexa will say: field. We went with a long-ish response to “What are the house rules for Uno?” as an example.
Create a skill with Blueprints
There are a number of Blueprints available that will let you customise the experience. The Quiz Blueprint lets you create a question and answer game for up to four friends. Alexa can check for the right answer, and deliver a related fact just afterwards. The Facts skill lets you relay a random fact from a list on any topic, and you can keep adding to the Facts. One Blueprint we found incredibly useful is known as Houseguest. Here, you can add custom items to a list to help someone find their way around the house. One category is known as “Where is the…” Here you can add items such as sandpaper, facewash, helmet and so on, write down the location, and provide additional contextual information if necessary. There is a section for “How do I…” which lets you explain particular tasks, such as “locking the door”, “using the washing machine” or “clean out the garbage”. You can add multiple ways to answer the question to get the same response. You can create as many custom responses as you want. Once you are done, tap on Next: Update Skill. You can also provide contact information for doctors, taxi services and so on in a Contact Info segment. You can then set a custom welcome message, a list of random phrases to greet the guest every time they interact with the Echo, and an Exit or Farewell message when they stop interacting with the Echo. Then, pick a name for the skill, which is the trigger phrase you need to inform your guest about. Click on Create Skill. This process may take up to two minutes. This time period is not there in the previous example of configuring a custom response. Most other Blueprints based Skills however, take some time. Once created, you can add or edit a skill, and delete them if no longer required. Note that Skills created with Blueprints are personal, and available only on your Echo device. You can however, choose to share your skills with friends, or publish them as well.
The Developer Console
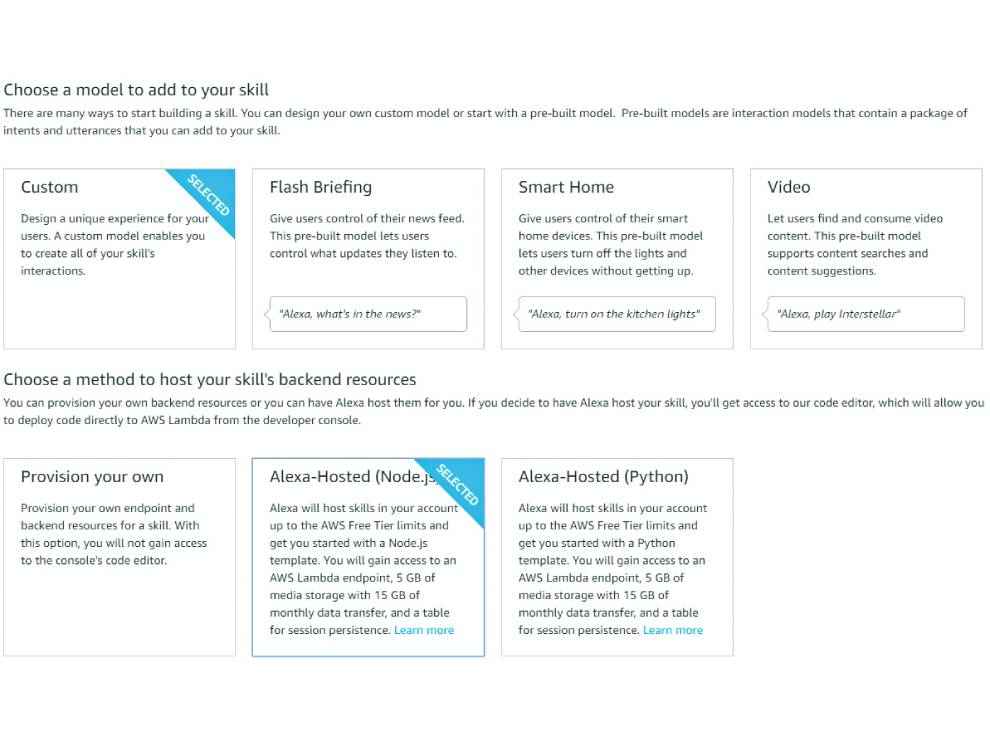
Now, we will be publishing our own skill. First, you will need to get an Amazon developer account. To do so, go to developer.amazon.com. You will have to provide a name, which will be the attribution if you publish your skill. The registration process is instant. Go to the Alexa Developer Console, and then click on Create Skill. Create a name for the skill, we are going to go with Indian States in this example. Now, you will have to select a model, which is a more complicated version of Blueprints. One of the simplest models available is the option of creating your own Flash Briefing, but that requires you to configure your own backend. Do note that, you can create and host skills locally, which is great for testing skills. We will be starting with something simpler. Select Custom as the model, and Alexa-Hosted (Node.js) as the backend. This gives you a free Amazon AWS Lambda endpoint, where you can store 5 GB of data, with a 15 GB data cap per month. Now you have to choose a template. From left to right, the templates increase in complexity, starting with a simple Hello World. Select the third one, which is Quiz Game Skill, and click on Choose. Now, you will see an Interaction Model, with an Invocation, as well as Intent and Slot Type sub menus. The Invocation is the phrase that people will use to start this skill. We will go with Indian States quiz here.
Install Notepad++, this is an easier way of editing the code than Amazon’s Developer console. Now, go to the spreadsheet program of your choice, and make an array that when copy pasted, shows up this line as a single example {StateName: ‘Andhra Pradesh’, Abbreviation: ‘AP’, Capital: ‘Amaravati’, StatehoodYear:2017, StatehoodOrder:26},. Fill out all the data for the states in this format. Once you have put in all the information, copy and paste the array to replace the code between the square brackets of const data = []. Then, find and replace all United States with India. Now, look for fifty states and replace it with twenty eight.
Amazon provides all the resources needed to train yourself to start building skills on the developer subsite. There is a course to familiarise with the Alexa Skills Kit as well as tutorials on the design aspect of skill creation such as Voice UI and monetisation. You also need to add images for function getSmallImage(item) {}, and we used spark.Adobe.com to create these graphics. Note that this skill is going to be publicly deployed, so it is good to make custom graphics. They show up in Echo devices with a touchscreen. Now, find and replace admitted to the Union in with established as a state in. It’s as simple as that, we are done. Copy all the text, go back to Alexa Developer Console, and replace all the code in index.js. If you have made any errors in the code, the line will show a red cross. Click on Save, then on Deploy. This will take some time. Now go back to Build and build the model again. Try creating your own unique quiz, or other skill. Once you are done, test the skill using the Test tab. This gives an interface identical to the Echo, and you can create skills even if you do not have an Echo. Once you have verified that it works as expected, you can go ahead and publish it. Click on Distribution, and change the descriptions to remove all traces of US. You also have to make and upload small and large icons. Fill out the Privacy and Compliance information, then choose availability settings. You can choose to release the skill all over the world, or in particular regions only. Now, the skill will get validated through an automated error checking system. Once that is done, click on Run to send the skill for certification. Now go to Certify and Publish, and you should be done. Do not try this with this exact same quiz, as it has been done many times before.