Creating an image gallery app with Flash Builder 4 in 10 steps
Introduction
Last time we created an widget which allowed you to search on Twitter, which introduced you to Flex Catalyst, and showed how it could be used to create a rich UI for you application. In this tutorial we will create an application which loads an XML gallery exported from Picasa, and displays the files in a gallery.
Picasa 3 allows one to export their images as a HTML galleries, and also supports an option to export the image gallery as an XML. If you choose to export as XML, Picasa will create an XML file with information about the images you selected to export. The file created by Picasa is quite verbose, and has a lot of detail we wont use, however you can expand your own application to utilize the same.
Our application will read in this data, and manipulate it using E4X (ECMAScript for XML) which is a simple and powerful way of manipulating XML documents. ActionScript 3 treats XML as a native type like any integer or string. We will only use a very small subset of these features.
Exporting the XML from Picasa
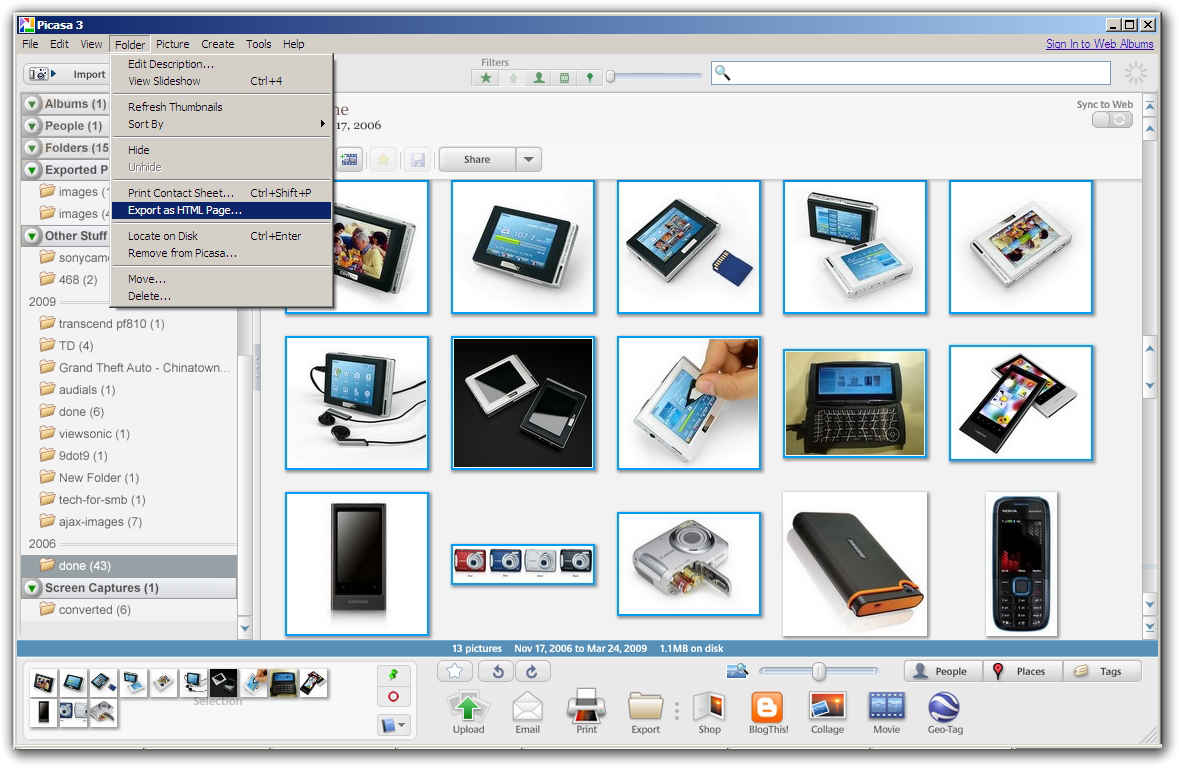
The feature we are looking for here is “Export as HTML Page…” which is found in the “Folder” menu item in Picasa. You can select the images you want in your gallery, and use this feature to generate an HTML gallery of the selected images. We will however use this to output an XML index for our gallery instead and develop our own front-end.
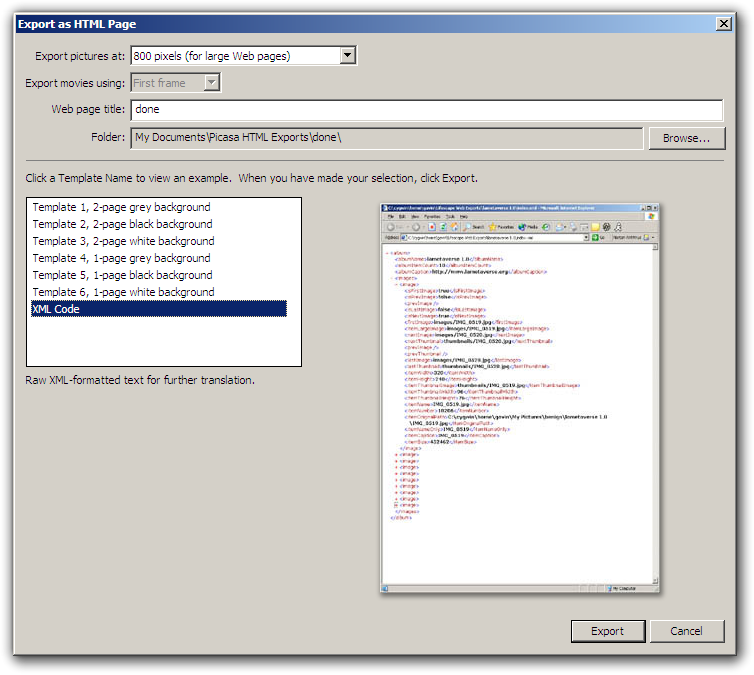
This option will show a dialog which will allow you to select the options for you export. You can choose the resolution at which the images will be resized, or you can just choose to export them at their original resolution. We will select 800 pixels so that all images have a similar size. Choose where to save it, and in the list of templates, select “XML Code”.
This will take a few minutes depending on the number of images selected, and will launch the XML file in your default editor. Before using this in the application, let us take a look at the XML format of the file:
<?xml version="1.0" encoding="utf-8" ?><album><albumName>Recently Updated</albumName><albumItemCount>24</albumItemCount><albumCaption></albumCaption><images><image>...
We have a root tag of <album> with an <albumName>, a count of the images in the album <albumItemCount>, a caption for the album <albumCaption> and an <images> tag which contains information about each image in an <image> tag.
Here is what the image tag looks like:
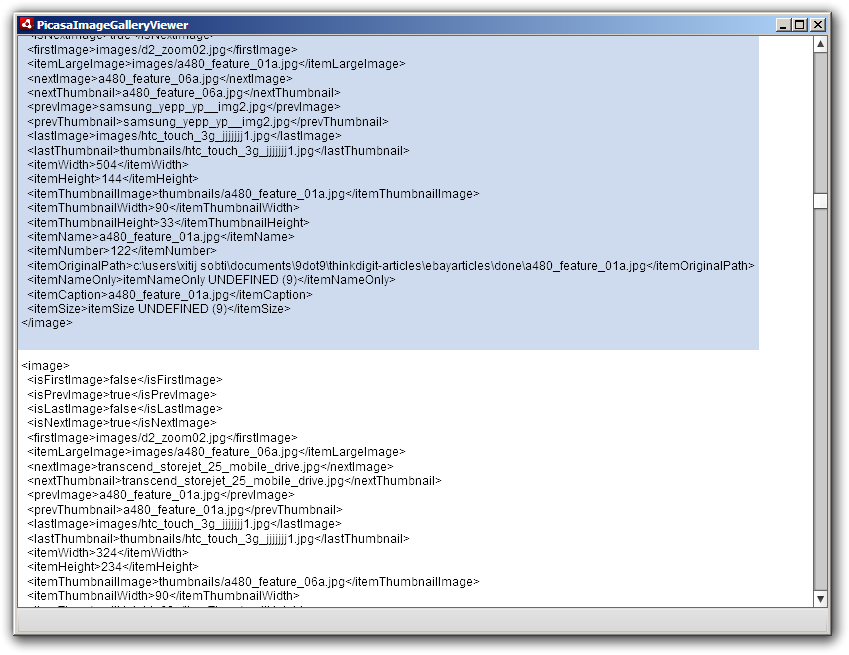
<image><isFirstImage>false</isFirstImage><isPrevImage>true</isPrevImage><isLastImage>false</isLastImage><isNextImage>true</isNextImage><firstImage>images/theresbenjamingualon.jpg</firstImage><itemLargeImage> images/reuse.jpg</itemLargeImage><nextImage>ewasteopening.jpg<nextImage><nextThumbnail>ewasteopening.jpg</nextThumbnail><prevImage>theresbenjamingualon.jpg </prevImage><prevThumbnail>theresbenjamingualon.jpg</prevThumbnail><lastImage>images/hp_laserjet_pro_m1213nf_aio___lr.jpg</lastImage><lastThumbnail>thumbnails/hp_laserjet_pro_m1213nf_aio___lr.jpg</lastThumbnail><itemWidth>468</itemWidth><itemHeight>313</itemHeight><itemThumbnailImage>thumbnails/someimagefile.jpg</itemThumbnailImage><itemThumbnailWidth>90</itemThumbnailWidth><itemThumbnailHeight> 64 </itemThumbnailHeight><itemName>someimagefile.jpg</itemName><itemNumber513</itemNumber><itemOriginalPath>c:somefoldersomeimagefile.jpg</itemOriginalPath><itemNameOnly> itemNameOnly UNDEFINED (9)</itemNameOnly><itemCaption>someimagefile.jpg</itemCaption><itemSize>itemSize UNDEFINED (9)</itemSize></image>
In all of this we only need the the <itemThumbnailImage>, <itemLargeImage>, and <itemName>. We can use the caption as well, but for our simple example we will avoid it.
You can download a free trial of Adobe Flash Builder 4 from the Adobe website.
Creating the Flex Gallery
Our Flex application needs only to load this XML file and use the list of images from it to populate the gallery. Simple! The execution is even simpler. For the most part this can be done entirely in declarative code. What this means is that we can do most of the coding in MXML – which is similar to XML / HTML. Declarative programming means that we simply declare all the user interface elements, and define some relations and the application works as expected instead of actually coding everything. You can read up on our previous article at thinkdigit.com/www.thinkdigit.com/d/adobefc for a better idea.
In fact, a functional gallery – which simply displays thumbnails – can be created entirely in declerative MXML code, the only ActionScript code we will require is for popping up the image when we click on its thumbnail in the gallery, and even that is minimal.
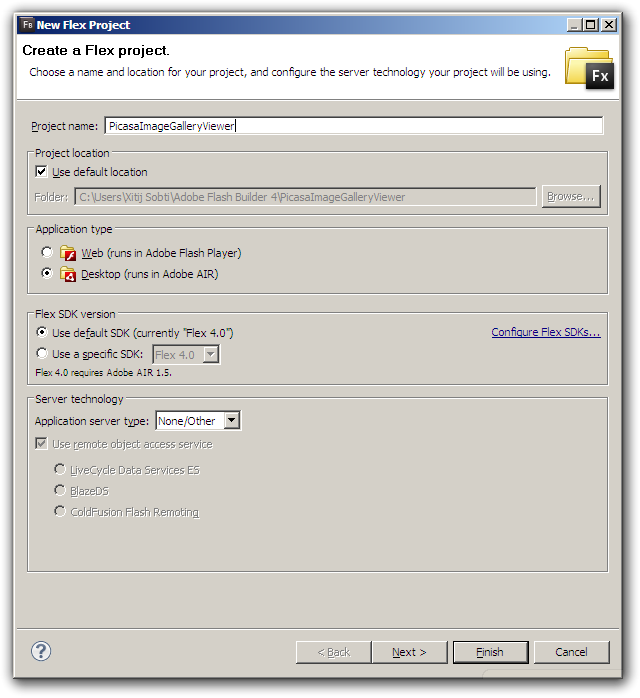
STEP 1: First of all you will need to create a new Flash Builder project. You can create either a Web project for viewing in your browser with the Flash plugin, or you can create Desktop project which will run in Adobe AIR. We are creating a Desktop project, however since we are not using any desktop specific features, you can use the same code for a Web project.
STEP 2: From the folder where you have exported the gallery to Flex, copy all the files and folders – there should be an index.xml file, and an images and thumbnails folder – to the “src” folder in you Flex project. Your Flex project will probably be in C:Users<username>Adobe Flash Builder 4<project name> (or C:Users<username>Adobe Flash Builder 4 Plug-in<project name> if you have the Flash Builder Eclipse plugin installed). You can also drag and drop these files into the Package Explorer view in Flash Builder.
STEP 3: First of all we need to load the XML index into our application. We do this using the XML tag in MXML. Add the following inside the <fx:Declarations> tag:
<fx:XML id="indexXML" source="index.xml" />
Here we are declaring an XML object called indexXML, and using the file “index.xml” as a source. For our list image gallery though we will need a list of all images from this.
STEP 4: We will now extract a list of all images from this XML file. With support for E4X in ActionScript and Flex, this is very simple.
We have our XML object indexXML, we can directly access the “images” tag inside this as: indexXML.images
If we needed to access the album name we could simply access it as: indexXML.albumName
If we access indexXML.images.image it will return a list of all image elements inside the images tag. We can directly pull this into an XMLListCollection, which can be directly used in the list we will add in the next step. Add the code which follows inside the <fx:Declarations> after the indexXML declaration:
<s:XMLListCollection id="index" source="{indexXML.images.image}" />
This will enable us to access a list of all images in the indexXML via the “index” object.
STEP 5: Now we add the list. Inside the <s:Application> – if you created a web project – or the <s:WindowedApplication> – if you created a Desktop application – add the List element.
<s:List id="imagesList" dataProvider="{index}" width="100%" height="100%" ><s:layout><s:TileLayout /></s:layout></s:List>
This creates a list inside our application which has an id / name imagesList, and fills up to take 100% of the width and 100% of the height of the application. The <s:TileLayout /> tag inside the <s:layout> tag specifies that the list will display content in a tiled layout, as rows and columns of images.
The ‘dataProvider=”{index}” ‘ bit is telling the list to use the “index” object we defined earlier as the source for populating this list. The list will automatically create one list item for each image in the index. It will automatically handle displaying and scrolling in the list. Right now however the list is not geared to handle images, it will simply display informaiton about each image as text.
STEP 6: What we need to add to this list, is an item renderer. As the name suggests, an item renderer defines how each item in the list is to be rendered / displayed. You can create complicated structures with multiple controls and set it as an itemrenderer for a list. You could for example actually create an image editor, and put it as an item renderer to have an editable image gallery! We will however do something much simpler. We will add the following inside the list declaraiton:
<s:itemRenderer><fx:Component><mx:Image source="{data.itemThumbnailImage}" /></fx:Component></s:itemRenderer>
Usually you will declare an item renderer in a separate file and provide that to the list, however this example is simple enough for an inline declaration. We are defining the Image component as the item renderer for the list.
The list passes the data associated with each list item, i.e. the contents of the <image> tag to the each item in the list as the “data” object. The image to be used for each list item is then accessible through data.itemThumbnailImage. This property as you can see from the XML format of the index file, has the releative path to the thumbnail of the image.
After adding this, you will notice that you can already see a gallery by running the project!

Right now though, you cannot view any images in their full-sized versions, which seriously hampers the usability of the gallery.
STEP 7: A gallery isn’t as useful if you can’t view the full-sized version of the image. That is the functionality we will add next. To do that, we will create a small MXML component which just displays an Image inside a panel. Right-click on your project in Flash Builder, and under the New menu, select MXML Component.
In the New MXML Component dialog, enter a name for your component: ImageViewer. For “Based on” delete the default value, and replace it with “spark.components.TitleWindow” – it should appear as an option if you start typing TitleWindow.
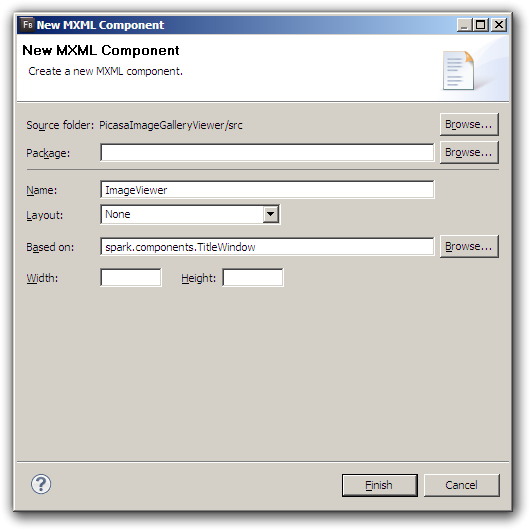
The “TitleWindow” component will display a window panel with shadow, a close button, and will automatically support being dragged using the title-bar. Delete the width and height values.
Inside this TitleWindow we will need to place our image. Add an image component as:
<mx:Image id="image" />
STEP 8: Now we will add some functionlity to this component. We will define an action for closing the window, and an action to ensure that the image appears centered on the screen.
In the <s:TitleWindow> tag, start typing “close” as an attribute, Flash Builder will offer to auto-complete this. When you choose to autocomplete, you will get the option “Generate Close Handler” select this option and press Enter. It will automatically create a function which will run when the TitleWindow’s close action is called – the close button is pressed. The function will be called something like “titlewindow1_closeHandler”.
Inside this function, type “PopUpManager” and press Ctrl Space, and press Enter. This will automatically include the required classes for the PopUpManager functionality. The PopUpManager handles popup windows in your application.
The code we will add to this function is:
PopUpManager.removePopUp(this);
This function will tell the popup manager to remove this popup window when the close button is clicked.
STEP 9: Now for centering the popup on screen. We need to center the popup on the screen when it is displayed, however it takes some time for the image to load, and that will offset the popop on the screen. So we need to center the popup when the image resizes. Just as we added the funciton in the previous example, add a function for the resize event for the image. After this the image tag should look like:
<mx:Image id="image" resize="image_resizeHandler(event)" />
And we should have a function called image_resizeHandler for the code. In this function we will add:
PopUpManager.centerPopUp(this);
What this does is to center the popup on screen.
Our image viewer code is now done.
STEP 10: Finally, we need to actually open this popup when someone clicks on an image in the list. To do this, add a funciton for the click event for the list. You should be left with a function called imagesList_clickHandler, into which we will add the following code:
var popupimage:ImageViewer = PopUpManager.createPopUp(this.root, ImageViewer, true) as ImageViewer;popupimage.image.source = imagesList.selectedItem.itemLargeImage;popupimage.title = imagesList.selectedItem.itemName;
If you simply typed in this code, you will need to add the code to import the required classes, in this case, “mx.managers.PopUpManager”. Simply add “import mx.managers.PopUpManager;” above the image_resizeHandler function.
The first line of this code is using the PopUpManager to create a popup window from our ImageViewer component. The first parameter: this.root tells the popup manager which display object is popping up the windows, i.e. the parent of the pop up window. The second parameter specifies what kind of window needs to be popped up, we have created our own ImageViewer. The third option specifies that the window is modal, i.e. it will block access to the main application while it is open. popupimage is the variable which is being associated with this window. With the “as ImageViewer” bit we are casting the windows being returned by the PopUpManager’s createPopUp function as ImageViewer so that we can reference it as such.
In the second line we are setting the source of the image component we added to the ImageViewer to the path of the large image specified by the selected item. In the third line we are setting the title of the TitleWindow component of our ImageViewer to the name of the image.
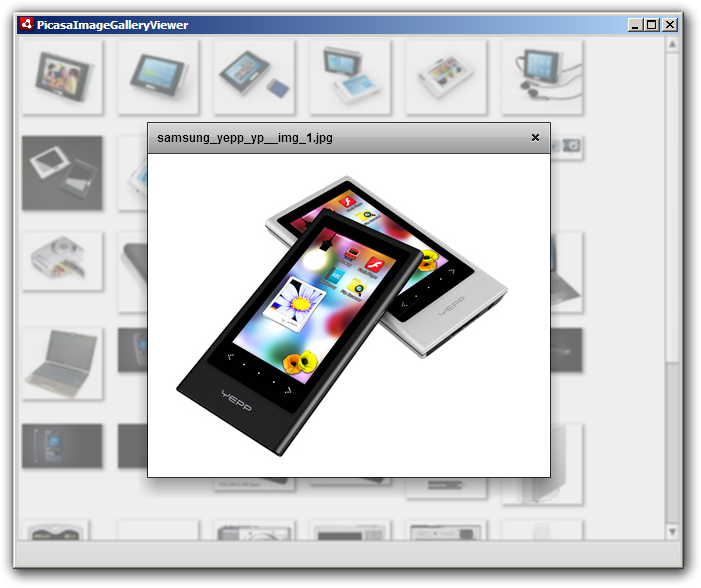
That’s it! If you run the project now, you will see the gallery as it appeared after step 6, now however you will be able to click on an image to see it in it’s own window. This window will appear at the center of the screen, and you will be able to drag it around. The title-bar of the window will display the name of the imaeg, and you will be able to close this window by clicking on the close button in the title-bar.
In 10 simple steps we have created a simple image gallery using Flex and Flash Builder, and we can use it quite easily with the XML galleries generated with Picasa.
With Flex you can quite easily swap out the TileLayout for a 3D layout or something exotic, or add functionality to select the source for the Picasa gallery XML file and load the gallery from there.
There are many ways that we can improve on this Image gallery, by adding more functionality, or making it more resilient to errors. Continue to figure out ways that you can improve this yourself, and you will learn much more than you can with a tutorial.
You can download a free trial of Adobe Flash Builder 4 from the Adobe website.