How to make Electronic Dance Music using FL Studio
Do you hum your own melodies and would think of creating your own music someday? You need not wait any longer, read on and get your hands dirty with nothing but your laptop.

There are two opinions about making Electronic Dance Music, a.k.a EDM, half the population believes that all you need to do is to press a button on your computer while the other half believes that it requires heavy investment on instruments, studio and maybe some luck. Apparently, both of these popular opinions have misguided a lot of people and might have even broken some dreams (especially if you took advice from ‘Sharma Ji’). As a matter of fact, you can make tracks like ‘Animals’ in your home, right now. Things get tricky only when you want to include custom lyrics in your tracks, for that you indeed require a studio or at least a good mic which won’t come for less than 10K. Right now, we’ll look at how to make music which is a central thing for any EDM. So I can tell you two things right now, making an EDM track doesn’t require any physical instruments or heavy investment and the other thing is, I’d give you a million bucks if you could make a button that could generate music on its own.
Let’s get into the main stuff now. There are three things that we require, firstly a good laptop with a decent CPU and as much RAM as possible. Second thing is, your song would be heard on various speaker setups and you want it to sound the same everywhere. That’s why you must get a good pair of studio headphones (Sony MDR-7506 are quite famous) as they are the closest to reproducing the actual song without powering up the bass and beats. And the third thing that we require is software, in the market a lot of them are available and for this tutorial I’ve chosen FL Studio, probably because a lot of people seem to be using it and you can get your free trial copy from image-line.
Open up FL Studio 12 and its first look might bewilder you but unlike any other complex software, it is pretty easy to learn. Before that, have a little idea on how electronic music is made in general. The basic unit is a ‘pattern’ which is pretty much like the basic beats for your song. Every melody/beat that you think is put on a pattern and then you take this (and many other) patterns on the main palette (blur colored box in the image). So, varying and repeated pattern come together to form your song. You might not actually notice but there are a lot of things that go into a song, such as Drums, Percussion, Chords, Melody, Bass and any other stuff that you might wish to put up. Things like reverb, distortion and various other effects on the sound are produced via the plugins that we’ll discuss later.
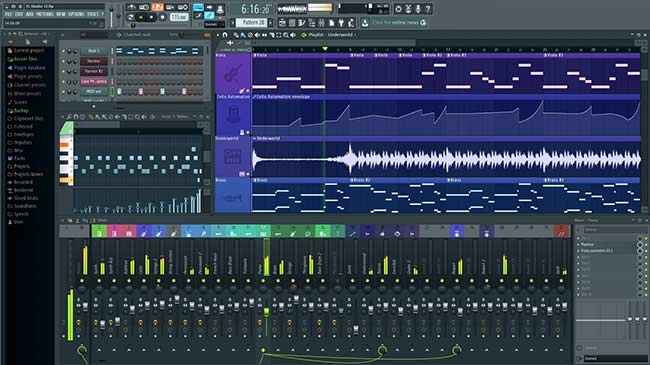
The FL Studio 12 is not a very complex software to learn
I’ve highlighted some essential controls with the help of colored boxes as you can see in the image. Starting from the top-left corner, the purple box is basically a kind of status bar that tells you the name of various icons and numerical values of settings which have knob like interface. The green box is pretty essential as it allows you to play and stop the song. The orange-colored-refresh-button lets you choose the play mode, which means, whether you want to play the whole song that you’ve made or just a pattern. The yellow box basically controls ‘what your mouse would do on click?’. You can set it to painting, muting, slicing or selecting a pattern. It also allows you to control the grid size of the palette, which generally becomes useful when the song is about to have a drop. The pink box on the left is just a file browser and useful as it contains all the instruments (mostly under Packs). The blue box in the center is the main area where stuff happens, everything goes in here, and I call it the palette.
Coming to the red box on the top, it is probably the most used area. The icon marked ‘1’ hides/unhides the palette. The icon marked ‘2’ brings up the channel rack, which is the place where you place all your instruments that you want to use. So, here’s the deal, think of a tone, open up FL Studio, from the library on the left, which can be hidden/unhidden from the button marked ‘4’, choose all the instruments at once that you want to use and place them in the channel rack. For a decent song, use at least one kick, snare, hat, 808 and cymbals. Put them all in the channel rack by drag-and-drop method. At the very bottom in channel rack, you’ll see a ‘plus’ sign, click it and choose ‘GMS’ which works as a synthesizer. Of course, you’re free to use any other one too, but these many instruments are at least required. In front of every instrument you’ll see small rectagular boxes, which you can click to make some beats but do not go this way unless it really works for you.
Rather, right click on any one instrument and click on ‘Piano roll’. The icon marked ‘3’ hides/unhides the piano roll. Piano roll is the place where you convert the tone, which is in your mind, to actual notes in the piano. If you can do that then that’s great otherwise an amateur way is to click on any random notes on the piano, avoid the black notes (the one with ‘#’ in their name), and you might end up with something good. But again, this is really a bad idea to proceed with.
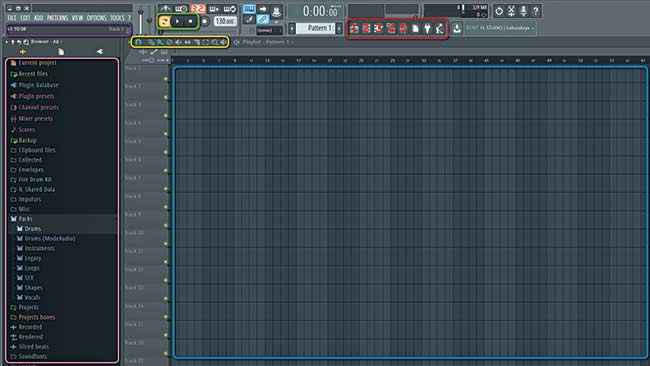
The FL Studio 12 Workspace
Assuming that you’ve converted your tone into the piano roll, get back to the channel rack and you’ll notice that those rectangular boxes have been replaced with something like broken straight lines (as per your notes). That’s it, you’ve created one pattern. Go ahead and paint it on the palette, which actually makes your song. Do remember, always use only one (or at most two) instrument in one pattern, this way, it allows you to use any specific instrument as and when required. For other instruments create a new pattern, for which you need to click on the ‘plus’ icon, just on the left of the red box. Get back to channel rack and you’ll have a fresh set of unused instruments. This time, go ahead with any other instrument, the same way you did with the first one. Repeat this process with all the instruments, for GMS and 808. You might need to look up videos on youtube, there are plenty of them available.
In the channel rack, on the left of instruments, you’ll see a field that assigns instruments to mixer track. Go ahead and assign each instrument a unique track number i.e. assign ‘1’ to the first instrument, ‘2’ to the next one and so on. All these instruments would be now available in the mixer which can be accessed from the icon marked ‘5’, which is for opening mixer. This is the place where you assign various effects, level the audio and overall, make the instrument sound good. Most of the controls are self explanatory and for assigning an effect to the instrument, choose the instrument and on the right side, click on ‘slot 1’ and choose the effect that you wish to apply. ‘Fruity’ plugins are often used, such as the ‘Reeverb 2’, ‘Delay 2’. The knob next to the slot’s name allows you to control the amount of that particular effect that goes into the song.
The thing with FL Studio is that, there are so many options that no one can explain all of them to you, you really need to experiment with plugins. Another useful feature is ‘automation clip’. This enables the amount of any effect to automatically change throughout your song. Right click on any knob and choose this feature. Go to palette and define how you want that effect to change throughout the song.
So that’s pretty much FL Studio for beginners. In one line, think of a track idea, add the required instruments to channel mixer, create patterns by sending instruments to piano roll while limiting each pattern to use 1-2 instruments only, assign each instrument a mixer track, enhance the way instruments sound using mixer and you’re done! And of course, as you can see, there are more fancy buttons out there which means more fancy things to control, so if you can think a music, you can create it on FL Studio also.
Golden advice is, don’t expect yourself to master FL Studio in the first attempt.In fact, the first attempt might make you uninstall FL Studio. And if you’re really getting FL Studio in the first attempt, then we don’t judge you. Patience is the key to unlocking the potential that it has to offer. Goodluck bass heads.
Disclaimer: The views expressed in this section are of the respective Digit Squad members. Neither Digit nor 9.9 Media takes responsibility of their claims whatsoever.
This article was first published in August 2016 issue of Digit magazine. To read Digit's articles first, subscribe here or download the Digit e-magazine app for Android and iOS. You could also buy Digit's previous issues here.