Sensor to Cloud: Connecting Intel NUC to the Microsoft Azure IoT Hub

Introduction
This article will show you how to use an Intel® Next Unit Computing (NUC) device to connect sensors on an Arduino 101* board to the Microsoft Azure* IoT Hub. You learn how to read real-time sensor data from the Arduino 101 board, view it locally on the Intel® NUC, and send it to the Azure IoT Hub, where the data can be stored, visualized, and processed in the cloud. To do all this, you use Node‑RED* on the NUC to create processing flows that perform the input, processing, and output functions that drive your application.
Setup and Prerequisites
- Intel® NUC connected to the Internet
- Arduino 101 board connected to the Intel® NUC through USB
- Seeed Studio Grove* Base Shield attached to the Arduino 101 board and switched to 3V3 VCC
- Grove sensors connected to the Base Shield: light on A1, rotary encoder on A2, button on D4, green LED on D5, buzzer on D6, and relay on D7
- An active Azure cloud account
- The packagegroup-cloud-azure package installed on the Intel® NUC
Read Sensors and Display Data on the Intel® IoT Gateway Developer Hub
Log in to the Intel® NUC’s Intel® IoT Gateway Developer Hub by entering the Intel® NUC’s IP address in your browser and using gwuser as the default user name and password. You’ll see basic information about the Intel® NUC, including its model number, version, Ethernet address, and network connectivity status.
Click the Sensors icon, and then click Manage Sensors to open the Node‑RED canvas, where you’ll see Sheet 1 with a default flow for an RH-USB sensor. You won’t use the RH-USB sensor for this project, so drag a box around the entire flow and delete it. You’re left with a blank canvas.
Along the left side of the Node-RED screen, you see a series of nodes. These are the building blocks for creating a Node‑RED application on the Intel® NUC. For this application, you’ll use the nodes shown in Table 1.
Table 1. Nodes used in the sample application

Drag nodes onto the canvas and arrange them as shown in Figure 1. You will need multiple copies of some of the nodes. Use your mouse to connect wires between the nodes as shown.
Note:You’ll use the azureiothub node later; don’t include it now.

Figure 1. Arranging nodes on the Node‑RED canvas
When you first place nodes on the canvas, they are in a default state. You must configure them before they’ll work. To do so, double-click them, and then set parameters in their configuration panels.
Double-click each node on the canvas and set its parameters as shown in Table 2. In some cases, theName field is left blank (it uses the default name of the node). Pin numbers correspond to the Base Shield jack to the sensor or actuator is connected.
Table 2. Nodes and their parameters

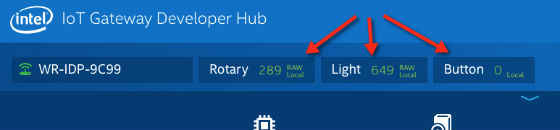
Verify your settings and wiring connections, and then click Deploy to deploy your changes and make them active on the Intel® NUC. After deploying the flow, you should see a data display toward the top of the Intel® IoT Gateway Developer Hub, with live values for Rotary, Light, and Button (Figure 2). Turning the rotary knob and covering the light sensor should make the numbers change up and down; pressing the button should turn on the LED, sound the buzzer, and energize the relay.
Figure 2. The deployed Intel® NUC in the Intel® IoT Gateway Developer Hub
Create the Microsoft Azure* IoT Hub
Before you can send sensor data to the Azure IoT Hub, you must create an Azure IoT Hub in your Azure cloud account. Log in to Azure, and then navigate to the Dashboard. To create an Azure IoT Hub, follow these steps:
1. Click New > Internet of Things > IoT Hub.
2. Set the parameters to match Table 3.
Table 3. Parameters for your Microsoft Azure IoT Hub

3. Select Pin to dashboard, and then click Create. Azure IoT Hub is deployed to your Azure account and appears on your Dashboard after a few minutes.
4. After it has been deployed, find the iothubowner Connection string–primary key, which is a text string that you’ll need later.
5. Click Dashboard > iothub-3982 > Settings > Shared access policies > iothubowner, and look for Connection string–primary key under Shared access keys. The string is complex, so copy it for use in the next step.
Create a Device Identity in Azure IoT Hub
Before a device can communicate with Azure IoT Hub, it must have a device identity in the Azure IoT Hub Device Identity Registry, which is a list of devices authorized to interact with your Azure IoT Hub instance.
You create and manage device identities through Representational State Transfer (REST) application programming interfaces (APIs) that Azure IoT Hub provides. There are different ways to use the REST APIs; in this guide, you’ll use an Azure open source command-line tool called iothub-explorer, which is available on GitHub. iothub-explorer is a Node.js* application, so you need Node.js 4.x or later installed on your computer to use it.
Use these shell commands to install iothub-explorer on your computer and create a device identity for the Intel® NUC. Make sure you that have the iothubowner Connection string–primary key string (found earlier) ready to paste:
Install the program:npm install -g iothub-explorer
Verify it runs:iothub-explorer help
Next, create and register a new device named intelnuc using the iothubowner Connection string–primary key you copied earlier. Run this shell command using your own iothubowner Connection string–primary key string inside the quotation marks:
iothub-explorer "HostName=iothub-3982.azure-
devices.net;SharedAccessKeyName=iothubowner;SharedAccessKey=Be0w9Zew0909LLAKeiseXsdf/adfe239EODo9iwee9w=" create intelnuc –connection-string
When the device has been created, you’ll see the message “Created device intelnuc” and a list of parameters for the newly created device. Locate the connectionString parameter, which will have a long text string value next to it that starts with HostName=. You’ll copy and paste this <device> connectionString value in the next task.
Send Data to Azure IoT Hub
Next, add an Azure IoT Hub output node to the Intel® NUC’s Node‑RED flow to send your data to Azure IoT Hub. Complete the following steps:
1. In the IoT Gateway Developer Hub, drag an azureiothub output node onto the canvas.
When the node is dropped onto the canvas, its name changes to Azure IoT Hub.
2. Connect a wire from the output of Grove Rotary to the input of Azure IoT Hub.
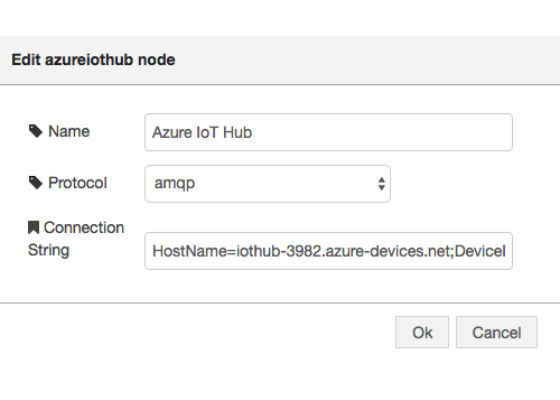
3. Double-click the Azure IoT Hub node, and set the following parameters:
Name: Azure IoT Hub
Protocol: amqp
4. For the Connection String property, paste in the <device> connectionString text string value you copied from the output of iothub-explorer. Make sure that Protocol remains set to amqp. After pasting the connectionString value, the node’s configuration panel should look like Figure 3.
Figure 3. Parameters for the azureiothub node
5. Click Ok, and then click Deploy to deploy your updated flow to the Intel® NUC.
At this point, the data values for your Grove Rotary sensor should be flowing to Azure IoT Hub once per second, which is the rate set in the Grove Rotary node. To view the transmission events in Azure IoT Hub, go to your Azure cloud account and navigate to Dashboard > iothub-3982. Look at the Usage tile. The number of transmission messages should be increasing at a rate corresponding to one message per second (Figure 4).
Figure 4. The number of transmission messages should increase by one per second.

If no messages are flowing, you’ll see 0 messages and 0 devices in the Usage tile. To view the actual event messages using iothub-explorer, run the following shell command using your own iothubowner Connection string–primary key:
iothub-explorer "HostName=iothub-3982.azure-
devices.net;SharedAccessKeyName=iothubowner;SharedAccessKey=Be0w9Zew0909LLAKeiseXsdf/adfe239EODo9iwee9w=" monitor-events intelnuc
Note: When you’re done testing this application, be sure to stop your Node‑RED flow (for example, by turning off the Intel® NUC or removing the wire between the Grove Rotary sensor and Azure IoT Hub and redeploying the flow) to preserve the remaining messages in your Free Tier allotment for the Azure IoT Hub instance. Otherwise, the Node‑RED application will consume them as it continues to run.
For more such intel IoT resources and tools from Intel, please visit the Intel® Developer Zone
Source: https://software.intel.com/en-us/articles/sensor-to-cloud-connecting-intel-nuc-and-arduino-101-to-microsoft-azure-iot-hub