Arduino 101 Bluetooth Low Energy

Introduction
Bluetooth® Low Energy (Bluetooth® LE or BLE) is a low-power, short-range wireless communication technology that is ideal for use on the Internet of Things (IoT). BLE is designed for small and distinct data transfer, providing a fast connection between client and server and a simple user interface, which makes it ideal for control and monitoring applications. Arduino 101* includes on-board Bluetooth® LE to enable developers to interact with Bluetooth®-enabled devices such as phones and tablets. We will discuss how to create a BLEservice and communicate with an Android* device. We also set up a BLE blood pressure monitoring system to demonstrate the BLE capabilities of the Arduino 101*.
Hardware Components
The hardware components used in this project are listed below:
- Arduino 101* module
- Grove* – Starter Kit Plus
- A standard, A-plug-to-B-plug USB cable
This project will use the angle rotary sensor from the Grove kit, as shown with the other components in Figure 1.
For details on installing the Intel® Curie™ boards and setting up the software development environment for the Arduino 101* platform, go to https://software.intel.com/en-us/articles/fun-with-the-arduino-101-genuino-101.
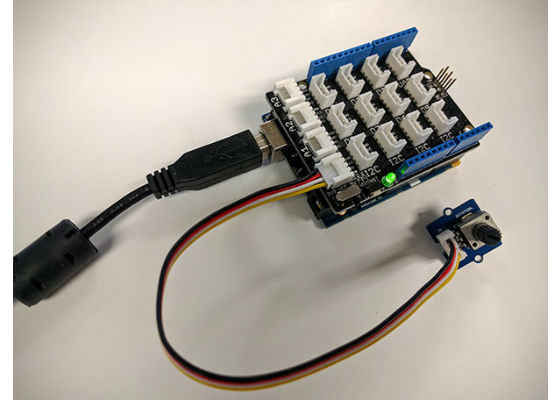
Figure 1: Arduino 101* with rotary angle sensor.
Central and Peripheral Devices
Bluetooth® LE supports two major roles for networked devices: central and peripheral.
Central: A Bluetooth® device such as smart phone, tablet, or PC that initiates an outgoing connection request to an advertising peripheral device. Once connected to the peripheral, the central device can exchange data, read values from the peripheral device, and execute commands on the peripheral devices.
Peripheral: A BLE device that accepts an incoming connection request after advertising. It gathers and publishes data for other devices to consume.
The central device communicates with peripherals through advertising packages. Peripheral devices send out the advertisements, and the central device scans for advertisements.
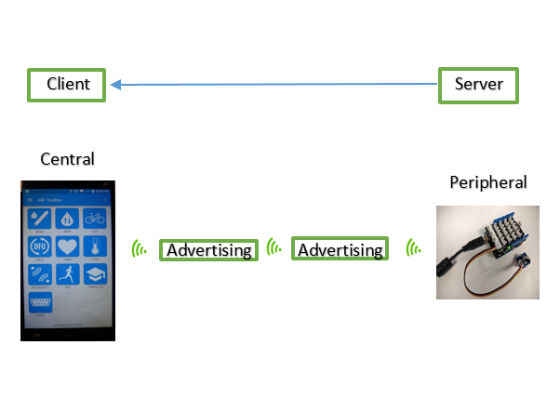
Figure 2: Central and peripheral device communication.
Generic Attribute Profile (GATT)
The Arduino 101* Bluetooth® LE is based on the Generic Attribute Profile (GATT) architecture. GATT defines a hierarchical data structure that is exposed to connected Bluetooth® LE devices. The GATT profile is a way of specifying small transmission data over the BLE link. These small data transmissions over a BLE link are called attributes. The GATT is built on top of the Attribute Protocol (ATT). The ATT transports the attributes and the attributes are formatted as characteristics and services. To learn more about the Bluetooth® LE and GATT, see https://www.bluetooth.com/what-is-bluetooth-technology/bluetooth-technology-basics/low-energyand https://www.bluetooth.com/specifications/gatt.
Peripheral Data Structure
In the GATT architecture, data is organized into services and characteristics. A Service is a set of features that encapsulate the behavior of the peripheral device. Characteristics are defined attributes of the service that provide additional information about it. For example, the characteristics of the blood pressure service are blood pressure measurement, intermediate cuff pressure, and blood pressure feature.
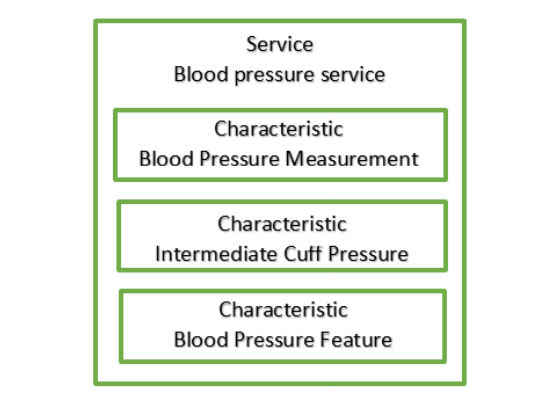
Figure 3: Bluetooth® service and characteristics relationship.
Creating a Blood Pressure BLE Service
To create a BLE service, you’ll need to know the service number and a corresponding characteristic number. On the Bluetooth® page, choose GATT Specifications -> Services for the full list of GATT-based services.
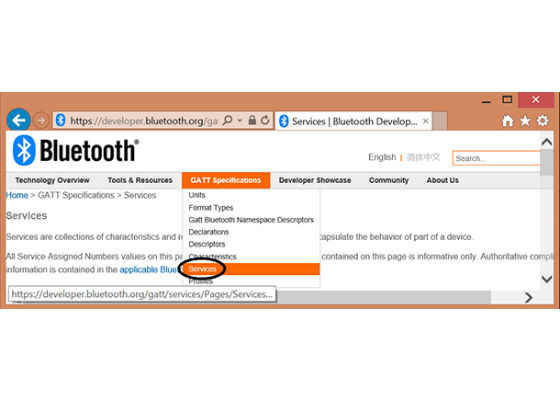
Figure 4: Bluetooth® GATT Specification pull down menu.
Select the blood pressure service and get the service number for the BLEService constructor.
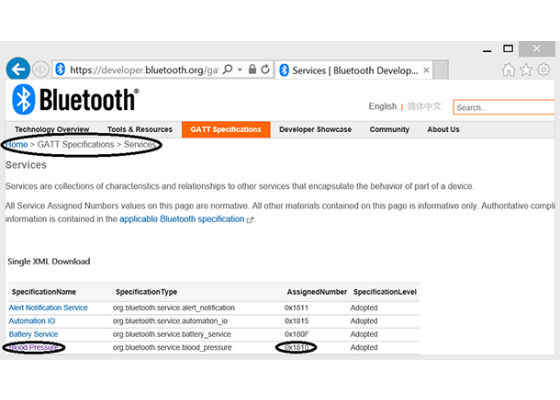
Figure 5: Bluetooth services.
On the Bluetooth® page, select GATT Specifications -> Characteristics to access the blood pressure characteristics number.
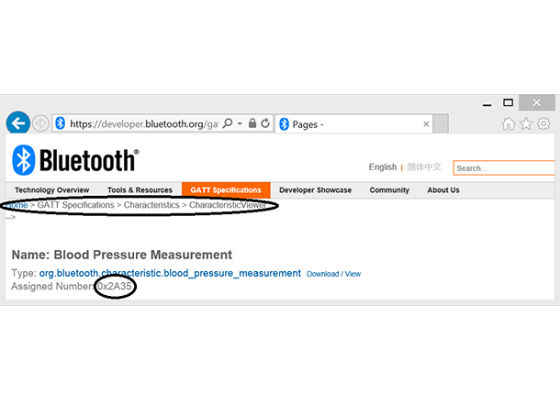
Figure 6: Bluetooth characteristics.
Next, include the Arduino 101* CurieBLE library components to enable communication and interaction with other Bluetooth® devices. You can find the open-source CurieBLE library athttps://github.com/01org/corelibs-arduino101.
#include <CurieBLE.h>
BLEPeripheral blePeripheral; // BLE Peripheral Device
BLEService bloodPressureService("1810"); // Blood Pressure Service
// BLE Blood Pressure Characteristic"
BLECharacteristic bloodPressureChar("2A35", // standard 16-bit characteristic UUID
BLERead | BLENotify, 2); // remote clients will be able to
// get notifications if this characteristic changes
Set a local name for the peripheral BLE device. When the phone (central device) connects to this peripheral Bluetooth® device, the local name will appear on the phone to identify the connected peripheral.
blePeripheral.setLocalName("BloodPressureSketch");
blePeripheral.setAdvertisedServiceUuid(bloodPressureService.uuid()); // add the service UUID
blePeripheral.addAttribute(bloodPressureService); // Add the BLE Blood Pressure service
blePeripheral.addAttribute(bloodPressureChar); // add the blood pressure characteristic
Connect the blood pressure device to analog pin A0 of the Arduino 101* platform. For this example, use the angle rotary sensor to simulate the blood pressure device.
int pressure = analogRead(A0);
int bloodPressure = map(pressure, 0, 1023, 0, 100);
Update the blood pressure measurement characteristic. This updated blood pressure value will be seen by the central device. For example, if the phone is connected to the peripheral blood pressure device, the phone can read the updated blood pressure value through an Android* app.
bloodPressureChar.setValue(bloodPressureCharArray, 2);
Android* Device Communicates with Arduino* Sensor
The peripheral communicates with the central Android* device through Bluetooth® advertising. In advertising, the peripheral device broadcasts packages to every device around it. The central device scans and connects to the peripheral device to receive data and get more information. Follow the steps below to enable communication between the Android* device and Arduino* sensor.
- Enabled Bluetooth® on the Android* device.
- There are many free BLE Android* apps available on Google Play. Search for BLE on Google Play and install a BLE Android* app on the Android* device.
- Start the BLE Android* app.
- Scan and connect to the BloodPressureSketch peripheral.
- Read or write the blood pressure value.
Figure 7 shows an example of an Android* device scan for the BloodPressureSketch peripheral.
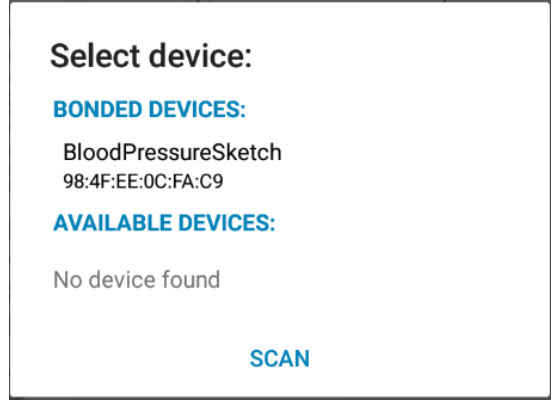
Figure 7: Android* device scans for BLE service.
Turn the rotary angle sensor to see the blood pressure value change on the screen of Android* device.
Develop an Android* Application
Visit http://developer.android.com/guide/topics/connectivity/bluetooth-le.html for detailed information on developing your own Android app that communicates with the peripheral through the Arduino 101* platform. If you are new to Android*, go to https://developer.android.com/training/basics/firstapp/index.html for instructions on creating an Android* project and building your first Android* app.
Example Arduino* IDE Sketch
Code sample 1, below, provides sample code for blood pressure measurement. Open the serial console to see the resulting output.
#include <CurieBLE.h>
/*
This sketch example partially implements the standard Bluetooth Low-Energy Battery service.
For more information:https://developer.bluetooth.org/gatt/services/Pages/ServicesHome.aspx
*/
/* */
BLEPeripheral blePeripheral; // BLE Peripheral Device (the board you're programming)
BLEService bloodPressureService("1810"); // Blood Pressure Service
// BLE Blood Pressure Characteristic"
//BLECharacteristic bloodPressureChar("2A49", // standard 16-bit characteristic UUID
BLECharacteristic bloodPressureChar("2A35", // standard 16-bit characteristic UUID
BLERead | BLENotify, 2); // remote clients will be able to
// get notifications if this characteristic changes
int oldBloodPressure = 0; // last blood pressure reading from analog input
long previousMillis = 0; // last time the blood pressure was checked, in ms
void setup() {
Serial.begin(9600); // initialize serial communication
pinMode(13, OUTPUT); // initialize the LED on pin 13 to indicate when a central is connected
/* Set a local name for the BLE device
This name will appear in advertising packets
and can be used by remote devices to identify this BLE device
The name can be changed but maybe be truncated based on space left in advertisement packet */
blePeripheral.setLocalName("BloodPressureSketch");
blePeripheral.setAdvertisedServiceUuid(bloodPressureService.uuid()); // add the service UUID
blePeripheral.addAttribute(bloodPressureService); // Add the BLE Blood Pressure service
blePeripheral.addAttribute(bloodPressureChar); // add the blood pressure characteristic
const unsigned char charArray[2] = { 0, (unsigned char)0 };
36
bloodPressureChar.setValue(charArray, 2); // initial value for this characteristic
/* Now activate the BLE device. It will start continuously transmitting BLE
advertising packets and will be visible to remote BLE central devices
until it receives a new connection */
blePeripheral.begin();
Serial.println("Bluetooth device active, waiting for connections…");
}
void loop() {
// listen for BLE peripherals to connect:
BLECentral central = blePeripheral.central();
// if a central is connected to peripheral:
if (central) {
Serial.print("Connected to central: ");
// print the central's MAC address:
Serial.println(central.address());
// turn on the LED to indicate the connection:
digitalWrite(13, HIGH);
// check the blood pressure mesurement every 200ms
// as long as the central is still connected:
while (central.connected()) {
long currentMillis = millis();
// if 200ms have passed, check the blood pressure mesurement:
if (currentMillis – previousMillis >= 200) {
previousMillis = currentMillis;
updateBloodPressure();
}
}
// when the central disconnects, turn off the LED:
digitalWrite(13, LOW);
Serial.print("Disconnected from central: ");
Serial.println(central.address());
}
}
void updateBloodPressure() {
/* Read the current voltage mesurement on the A0 analog input pin.
This is used here to simulate the blood pressure.
*/
int pressure = analogRead(A0);
int bloodPressure = map(pressure, 0, 1023, 0, 100);
// If the blood pressure has changed
if (bloodPressure != oldBloodPressure) {
Serial.print("The current blood pressure is: ");
Serial.println(bloodPressure);
const unsigned char bloodPressureCharArray[2] = { 0, (unsignedchar)bloodPressure };
// Update the blood pressure measurement characteristic
bloodPressureChar.setValue(bloodPressureCharArray, 2);
// Save the measurement for next comparison
oldBloodPressure = bloodPressure;
}
}
For more such intel IoT resources and tools from Intel, please visit the Intel® Developer Zone
Source:https://software.intel.com/en-us/articles/arduino-101-bluetooth-low-energy