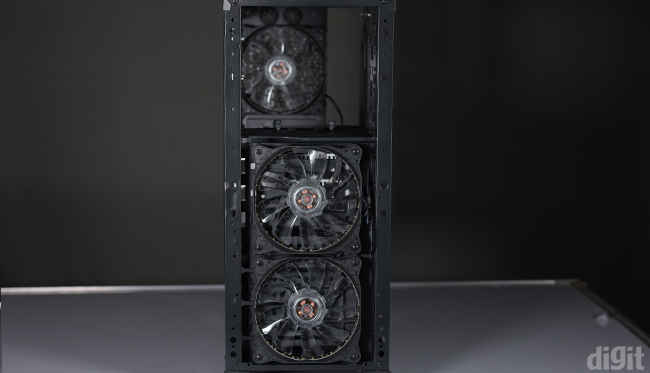
Let’s summarise all the aspects of the Premier before giving out our final verdict. There are two 120mm fans on the front panel and one 120mm fan on the back panel installed which are incredibly bright with white LEDs. It would have been great if there was a button to switch on and off the LED lights on the fans but that’s asking too much at this price. The top panel contains all the IO ports including two USB 2.0 and one USB 3.0 ports, audio out and mic in ports, power and reset button, and an SD/microSD card slot. There are two mounts on the top panel for two 120mm fans, but we were successful in installing only one otherwise the top panel wouldn’t attach.
You will be able to install a GPU with a maximum length of 270mm. If your GPU is longer (up to 320mm) then you will have to remove the SSD cage. There’s no room to install radiators anywhere in the cabinet which could be an issue if you're planning an upgrade to liquid cooling. With our test rig, the CPU touched 70 degree Celsius in our Prime95 stress test. The GPU was able to reach a maximum temperature of 65 degree Celsius in our Furmark benchmarking 1080p preset. Air cooling isn’t that great on the Premier in its factory-shipped state, and only if you have intensive workloads should you consider adding more fans. In real-world tests including casual browsing and gaming CS: GO, the CPU and GPU lingered around 55-60 degree and 55 degree Celsius respectively.
The low price and good build quality compensate for the poor cooling performance and average features of the cabinet. This results in a higher overall score. We would only recommend the cabinet if you were building a PC strictly for multimedia consumption, office work, and web browsing. If you are planning to build a budget gaming system, you should skip this cabinet.
Specifications
Motherboard form factor: ATX, Micro-ATX and Mini-ITX
PSU form factor: ATX standard (max. length of 225mm)
Front I/O: 1 x USB 3.0, Mic in and Audio Out, 2 x USB 2.0, SD/microSD card reader
Drive options: 3 x 3.5-inch HDD, 2 x 2.5-inch SSD, 2 x 5.25-inch ODD
Fan support: 2 x 120mm (front), 2 x 120mm (top), 1 x 120mm (rear), 1 x 90mm (bottom)
Radiator support: 360mm (front), 240mm (top), 120mm (rear)
Design: External and internal
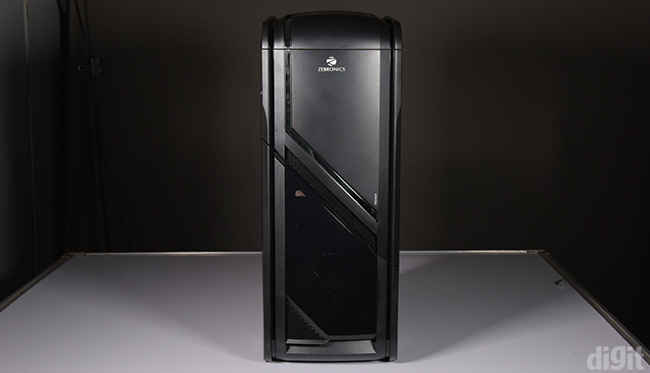
The front panel has an interesting design with a hinged panel that opens up to provide access to optical disk drives. There’s a black-tinted plastic panel on the bottom, with a small area covered with mesh for air intake. The front panel is easily removable, giving you access to the two 120mm fans. The fans have a white LED strip around them which makes them incredibly bright when turned on. It makes complete sense to have the tinted plastic panel on the front panel so that it doesn’t blind you every time you switch on your PC. There are no buttons to switch off the LED light on the fans. Both the front intake fans connect to the system using Molex cables.
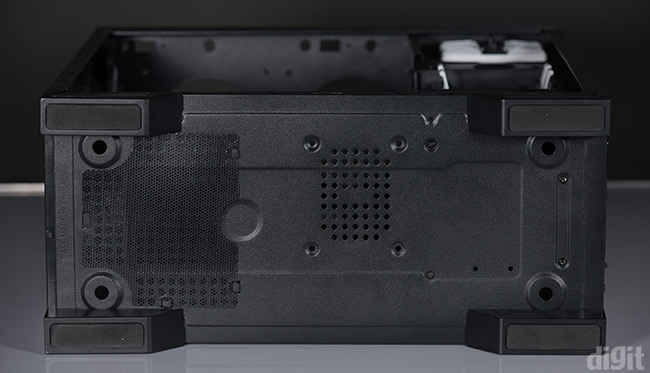
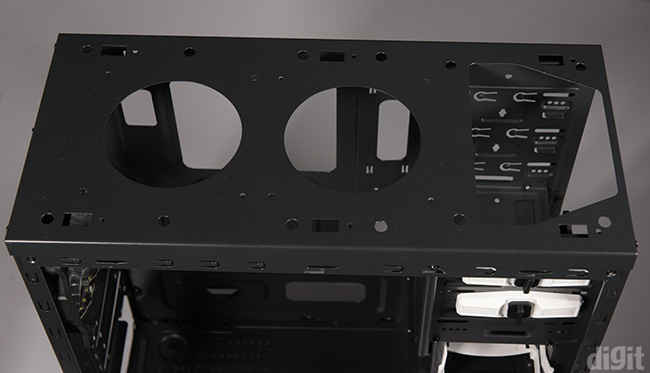
The top panel contains all the IO ports including two USB 2.0 and one USB 3.0 ports, audio out and mic in ports, power and reset buttons, and an SD/microSD card slot. SD/microSD card support isn’t common in cabinets and it’s a good addition to have. The top panel has a winged structure towards the back of air exhaust. It can be removed easily to access the two 120mm fan mounts. The bottom panel has huge rubberised plastic feet and a dust filter below the PSU area.
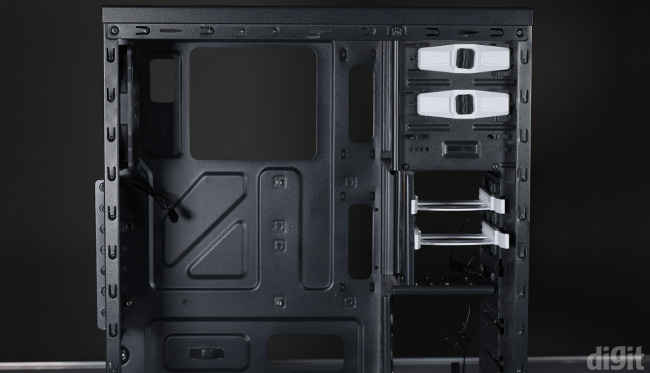
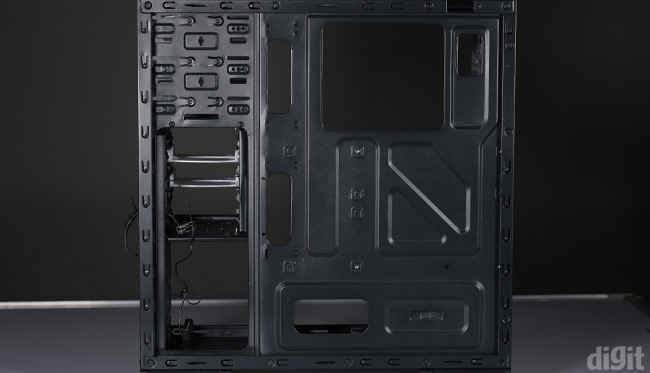
Inside the chassis, there’s a 90mm fan mount right beside the HDD cage. You will be able to install a GPU with a maximum length of something less than 270mm in the default state. It’s disappointing that there aren’t any fan mounts in front of the ODD cage since that area becomes useless if you aren’t going to use DVD/Bluray drives. The HDD cage is riveted to the bottom of the cabinet, leaving no option to remove the cage. This makes it impossible to install any radiators at the front. If you still wish to add a 240mm radiator at the front, you will have to remove the HDD cage completely. The installation of HDDs requires you to screw them to the slots. There is minimal support on the bottom in the storage slots, so your HDD will be suspended once you screw it to the cage. Speaking of the SSD cage, there is provision to support three SSDs but only two trays are shipped in the box which is surprising. Installing SSDs is completely tool-less and the quality of the trays should have better. The ODD drive slot supports two drives and it can be accessed from the hinged front panel. The installation is also completely tool-less.
Assembly and cable management
We didn’t face any glaring problems in the Premier while assembling our test rig inside it. Being a budget cabinet, there isn’t much scope for liquid cooling but you’ll be able to build a good enough system with this cabinet. So, if you have plans of upgrading to liquid coolers later, you can’t do much here. Another component upgrade that you need to keep in mind is your GPU. Installing a GPU longer than 270mm will require the removal of the SSD cage. This can be done with the two screws on the top of the HDD cage and two thumbscrews at the bottom of the ODD cage. By removing the SSD cage, you will be able to insert a GPU with a maximum length of 320mm. The top panel’s fan mounts should have been a little higher. We tried installing fans on them but were successful in installing only one on the second mount otherwise the top panel wouldn’t attach to the cabinet. Fans need to be installed below the top panel if they are thicker than 2.5cm and do keep in mind that you will have to install them before you install the motherboard.
You won’t get to enjoy much freedom in routing the cables and having a clean setup. If your CPU power cable isn’t long enough, you won’t be able to route it from behind the motherboard plate. There aren’t many cable-tie points on the motherboard plate. Just enough behind the middle grommets to tie down the main cables including motherboard power, SATA, and IO ports. Since the bottom part of the cabinet is completely open, you can’t simply stash away all the extra cables. Unless you don’t mind a mess of cables sitting between the HDD cage and PSU. Also, thanks to the windowed-side panel, if you’ve created a mess inside, it will only be visible from a top angle.
Test rig
Motherboard: ASRock X79 Extreme9
CPU: Intel Core i7-4960X
GPU: Sapphire Radeon HD 7790
RAM: Corsair Dominator 2x8GB DDR3 (16GB)
HDD: WD Red 2TB
SSD: Kingston SSDNow V300 (120GB)
PSU: Antec HCP-1000 Platinum
CPU Cooler: Noctua NH-L9x65
Temperature performance
The Premier ships with three 120mm fans, two installed on the front panel and one installed on the rear. Airflow coming inside the cabinet has a lot of obstruction because of the storage drive cages right behind the fans on the front panel. Even if you manage to install high-speed fans, you won’t be able to achieve optimal cooling because of the absurd obstruction. So there’s a lot of pressure on the rear exhaust fan to take out all the hot air circulating inside. Installing a high-speed aftermarket fan as exhaust will certainly help reduce the temperatures inside. In our synthetic benchmarks, the CPU settled at 29 degree Celsius with no load, while the GPU lingered around 36 degree Celsius. When the load test was run, the CPU touched 70 degree Celsius while the GPU touched a maximum of 65 degree Celsius.
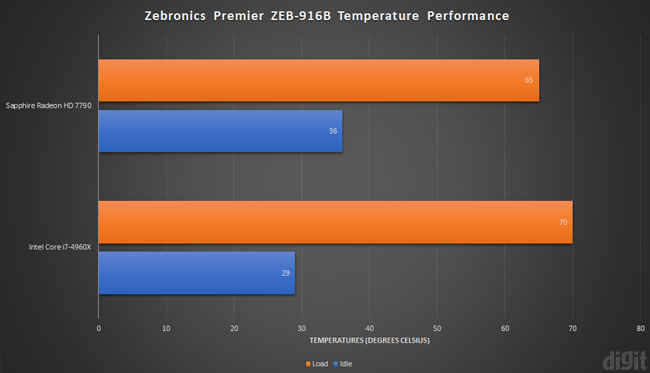
We expected such a result because of the design choices mentioned above. But when it came to regular real-world testing, the temperatures held just fine. Playing some CS: GO bumped up the CPU temperature to around 60 while the GPU kept fluctuating near 55 degree Celsius.
Abhijit Dey
A Star Wars fan and sci-fi enthusiast. When I'm not playing games on my PC, I usually lurk around the Internet, mostly on Reddit. View Full Profile


