The Jonsbo C4 delivers an aluminium exterior which is refreshing from all the cases with steel panels. And with a tempered glass side panel, you will be able to show-off all your components in full glory. The front panel fan mounts is another approach that Jonsbo has taken to further expand the aesthetics of the case. Even though it doesn’t do much in cooling the case, the rest of the options are enough to run a cool system. Overall, the case offers decent cooling but lacks behind in cable management. We struggled a lot while installing all the components, especially storage. After a lot of trial and error, we were able to assemble our test rig that didn’t hinder with the airflow. The poor choice of cutouts or the lack of it, made this a time consuming affair.
Our stress tests didn’t push the components to alarming temperatures. We were able to test the case in different air cooling configurations to find out the best one. A detailed analysis for these different cooling configurations can be found in the review. There’s enough support for AIO cooling solutions in the future but cable management is something where you might struggle again. With support for a reservoir and pump, you can also consider custom liquid cooling for your build.
Considering the price, the C4 is meant for enthusiasts who want a beautiful-looking case. Its new design approach hasn’t affected the temperature performance but it’s certainly a pain to assemble. You’ll be better off with longer cables on a non-modular or a fully modular PSU if you’re buying the case. Apart from the cable management dilemma, the case performs decently in the rest of the aspects and doesn’t offer anything extraordinary. However, a finished build with RGB (or without) lighting, along with the aluminium exterior offers an unmatched aesthetic to your system.

Packaging and accessories
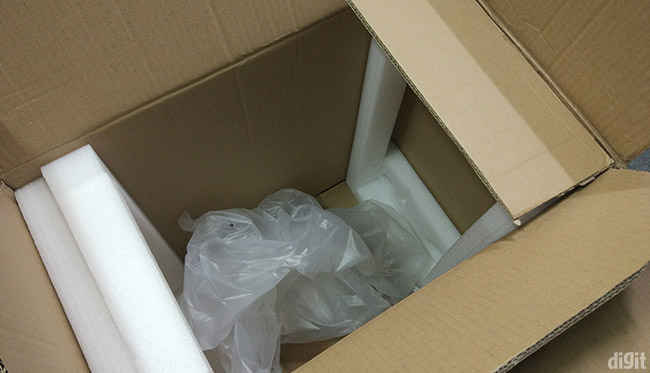
After tempered glass side panels started rolling out, we expect the packaging to be better than normal. The Jonsbo C4 packs the case within two styrofoams that does the job decently. However, by paying such a premium price and considering how fragile the package is, we would want better padding to absorb any kind of drop while delivery. Cooler Master’s high-grade packaging styrofoam is a great example.
There are enough screws included for all your components and it’s unlikely that you might run out of them. You will be able to install all the fan mounts using the screws shipped in the package. The accessory box only consists of five zip ties. We’ll speak more in detail about cable management in the case later and explain why more zip ties are required. There aren’t any HDD or SSD trays in the case but screw mounts. Rubber holders have been provided that need to installed in the holes before installing the storage drives.
Technical specifications
Motherboard form factor support: Mini-ITX, Micro-ATX, ATX
Power supply standard: ATX standard (max. length of 150mm)
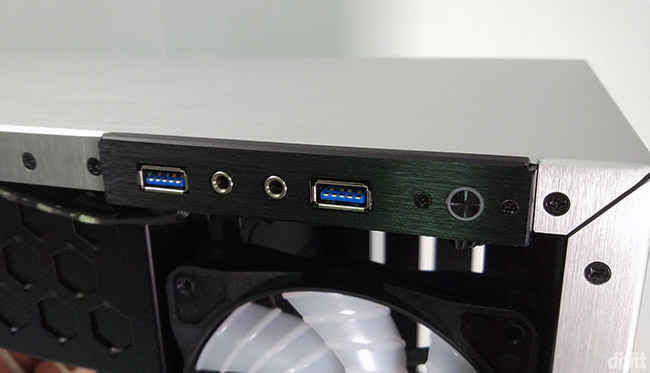
I/O ports: 2x USB 3.0, 1x microphone, 1x headphone, Power button
Drive bays: 2 x 3.5-inch HDD (2.5-inch SSD), 2 x 2.5-inch SSD
Cooling support: 3 x 120mm (front), 2 x 120mm (bottom), 1 x 120mm (rear)
Radiator support: Up to 360mm (front), up to 120mm (rear)
Clearances: CPU cooler – 167mm, Graphics card – 300mm
Dimensions (H x W x D): 434mm x 205mm x 449mm
Exteriors of the Jonsbo C4
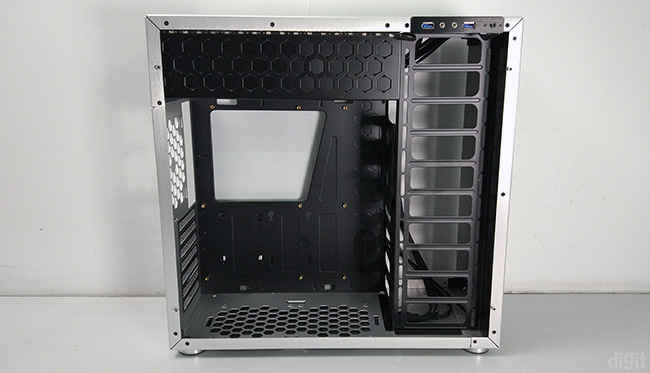
The Jonsbo C4 uses Aluminium on its exterior and we’ve got to admit, it looks beautiful. There aren’t any special design features, just shiny aluminium sheets on the front and top panel. This clean design comes at a cost of doing away with fan mounts on the top or front panel. Although there’s no provision on the top, the front panel’s air intake has been moved to the right side of the case. So, there are vents on the tempered glass side panel that goes on the right side of the case. There aren’t any dust filters on these vents. So, if you’re using the front panel as an inlet, you’ll be pulling in a lot of dust inside.

The front I/O ports are found on the left side of the case at the top. We prefer ports that aren’t placed on the top panel since it prevents dust from easily entering the ports. Surprisingly, there’s no reset button and now as we move into new case trends, we now expect case manufacturers to start including a USB Type-C port as well at this price range.
Tempered glass side panels are present on both the sides. The one on the right has a black opaque coating so that all the cabling behind the motherboard plate can be hidden. Both the panels use the four-corner mounting mechanism for attaching the panels. Although this isn’t bad, it’s a little more time-consuming. This also means that if you need to access the interior, you will have to remove the entire panel.
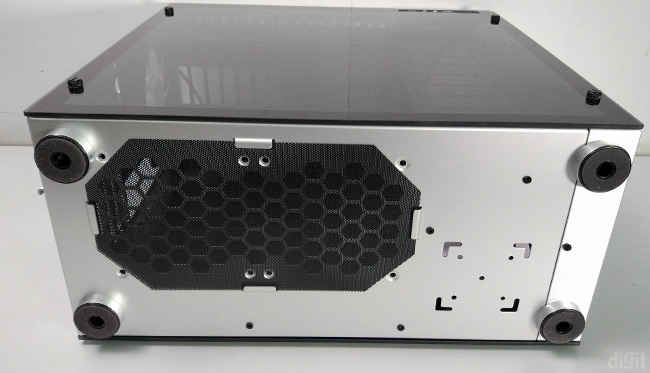
The rear of the panel includes the opening for the PSU on the top, the rear exhaust fan and the seven expansion slots for your PCI-e cards. On the bottom, you will find a cheap dust filter, the only one in the case. Even though it does the job, at this premium price we expected one at a better quality. This dust filter covers the two fan mounts on the bottom of the case. There are four feet lined with rubber at the bottom.
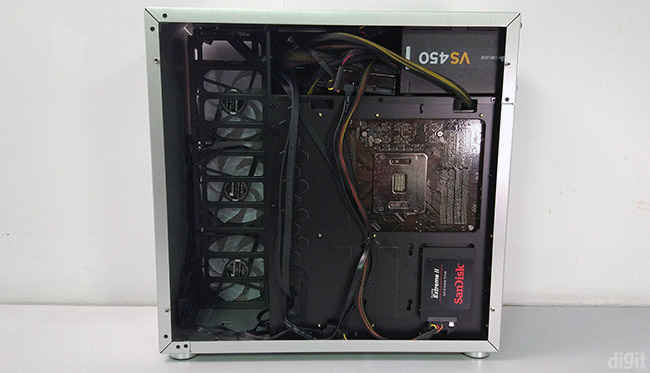
Inside the Jonsbo C4
Apart from all the aluminium on the exterior, you’ll still find steel in the motherboard tray, PSU shroud, fan and storage mounts. Jonsbo has taken a different approach by moving the PSU mount location to the top. In this design, the PSU fan might partially pull the hot air coming out of the CPU fan while the rest of it will escape from the rear exhaust fan. Essentially, the PSU might contribute to keeping the temperatures low inside the case. The 120mm exhaust fan is the only fan included in the case. Because of the PSU shroud on the top, there’s no space to install fans on the top panel. Instead, it has been moved to the bottom of the case.
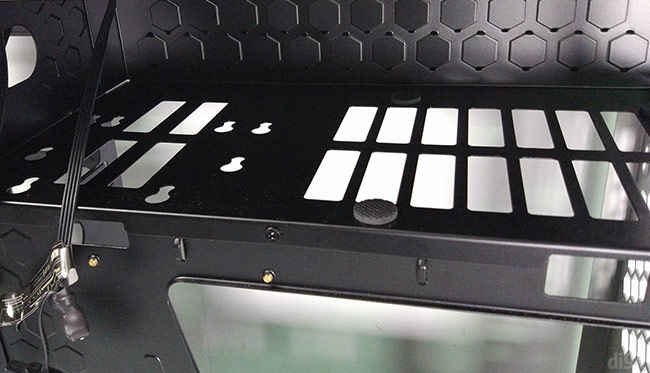
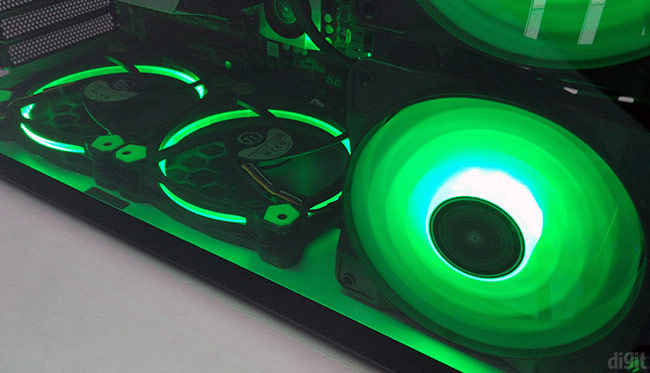
Another interesting design is the fan cage at the front. Instead of using the front panel, they have added a cage with fan mounts facing the side panel. It supports up to three 120mm fans. This mount can also support up to a 360mm radiator. There are reservoir mounting points at the bottom as well.
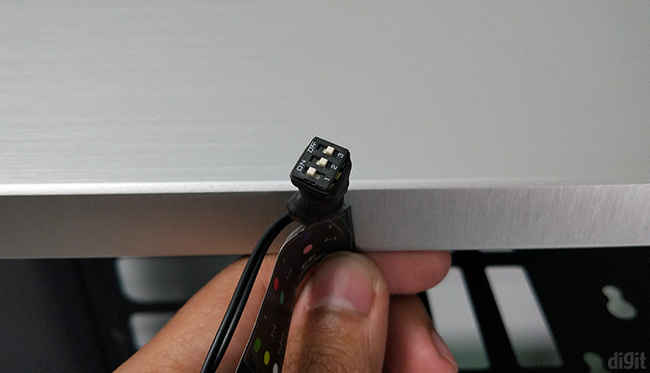
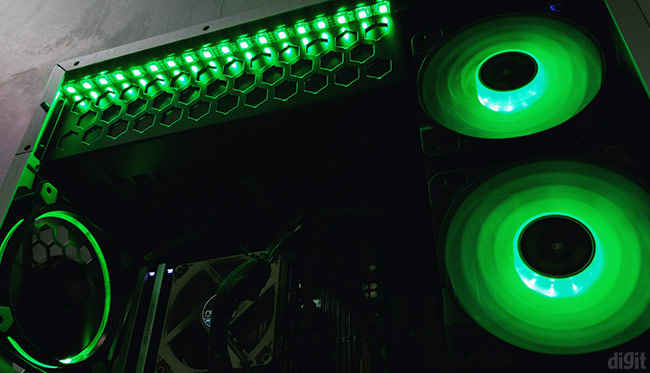
The C4 comes with an RGB light strip below the top panel. Our review unit’s strip was dangling when it had come, so we hope that it was the case with just our unit. The colours can be changed using a small module with three switches. What we didn’t like about it is that it can’t be controlled from anywhere else in the case. Every time you want to change the colour, you have to open the side panel in order to access it. A more convenient way would have been to include the lighting control on the front I/O ports.
There are two SSD mounts behind the motherboard tray towards the bottom. If you wish to use them then you have to install them before installing the motherboard since they are located behind it. This is poor design and Jonsbo could have simply gone for SSD trays attachable through thumbscrews. If you wish to remove your SSD later for whatever reason, you will have to remove the entire motherboard.
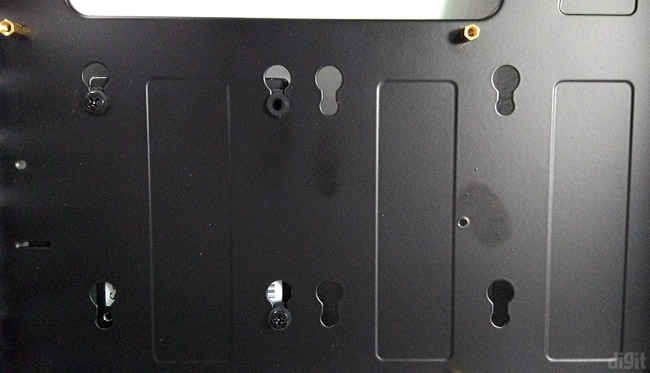
The PSU shroud also contains a storage mount but we would recommend you to avoid it and use this area to store the extra cables instead. If you choose to use this mount for your storage, you will also be blocking the cutouts where you could have routed certain cables from the PSU. Choosing the best routes for cables can be a pain since there aren’t enough tying points on the plate which is another major flaw. There’s also only one cutout on the plate and again, short cables will be a problem, especially for the 24-pin motherboard power cable. The fan cage has a storage mounting plate on the motherboard side but we you will need conventionally longer SATA power cables to reach it.
Installing the fans on the front cage is easy. The entire front cage can be removed if you aren’t keen on installing fans or radiators. This will also allow you to install longer graphics cards. However, this means you completely lose support for the three fans. One peculiar thing we noticed was that the case started vibrating when fans were installed on the bottom mount.
Testing methodology
Our PC case testing methodology was upgraded last month. The Corsair Obsidian 500D was the first case to go through the set of new tests. We are now focussing more on consistent peak temperatures rather than the peak temperature at a constant time instance. Along with tests being conducted in the default factory shipped state, we are now recording temperatures in the case's full air cooling potential. Our test bed is as follows:
CPU: Intel Core i7-4960X
Motherboard: ASRock X79 Extreme9
Graphics card: Sapphire Radeon HD 7790
CPU Cooler: Noctua NH-L9x65
RAM: Corsair Dominator 2x8GB DDR3 (16GB)
HDD: WD Red 2TB
SSD: SanDisk Extreme II (240GB)
Power supply: Corsair VS450
Every stress test tries to generate the maximum amount of heat in the components and inside the case. The CPU is running at its stock clock speed of 3.6GHz without any overclocking. However, the graphics card was overclocked to 1.1GHz to generate more heat while the fan speed was kept on auto mode. Before running the stress test, the assembled test bed is kept idle for 15 minutes. The ambient temperature in the room is maintained at 25 degrees Celsius. Apart from recording the temperatures from the component diodes, we measure the temperature at the rear exhaust case fan and graphics card exhaust, along with the CPU fan zone with a thermocouple. The CPU is put under stress using Prime95's In-place large FFTs over 12 threads that runs for 15 minutes. Then the graphics cards is put through a 15-minute FurMark custom test running at 1080p with anti-aliasing and burn-in switched off. We also test the drop in temperature after a constant time period, giving us a better idea of how good the case is in lowering the temperatures over time. To put the HDD and SSD under stress, we move a Steam backup of DOOM (roughly 56 GB) to and fro between them.
All of the above tests are repeated in different fan configurations to explore more about the cooling inside the case. The final test is conducted after all the fan mounts are populated while trying to maintain a balanced air pressure inside the case. We might try out different approaches if we notice an anomaly during the tests.
Thermal performance
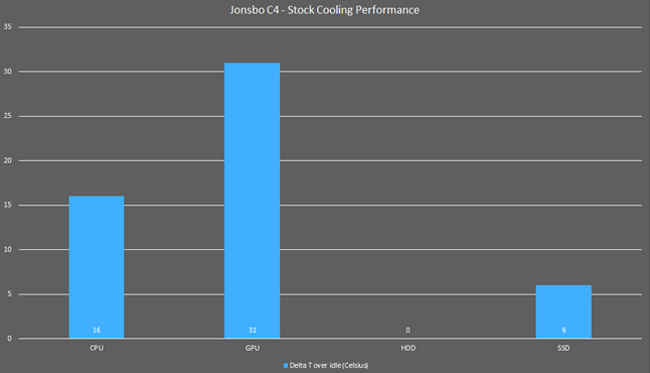
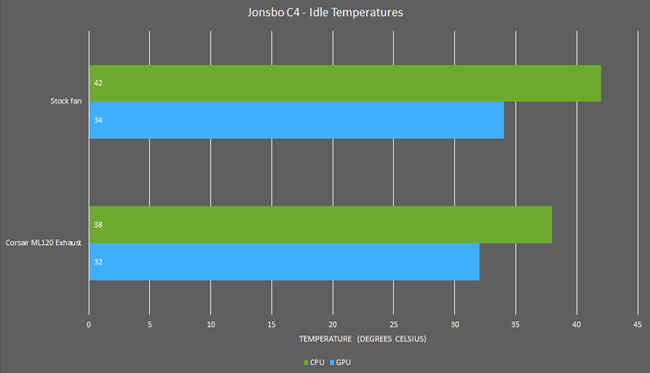
We tested the case first in its default state with the single rear 120mm exhaust fan that spins at about 1600-1900 RPM. The air intake is possible through the tempered glass side panel and the bottom fan mount. After leaving the system idle for 15 minutes, we recorded the temperatures across the components. The CPU idled at 42 degrees and the graphics card stabilised at 34 degrees. We’d like to mention that this is the second case undergoing our new testing methodology.
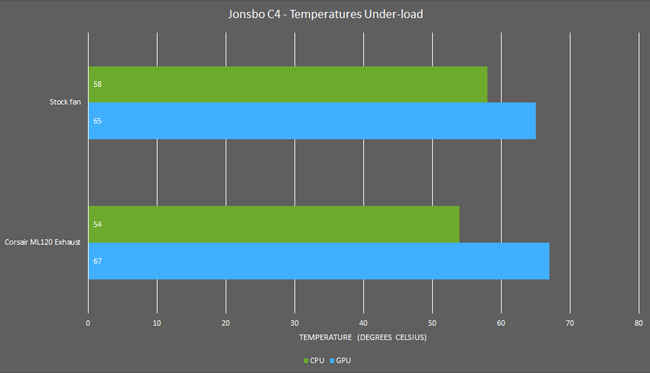
Compared to the Corsair Obsidian 500D, the CPU was hotter by just one degree but the graphics card ran cooler on the C4 by three degrees. This was achieved in spite of the Corsair case offering one fan configured as an intake fan. With just a rear exhaust fan, the C4 managed a cooler graphics card when idle. We think this is because of the fan vents at the bottom which happen to be really close to the graphics card even when installed in the first PCI-e slot. So, the graphics card’s fan could easily pull in cool air from the bottom. The Obsidian 500D had the PSU shroud underneath the graphics card, so it didn’t have any vents to pull cool air from outside. When the system was put on load, we saw a similar phenomenon. The CPU temperature rose to 58 degrees, the same as the Obsidian 500D. But for the graphics card, it touched 65 degrees whereas the Obsidian 500D pushed the temperature to 70 degrees.
We also wanted to find out which configuration would serve the best air cooling. Because of the design approach of a top-mounted PSU in the C4, there aren’t any vents on the top panel. Hence, there’s no scope of hot air leaving from the top. The only option is the rear exhaust fan. It won’t make sense to use the bottom mount for exhaust since hot air rises and there’s no way hot air will linger in that area. So, we used the two bottom fans for air intake. The three fans on the front cage could either be used for intake or exhaust. We started off in the configuration where the three fans were acting as intake and the bottom fans were also used for intake. This configuration created a really high pressure inside the cabinet with only the rear fan acting as an exhaust. There wasn’t much of a difference in the CPU temperatures. It was the same as the idle temperature with the single exhaust fan whereas, under stress, the temperature went up by one degree. However, the graphics card temperatures actually went up compared to the first default configuration. This was surprising to us since the graphics card was supposed to get more air from the two 120mm bottom fans. Whether it was idle or under stress, the temperatures were more than what we recorded in the default configuration, including the graphics card exhaust temperatures recorded with a thermocouple. The only explanation here could be that an open bottom mount allows the graphics card fans to pull in more air from the outside. This stays true for all the configurations as long as the two bottom mounts are acting as the air intake. However, the temperature difference is only four to five degrees and if that number bothers you, then you should keep the bottom mount vacant.
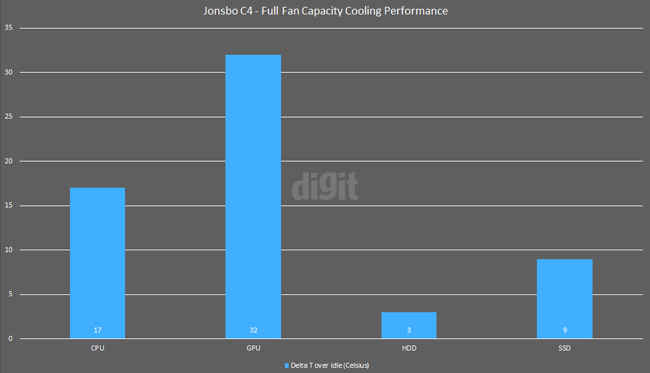
Coming to the three front fan mounts, we installed them as intake and exhaust. There wasn’t any considerable difference in temperatures in both the configurations. We replaced the rear exhaust fan with a high airflow fan and found a considerable difference in the CPU and graphics card temperatures when idle. However, it hardly affected the graphics card during stress testing. Our conclusion to testing the case in different fan configurations was surprising. You can achieve the best cooling by simply replacing the rear exhaust fan with a high airflow fan. Adding more fans to the other slots didn’t affect the temperatures enough to justify these extra fans. The rest of the fan mounts can, however, be used for aesthetic purposes. We admit that installing three fans on the front looks beautiful behind the tempered glass side panel.
Abhijit Dey
A Star Wars fan and sci-fi enthusiast. When I'm not playing games on my PC, I usually lurk around the Internet, mostly on Reddit. View Full Profile


