
The Haswell platform is finally upon us and as always we help you select the best Z87 board that meets your needs out of 21 contenders.
Intel announced its fourth generation of Core-i series of processors in the first week of June this year. Codenamed Haswell, this platform introduces a brand new socket: LGA 1150 which means you will have to buy a new board and processor combo, if you want to get the latest Intel platform. However, you can still use coolers of your older LGA 115x sockets.
The platform also introduces the Intel Express Z87 chipset which gives you upto six SATA III, 6Gbps ports and six USB 3.0 ports from two each, as seen on the Ivy Bridge or Z77 platform.
HOW WE TESTED
Motherboard performance is completely a function of its components. The higher specced the components, the better performance you will get. For the same chipset, the variation in scores is not much as will be evident from our scores. The difference is within the margin of error. This can be easily understood by the fact that benchmark scores from a Rs.10,000 board are very close to the benchmark scores from a Rs. 30,000 motherboard, give or take 5 percent. It ultimately boils down to the feature set you are getting with the motherboard, the build quality, ease of overclocking and the various ways in which you can overclock, among other factors. Keeping this in mind, we decided to not give any weightage to the performance scores.
Our Test Rig
Processor: Intel Core i7-4770K
SSD: Kingston HyperX 120GB SSD
RAM: 4x4GB Kingston HyperX @ 1866 MHz
Cooler: Cooler Master Hyper T4
Power Supply: Cooler Master Silent Pro 850W
OS: Windows 7 Ultimate x64
We ran the benchmarks and logged the scores for pure reference purposes. As you will see there is not much of a difference as the chipset is the same.
The layout of the board was scored, we checked if there was enough spacing around the CPU region to comfortably attach the CPU cooler and which way the SATA ports were pointing (those pointing up got a lesser score). We also noted the spacing between PCIe and PCI slots. If a dual slot card blocked the next PCIe slot, marks were deducted.
For build quality we noted the sturdiness of the heat sinks around the VRM regions and southbridge. Motherboards lacking a heatsink around the VRM region got lesser score, whereas those having an active cooling mechanism on the Southbridge scored higher. A board with all solid state capacitors got a higher score. Back panel I/O ports were noted and also the option to expand USB ports. Fan connectors, SATA connections and USB headers were also noted.
Overclocking is a key feature with Z87 boards. We overclocked most of the boards to at least 4.5GHz at the very least. Overclocking prowess can again vary and is subject to parameters such as what cooler you are using, how good the air-flow of your cabinet is, whether you are using air cooling or liquid cooling. We have played with just the basic settings such as BCLK and multipliers, but you can also do voltage tweaking to get a higher overclock. Features such as overclocking utilities, onboard chip additions, were taken into consideration. A board having more options to overclock and tweak got a higher score.
Also the BIOS user experience was noted. Since most BIOSes these days have a graphical interface, we laid stress on the ease of navigation with the help of home screens, profile settings, shortcut keys and ease of changing settings. We did a thorough checking and testing (wherever applicable) of the feature set offered by a motherboard and based on the price have decided on the winners. To check out our list of winners across form factors and price-points, scroll to the bottom of this story. Otherwise, here’s what all we discovered when testing these motherboards.
Under 10k
.jpg)
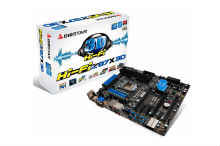
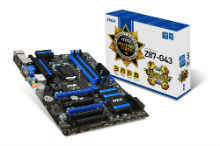
The ASRock, the Biostar & the MSI boards (from left to right)
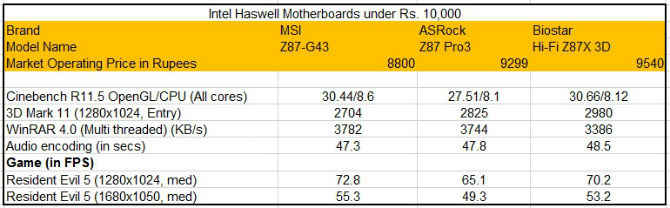
Benchmarks scores & price of the boards under Rs. 10K
Of the three boards we looked at in this category, the one which stood out was the ASRock Z87 Pro3 thanks to its breadth which was visibly shorter than the other ATX heat sinks around the VRMs. The only justification we can think for the limited breadth is that it’s meant for systems that have a small cabinet size. The Hi-Fi Z87X 3D was the only board we got from Biostar. It comes with three PCIe x16 slots and supports CrossFireX. The heatsinks aren’t that impressive when compared with the MSI Z87-G43. The two things that we liked about Z87X 3D were the presence of an LED POST code readout, dedicated buttons for start and reset and all SATA ports pointing sideways instead of upwards. Considering the other boards lack these features, the Biostar gets an edge over them.
The MSI Z87-G43 comes in a blue and black design. It comes with two PCIe x16 slots which support only CrossFireX with x8/x8 speeds. The two upwards facing SATA ports are a bit of an eyesore on this otherwise well laid out board.
MSI Z87-G43 offers a utility called Command Centre which can be used on the desktop as well as an app on your Android smartphones. It allows you to monitor your system settings and tweak them from either platforms. Although the MSI board does not have a OC Genie physical button, you do get a virtual OC Genie button in the BIOS which overclocks your system. The best way to overclock is still via the ClickBIOS 4 screen. The A-Tuning utility of the ASRock board isn’t as elaborate as the Command Centre, but gets the work done. Overclocking using the OC Tweaker is a breeze – you can either do it using the presets or you can manually tweak settings with the sliders. Overclocking via the BIOS is also pretty quick. The Biostar utility T-Overclocker wasn’t as impressive as the ones seen on other boards in this segment. Just like MSI, the Biostar board also comes with a BIO-Remote 2 app which allows you to not just overclock from an app, but also use your mobile device as a remote control to work with your system. We could overclock the processor on each of the boards till 4.6GHz getting a comfortable 20 percent boost in Cinebench R11.5 readings. the scores were nearly similar except in gaming where the ASRock Z87 Pro3 gave comparatively lower scores – 5 fps lower.
10k-15k
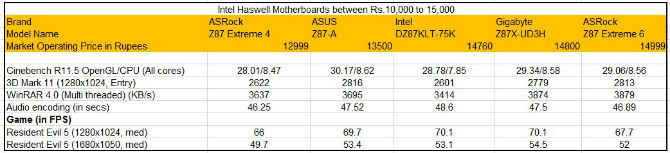
Benchmarks scores & price of the boards between Rs. 10K to Rs. 15K
This category will be important, as we feel most volumes will be selling within this price bracket for the new platform. Let us start off with the Intel DZ87KLT-75K which is the last motherboard manufactured by Intel. This series 8 board is Intel’s swansong as far as desktop motherboards go. As compared to the Z77 chipset based Intel DZ77GA-70K, the DZ78KLT-75K looks quite different. For starters, the skull embossed heatsink on the southbridge and blue coloured PCIe slots are absent. Heatsinks around the VRM section are better than the last generation. While there are eight SATA ports, dedicated power/ reset buttons and dual two-digit POST code readouts, we were not impressed with the display outs – just one HDMI port. It is the only board in this segment which comes with a Thunderbolt port. Along with the on-board connections, it also bundles in a WiFi / Bluetooth module. The board is well laid out with enough clearance around the CPU region and enough spacing between successive PCIe x16 slots.
Coming to the two ASRock boards – Z87 Extreme 4 and Z87 Extreme 6. Both the brown coloured boards are well laid out and do not look too flashy. The Extreme 6 of course has better heatsinks, more number of SATA 3 ports and larger power/reset buttons. The PCIe x16 ports on both the boards are both rated as x16 for single card, x8/x8 for two cards and x8/x4/x4 for three cards. While the Extreme 4 has two PCIe x1 slots, the Extreme 6 has a single PCIe x1 slot and the space between the PCIe x16 and PCI slot is filled with an mSATA port. Both the boards apart from having the Realtek ALC1150 audio codec, also has a pair of TI NE5532 headset amplifiers which supports up to 600 ohm headphones. Both boards have isolated audio sections to help prevent digital noise from the board affect the analogue sound signals. Both boards come with an HDMI-in port which allows you to feed two inputs to your monitor and switch between your system and the other input. So, for instance, you can connect your PlayStation to use the monitor and can switch to your system using a hotkey.
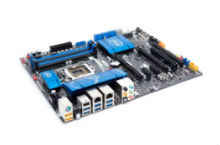
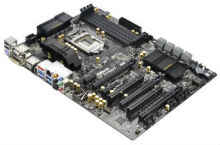
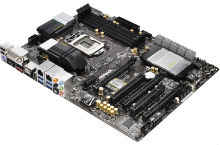
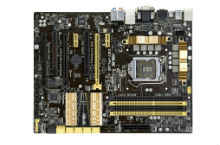
The Intel, the ASRock Z87 Extreme 4 and Extreme 6, the Asus and the Gigabyte boards (clockwise from top left).
With the Z87-A, ASUS is going in for a new colour scheme – black and golden/yellow as opposed to the blue coloured theme on the mainstream boards from the previous generation. The Z87-A has minimal heatsink design on the VRMs and the south bridge, even the arrangement of the SATA ports was a bit unconventional – only one double SATA slot and four single-SATA slots.The layout is quite decent with enough room around the CPU region and PCIe x16 slots also have at least one other slot between them to easily take in a dual-slot card without blocking the neighbouring PCIe x16 slot. Although it lacks power/reset buttons, it has buttons for checking DRAM and the DirectKey allows you to go to BIOS on rebooting without any need to press Del key repeatedly.
Finally we have the Gigabyte Z87X-UD3H which has an understated but lovely matte-black colour. It is well laid out and has dedicated power/ reset and clear CMOS buttons, sturdy looking heatsinks, eight SATA ports and two USB 3.0 internal connectors. Beside the SATA ports you will notice a SATA power connector for providing additional power to the PCIe slots when you are using a three-way GPU setup.
All boards in this category successfully overclocked the processor to 4.6GHz and gave around 20 per cent boost in readings. When it came to bundled utilities, we felt that the ones from Gigabyte and ASUS were much superior. ASUS’s AI Suite III offers lots of options to monitor and tweak settings. Gigabyte have revamped their tuning utility as well, which has a more Windows 8-tile like look and feel. It provides the option to update BIOS, control fan speeds, overclock and so on from the same parent utility. Even Intel’s Extreme Tuning Utility was a great application for overclocking.
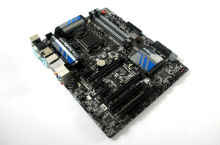
15k to 20K
Benchmarks scores & price of the boards between Rs. 15K to Rs. 20K
This segment had two boards each from ASUS and MSI and one board from ECS. In terms of performance there isn’t much of a difference from other segments, but with these boards you get additional features such as extra SATA ports, USB 3.0 ports, extra PCIe 3.0 slots and so on which enable you to build a high-end rig.
Let us start off with the ECS Z87XH3-A2X Extreme which is also called the Gank Machine. It has a very interesting passive cooler which also has a small fan on one side. This Qooltech V heatsink is connected to the southbridge heatsink via a heatpipe. The chipset heatsink is intricately designed for faster heat dissipation and has a temperature sensitive sticker. It has a plethora of buttons on the lower corner for power/reset, ROM backup, overclocking and so on. It also packs in an mSATA port in the space between the heatsink and the buttons.
MSI had two very different boards – MSI Z87 MPower targeted at overclockers and the MSI Z87-GD65 for gamers. The Z87-GD65 Gaming board looks quite attractive with its black/maroon colour tones (with the maroon accents seen only on the heatsinks) and the impressive sculpted dragon on the southbridge heatsink. The heatsinks are elaborately designed to dissipate heat faster. The MSI Z87 MPower on the other hand has a black/yellow colour tone with yellow seen on the heatsinks which have a comparatively simpler design as compared to the gaming board. In terms of the layout, both the boards have identical number of PCIe slots but on the MPower board, the mSATA slot is present between the first two PCIe x16 slots whereas on the gaming board, the mSATA connector is present before the first PCIe x16 slot. The number of physical buttons on the MPower boards exceeds those on the GD65, but both come with the OC Genie button for overclocking to preset values. The audio section on the MPower board is isolated whereas it isn’t on the GD65 which we found a bit strange. We liked the fact that the USB 3.0 connector on both the boards is placed at 90 degrees to the board.
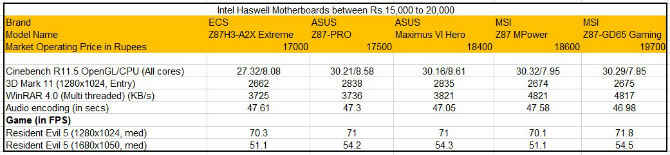
The MSI Z87 MPower board.
We also looked at two Asus boards – the Z87 Pro and Maximus VI Hero. The Z87 Pro comes with the black/yellow colouring seen on the Z87-A board but the heatsinks on Z87 Pro are more elaborate. The board appears quite dense and the layout is good with enough clearance for the CPU cooler and enough spacing between PCIe x16 slots.The Maximus VI Hero is a notch below the Maximus VI Extreme in the Republic of Gamers (ROG) hierarchy. The Hero has the typical red/black theme, sturdy heatsinks, eight SATA ports,dedicated power reset buttons among other things.
In terms of overclocking the ASUS boards were quite impressive with the Hero taking the Intel Core i7-4770K to 4.72GHz. With the ECS board we noticed a peculiarity while overclocking. The ECS board bundles an overclocking utility called eOC which wasn’t really that helpful as it was just showing voltages that too of components outside the processor such as RAM, chipset and so on. We could overclock the processor using Intel’s Extreme Tuning Utility. But despite setting all cores to, say 46x which gave a speed of 4600MHz, the processor speeds fell to 4400MHz while running the Cinebench R11.5 benchmark. This was noted on all overclocked frequencies.
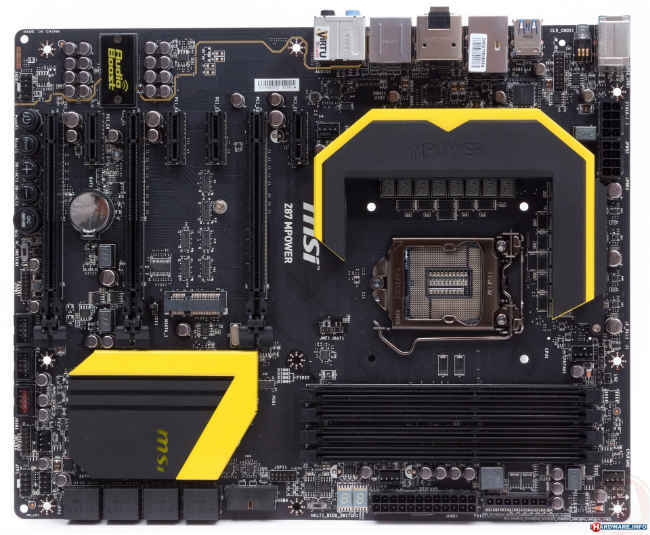
Over 20k
Benchmarks scores & price of the boards above Rs. 20K
This segment is for the niche users who know exactly what they want from their systems. Since all boards cost upwards of 20k, they are packed to the gills with features and are expected to come with a lot of bundled goodies.
The Gigabyte G1 Sniper 5 has come to be associated with gaming just like the ROG for ASUS boards. The board comes in the traditional black/green colour tones with a beautifully designed heat sink which also offers active cooling.
The heatsink around the VRM is connected to the southbridge. Tube connectors are also present on the heatsink to further help dissipate heat if you plan to use liquid cooling solutions. The G1 Sniper logo on the southbridge heatsink looks impressive as well. The audio section which uses Creative audio processors, is the USP of the board as it is the first board to introduce an audio section which has removable operational amplifiers for analog headphones. Gigabyte also bundles in two Op-Amps along with the board but you can add your own. The audio section as expected, is isolated from the rest of the board. Dual gigabit LAN ports with one of them being controlled by the Killer E2200 processor is another feature targeted at LAN gamers. It also bundles in an 802.11n WiFi and Bluetooth module which fits in one of the PCIe x1 slots.
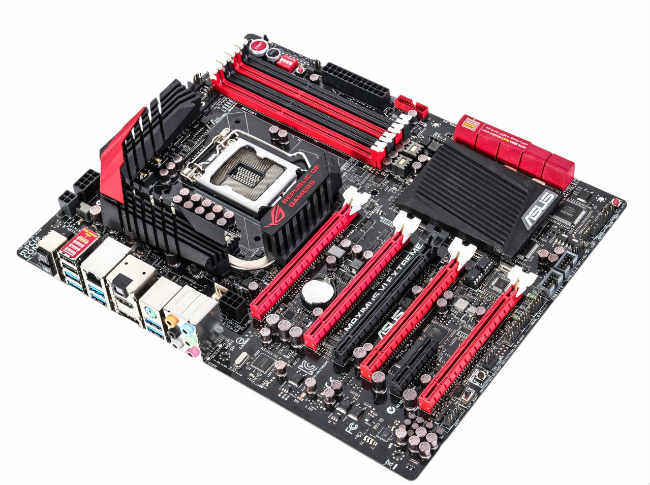
The Asus Maximus VI Extreme board
The Maximus VI Extreme is the flagship ROG board from ASUS and packs in more features than we could count (figuratively speaking, of course). There are five PCIe 3.0 x16 and you will need to refer to the manual to check which slots need to be used based on the number of cards you have. It has PCIe slot controllers present just behind the memory modules. So, in case you do not want to use all the four graphics cards connected to your system, you can switch certain PCIe x16 slots off. There are voltage readout points just in front of the power/reset buttons.
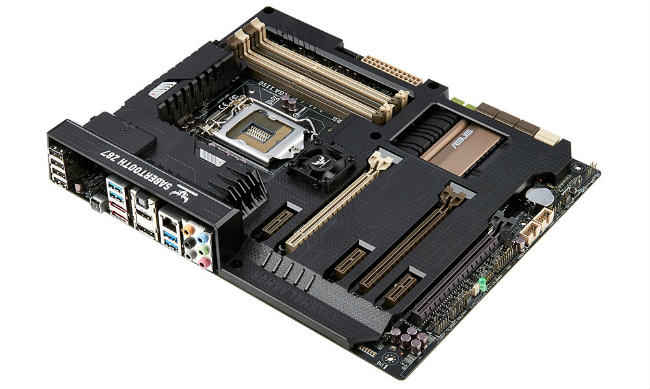
Of the other two ASUS boards the first is the Sabertooth TUF series board which comes with a 5-year warranty. The board has similar design elements from the previous generation which includes the thermal armour, brown coloured memory and PCIe slots. The armour has air flow valves around the VRM region. There are no buttons on the board apart from the MemOK button just behind the memory slots. There are three thermal sensor pins located just beside the USB connectors which are connected to thermistors. You can monitor temperatures of the CPU and GPU regions on the Thermal Radar utility. The board also bundles dust defenders which protect your PCIe and DRAM slots and two minute fans which can either be placed at the backpanel IO. The board also has a strengthening plate on the other side for giving more stability to the board and prevent it from bending.
The ASUS Z87-Deluxe is the flagship board meant for enthusiasts who do not want all the bells and whistles associated with an ROG board. It comes with elaborate heatsinks, ten SATA ports, on-board Wi-fi and Bluetooth adapter and three PCIe x16 slots. It supports 802.11ac standard which makes your system future proof to an extent as 802.11ac is the successor to 802.11n. It comes with the ‘Dual Intelligent Processors IV’ moniker which allows you to tune your system for fan control, power control and energy efficiency. When you overclock the processor, the 4-way optimisation process optimises the fan speeds, energy efficiency, power ratings and runs on the fly stress tests to get a stable overclock.
Since this category of boards is meant for the enthusiast crowd overclocking was a breeze and we comfortably scaled the 4.7GHz mark on the Intel Core i7-4770K. The Maximus VI Extreme offered the most number of ways to overclock your system some of which may seem a bit roundabout to some.
MicroATX boards
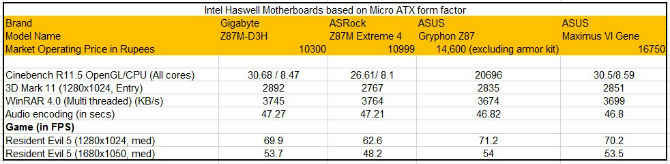
Benchmarks scores & price of Micro ATX boards
This is one segment which is quite interesting if seen from the perspective of system builders who are looking at a compact system. Not everyone has the luxury of space to house full tower cabinets, in such cases these boards with the microATX form factor cabinets are a good alternative. Of course, for those looking at an even more compact build, always have the option to use miniITX boards – with or without an on-board processor. This time around we decided to have a separate category for these boards. We had two regular boards from ASRock and Gigabyte each, one gaming related and one high warranty one from ASUS.
The ASRock Z87M Extreme 4 is the younger sibling of the Z87 Extreme 4 and follows all the design philosophies seen on it. The heatsinks are quite good with golden accents and it has three PCIe x16 slots. The audio section is isolated from the rest of the board as is seen on its ATX cousins.
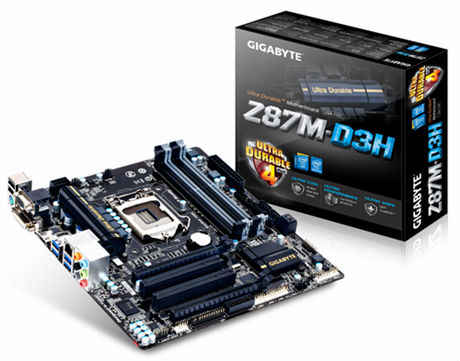
The Gigabyte Z87M-D3H looks a bit similar to the ASRock Z87M Extreme 4 except for the golden coloured capacitors and more PCIe x16 slots and the comparatively chunkier build of the latter. Although the SATA ports point upwards, the only consolation is that they are located behind the DIMM slots so the HDD SATA cables will not interfere with longer graphics card.
We also checked out two interesting micro ATX boards from Asus – Z87 Gryphon and Maximus VI Gene. The Z87 Gryphon is the first TUF series board in the microATX form factor. The visual DNA is very similar to its elder sibling, the Z87 Sabertooth board – brown coloured PCIe and memory slots, intricately designed heatsinks and absence of any on-board buttons. The Gryphon board does not come bundled in with the Thermal armour that has come to represent Sabertooth boards since the last couple of generations. But you do get the option to buy the Gryphon Armour kit which is sold separately which has the thermal armour and all the PCIe slot covers, port protection pads and thermal sensor probes among other things. The board has three thermal sensor pins which give temperatures on the graphics card, HDD/ SSD and CPU.
Finally we have the ASUS Maximus VI Gene which is a ROG board in a microATX form factor. The Gene series of boards has been a good value proposition for gamers who want an ROG board, albeit within a limited budget. It has the same red and black coloured design which we have come to adore and the board layout is quite dense as compared to other boards we have seen in this segment. The heatsinks are quite sturdy and well designed, there are dedicate power/reset buttons and the audio section is isolated from the rest of the board. The board also bundles in a mPCIe combo card for on-board WiFi and Bluetooth.
When it came to overclocking, we did not have issues with any board in this test. The overclocking related utilities with the ASUS boards are much more detailed than the ones on the other boards. For instance, the ASUS Ai Suite III has an overclocking setup where the program after overclocking the system tunes other aspects such as fan speeds and energy and so on. Gigabyte have also revamped their overclocking utility which comes with some presets as well as manual overclocking options. We could easily take the Intel Core i4-4770K to 4.6GHz and slightly higher with the ASUS Maximus VI Gene and ASRock boards.
ASRock Z87M Extreme 4 features the Home Cloud feature which allows you to remotely access your system and stream content from it. Apart from this it has its proprietary XFast 555 feature which speeds up RAM, LAN and USB speeds and also the Dehumidifier function which dehumidifies a system that hasn’t been used for a long time, before fully powering it on. ASUS Maximus VI Gene supports a feature called Sonic Radar which basically gives you a visual direction of where sound is coming from while you are playing a game. You can further prioritise sounds that you want to hear over others – such as bullet shots, footsteps and so on. There are four optimised game presets based on major FPS games and six sound effects are detected in all.
SIDENOTES:
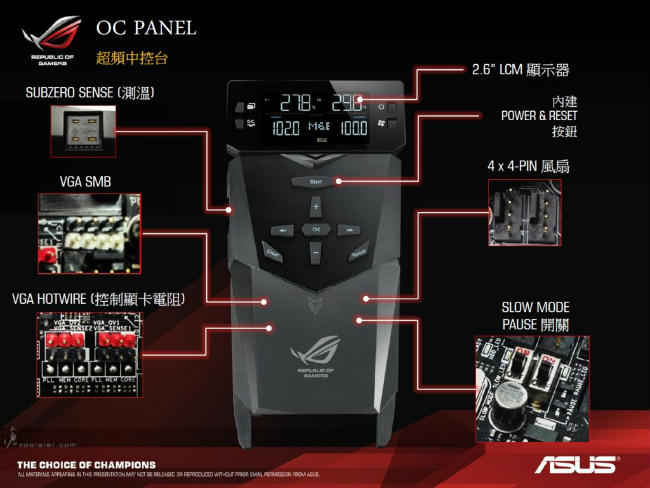
Asus ROG OC Panel
The OC Panel is an accessory that is bundled with the ASUS Maximus VI Extreme board. It has a lovely black/gray coloured body, a 2.6- inch screen, a stand (if it is used externally) as well as a 5.25- inch bay bracket if you plan to house the panel within your cabinet. The screen can rotate by 90 degrees which allows it to be easily mounted in the 5.25-inch bracket. On the left hand edge it has a Sub-zero sense temperature monitoring tool meant for the LN2 crowd. The OC Panel offers real-time monitoring of various parameters such as CPU clock speeds, voltages, fan speeds and so on. There are four buttons: Normal/Extreme mode switch; One-click CPU level up; Power button and FanSpeed controller. Apart from this there is the directional pad on the front face of the OC Panel. Opening up the OC Panel reveals a circuitry which has four fan connectors, extra resistors and capacitors for VGA mods. The Panel is powered either by an OC panel connector (if used as an external monitor) or by a SATA power connector. Monitoring statuses was a breeze and in the extreme mode we were able to adjust BCLK and CPU ratio on the fly. The display is quite sharp, but we found the limited space alloted to debug code and scrolling notifications a bit annoying. On the whole, it is quite an innovative accessory.
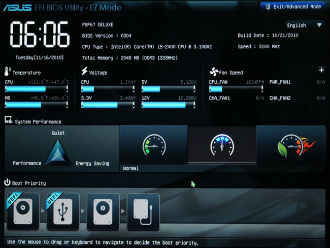
UEFI BIOS
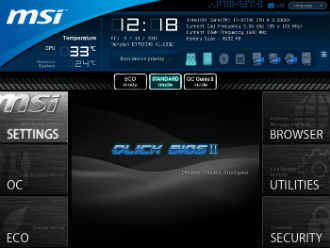
For the Haswell platform all boards that we tested had UEFI BIOSes, though each one was different in some way or the other. The MSI Click BIOS 4 implementation was noteworthy here: it has a main home page which is neatly segregated into various parts letting you quickly access settings, load profiles, flash BIOS among other things. The board explorer option is similar to the 3D BIOS we had seen in previous generation Gigabyte BIOS. It basically gives you an overview of your board and the components that can be tweaked in that particular area. Hardware Monitor allows you to set fan control speeds and monitor other relevant settings. The Click BIOS has different colour themes for different boards (yellow for MPower, red for Gaming series boards and blue for the mainstream ones). Navigation is a breeze and we did not notice any lag while using the mouse.
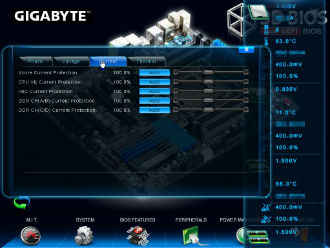
Gigabyte have completely revamped the UEFI BIOS and have thankfully done away with the 3D BIOS. The new BIOS looks quite impressive and you can customise the way it looks – set a background, add a different colour theme, set which settings come up front, go back to the classic BIOS design if you so want and so on. The homepage has the CPU status on the left and the system status on the right hand side with the BIOS details below and voltage, fan speed and temperature graphs up top. If you are not interested in these details, you can opt for a lower resolution mode which just shows the BIOS menus.
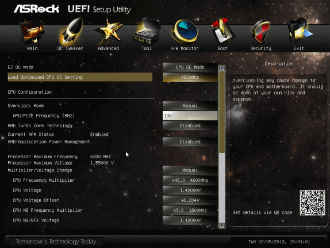
ASUS have taken most of the elements from the previous generation of UEFI BIOSes and it still is quite functional. ASUS have added some additional features such as a list of all the changes made before you exit the BIOS along with the short cut keys that were present. It comes with a home page which gives you a quick view of all the necessary settings and statuses. You can even set XMP profiles and adjust fan speeds from the homepage itself. The look is different for the ROG boards and other boards, but basic navigational design is the same. The ‘My Favourites’ section allows you to add in your most commonly used settings under one tab for quick access. With different ASUS boards, you get different colours and the number of tweaking options increase.
Intel had impressed us with its UEFI implementation in the last generation and it continues to impress this time as well. Apart from the home page it has other menus and you can also customise your home page by selecting your preferred page. The cooling tab has some colours based on the values being depicted and some pages have further sub-pages making navigation seem a bit intimidating. But on the whole for someone who loves to tweak a lot, the Intel Visual BIOS has lots of options.
The ASRock, ECS and Biostar UEFI BIOSes are quite ordinary when compared to the ones above. Sure they have some design element associated with them, but little touches such as shortcuts, customisations, separate home pages are absent. You still have to navigate through the tabs to get to what you want. Biostar has the menu options on the bottom whereas the CPU and memory status on the left hand side. It seems as if Biostar is being different for the sake of being different without any thought process.
The UEFI BIOS interfaces of MSI, Gigabyte, ASRock & Asus boards (clockwise from top right).
THE WINNERS’ CIRCLE
In the Under 10k price bracket, the Biostar Hi-Fi Z87X 3D provided a lot of features for its price and offered good value for money. The MSI board comes a close second.
For the 10k to 15k price segment, there was a close fight between the ASRock Z87 Extreme 4 and the Gigabyte Z87XUD3H. Both offer a very good board, wonderful overclocking potential and pertinent utilities. But due to the price difference, the ASRock Z87 Extreme 4 would be the one to buy. Having said that, the Gigabyte Z87X-UD3H is an equally good board, especially if you want onboard Wi-fi.
In the 15k to 20k price segment too two boards finished very close. The ASUS Z87 Pro and MSI Z87 MPower are both good boards, but the MSI Z87 MPower despite coming at a higher price point offered a better value proposition than the other and is therefore the one to buy. The Asus Maximus VI Extreme is also worth considering as this board offers the best features of the lot, multiple ways to overclock the system, an innovative monitoring and tweaking tool in the form of the ROG OC Panel and so on.
In the above 20K category, the Asus Z87 Sabertooth board is the pick considering it comes with a five year warranty and is priced lower than the ASUS Z87 Deluxe.
As far as the MicroATX boards go, the Gigabyte Z87MD3H is the one you should buy due to its lower price point that makes it the best value for money proposition. If money is not an objective for you, but you are keen to get a microATX form factor board to build a gaming rig, then the Asus Maximus VI Gene is worth considering as well.