How to setup NVIDIA Reflex
NVIDIA Reflex is a bouquet of technologies designed to measure, analyse and help reduce input lag to give gamers a better experience. In the previous article, we explored the different kinds of latencies that gamers would likely experience and looked at how NVIDIA Reflex can help reduce system latency. In this article, we’re going to explore how you can setup NVIDIA Reflex on your PC and improve your gaming experience.
What you’ll need for NVIDIA Reflex?
The reduction of latency will vary from system-to-system since there are a lot of variables and following the optimal method will help you reduce system latency the most. Let’s look at the games that support NVIDIA Reflex, the peripherals that work best with the SDK, all NVIDIA GPU families that are currently supported and the displays which work best with all of the above.
NVIDIA Graphics cards that support NVIDIA Reflex
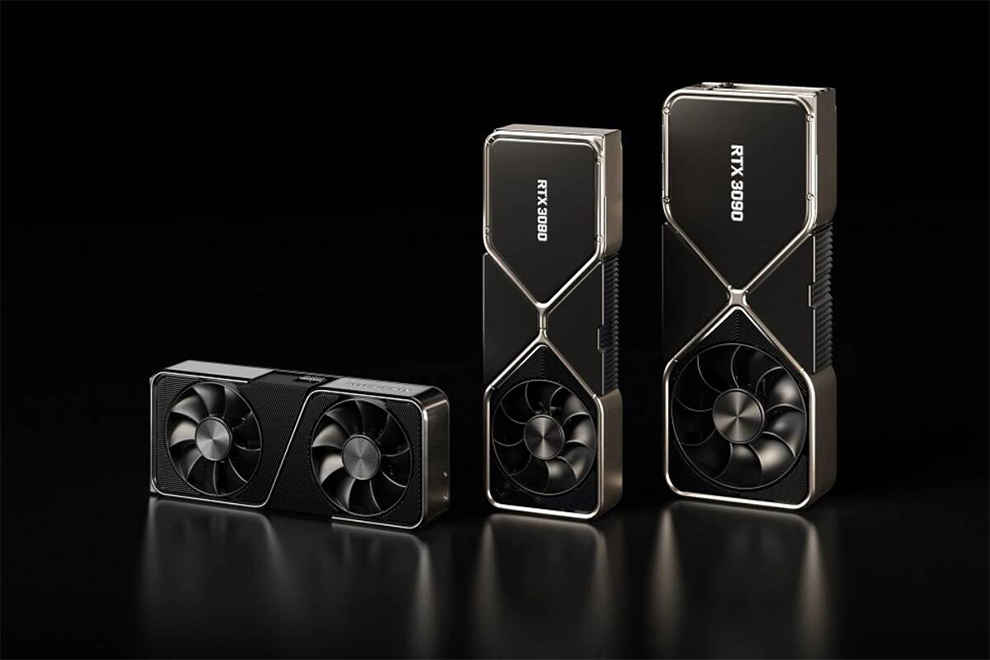
NVIDIA has stated that all graphics cards from the GTX 900 series onwards will support NVIDIA Reflex. This includes:
- NVIDIA GeForce GTX 900 Series – Maxwell Architecture
- NVIDIA GeForce GTX 10 Series – Pascal Architecture
- NVIDIA GeForce GTX 16 Series – Turing Architecture
- NVIDIA GeForce RTX 20 Series – Turing Architecture
- NVIDIA GeForce RTX 30 Series – Ampere Architecture
If you have any NVIDIA Graphics card from the above families, you should be able to enable NVIDIA Reflex in supported video games. Speaking of which, let’s look at all the games that are currently supported.
Video games that support NVIDIA Reflex
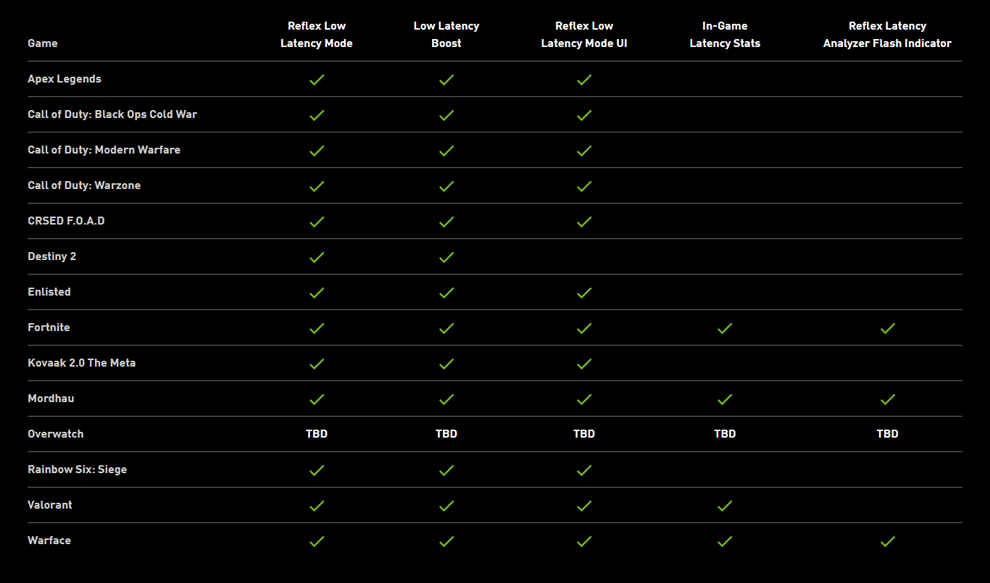
NVIDIA Reflex relies on game developers to implement the NVIDIA SDK into their video games. To this end, here’s a list of all games which have implemented NVIDIA Reflex at the time of publishing this article – Apex Legends, Call of Duty: Black Ops Cold War, Call of Duty: Modern Warfare, Call of Duty: Warzone, CRSED F.O.A.D, Destiny 2, Enlisted, Fortnite, Kovaak 2.0 The Meta, Mordhau, Overwatch, Rainbow Six: Siege, Valorant and Warface.
Game developers have the freedom to decide which all features of NVIDIA Reflex they wish to implement in their video games. Some implementations might require refactoring the code to a larger extent and some features aren’t required since the game developers have already implemented something similar. Regardless of the reasons, you’ll want to know which all features of NVIDIA Reflex you can play around with in each of the aforementioned games. So here’s a simple table outlining all of them and what each feature does.
NVIDIA Reflex Low Latency Mode – Boosts responsiveness by getting the CPU and GPU to work in an optimal fashion so that the GPU does not have waste time while pushing out frames to the display.
Low Latency Boost – Overrides the power saving feature within the GPU to allow the GPU to run at higher clocks, especially with CPU-bound games.
Reflex Low Latency Mode UI – A graphical NVIDIA overlay that provides gamers stats such as Render Latency, Game to Render Latency, Client FPS and Game Latency.
Reflex Latency Analyzer Flash Indicator – A flashing box that can be placed anywhere on the screen. This box flashes in response to your mouse clicks and provides a clear and very visible indicator that can be used to measure latency.
In-Game Latency Stats – Game developers can feed NVIDIA Reflex Software Metrics into the in-game stats overlays.
Enabling NVIDIA Reflex in-game
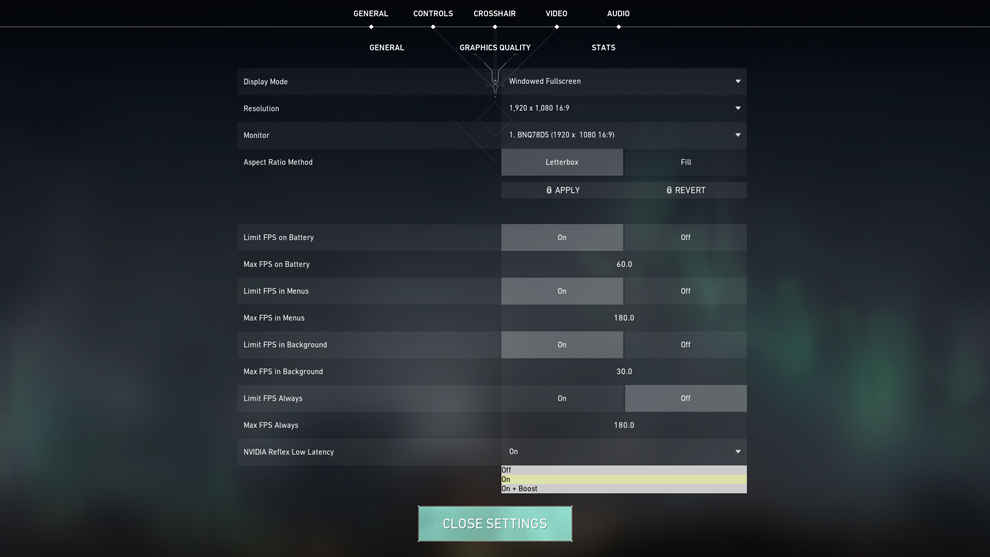
Once you have procured all the necessary hardware and the accompanying drivers and software, you should install the same and check if they’re functioning properly. We will not be going into basic hardware and driver installation in this article. Now fire up the supported video game and head into the settings to enable NVIDIA Reflex. In most games, you will find the NVIDIA Reflex options with the Graphics Settings panel of the video game. Let’s take a look at Valorant for example:
The NVIDIA Reflex settings can be seen at the bottom under the label “NVIDIA Reflex Low Latency” and it has three options:
- Off
- On
- On + Boost
The ‘On + Boost’ option switches on NVIDIA Reflex and also turns on Low Latency Boost which overrides the power saving features of the GPU to keep it at higher clock speeds. This helps the GPU to handle a larger spurt of frames from the CPU.
With this done, you should be able to reap the benefits of reduced system latency and have a better experience. Of course, you must wonder how much of a difference NVIDIA Reflex has brought to the table, and that’s where NVIDIA Reflex Latency Analyser comes into the picture. We’ll look at the same in greater detail shortly.
What if my game doesn’t support NVIDIA Reflex?
You can still enjoy a partial improvement in system latency even if the game developers have not integrated the NVIDIA Reflex SDK. In order to get this benefit, you will have to access NVIDIA Control Panel. You can do this by right-clicking anywhere on your desktop and opening the NVIDIA Control Panel. Under ‘3D Settings’ in the left-hand panel you will find ‘Manage 3D Settings’, click on it. In the right-hand panel, you will find a large set of configurable settings. Scroll down till you get to ‘Low Latency Mode’ which has three options:
- Off
- On
- Ultra
You can pick either On or Ultra and see which helps the most in-game. And if your game has NVIDIA Reflex and you have enabled Low Latency Mode in the NVIDIA Control Panel, then the in-game NVIDIA Reflex settings overrides the one seen in the NVIDIA Control Panel. This way, you don’t have to go back and forth each time you’re playing a different video game.
Ensure high-refresh rate is enabled
NVIDIA Reflex works best on the supported monitors and you can get the highest benefit on high-refresh rate monitors. If you have a 240Hz or 360Hz monitor, you should open up the display adapter settings to see if the refresh rate is indeed set to the maximum rate. Most monitors will be set to 60Hz by default if you do not install the software and drivers properly.
What else can I do to improve latency?
Gaming is huge and a lot of video games have already incorporated several features that help with reducing input latency. Here are some of the OS and game settings that you can play around with to reduce a few milliseconds.
1. Enable Exclusive Fullscreen
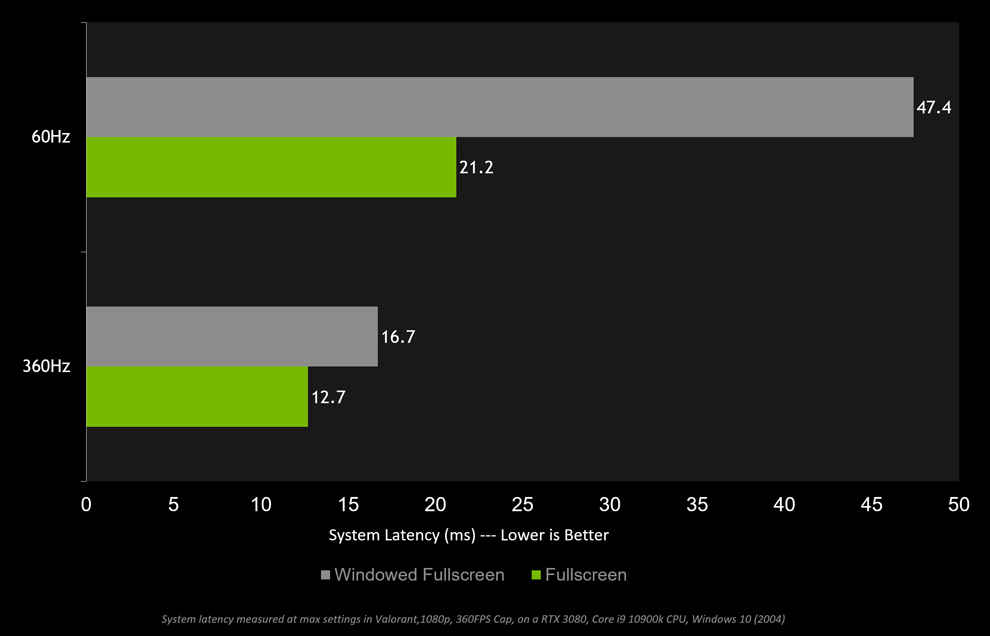
Often, when you are changing your video settings in-game, you will come across multiple full screen modes. The two common options are Windowed Fullscreen mode and Exclusive Fullscreen mode. The former gives the operating system control over the window and uses the Windows Compositor. This adds a bit of latency so switching to Exclusive Fullscreen mode will help reduce that bit.
2. Switch off V-sync if you don’t have a G-SYNC monitor
V-sync is a technology that limits the FPS of your game and brings it under the max limit of the display. This causes back pressure on the GPU if it is capable of producing more than the max limit of the display. Disabling V-sync helps reduce this back pressure and any additional latency implications that might occur.
3. Turn on G-SYNC if you have a compatible monitor
On the flip side, if you have a G-SYNC monitor then you should switch on G-SYNC since it will bring your frame rate in line with the refresh rate of the monitor. This way, you will experience no frame-tearing and there will be an improvement in the system latency.
4. Turn on Game Mode in Windows
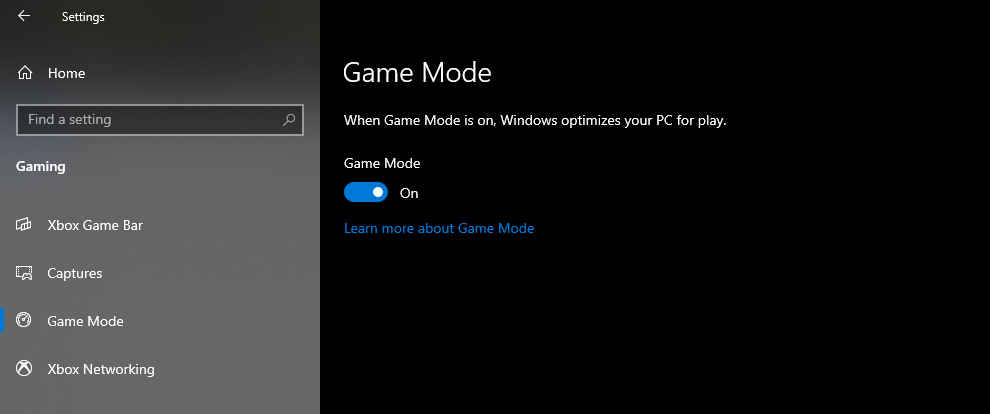
Microsoft has implemented a ‘Game Mode’ in Windows 10 which tells the operating system to prioritise all processes linked to any actively running video game. Game Mode is enabled by default in Windows 10, however, you should always check to see if it is indeed switched on. Performance varies from game-to-game so you should always check if there’s any improvement with Game Mode turned on. You can access the settings by opening up ‘Settings’ and then navigating to Gaming. Game Mode will be in the left-hand side and you can click on it to see the toggle button.
In this article, we’ve explored the different hardware that is compatible with NVIDIA Reflex and we explored the different steps required to switch on NVIDIA Reflex and make the most of it. If you’re curious about how NVIDIA Reflex works then check out our previous article that dives into the underlying technology.
Monitor latency in real time with NVIDIA Reflex Latency Analyzer
So you’ve now enabled NVIDIA Reflex in your supported video game. It’s most certainly improving your system latency but the question remains – By how much? For that, we’ll make use of NVIDIA Reflex Latency Analyser. To make use of this feature, the game developer should have made a few provisions for it within the game. And then you’ll need additional compatible hardware. Instead of system latency, we’ll now be looking at end-to-end system latency. Here’s what you need to do:
1. Get a gaming mice that works best with NVIDIA Reflex
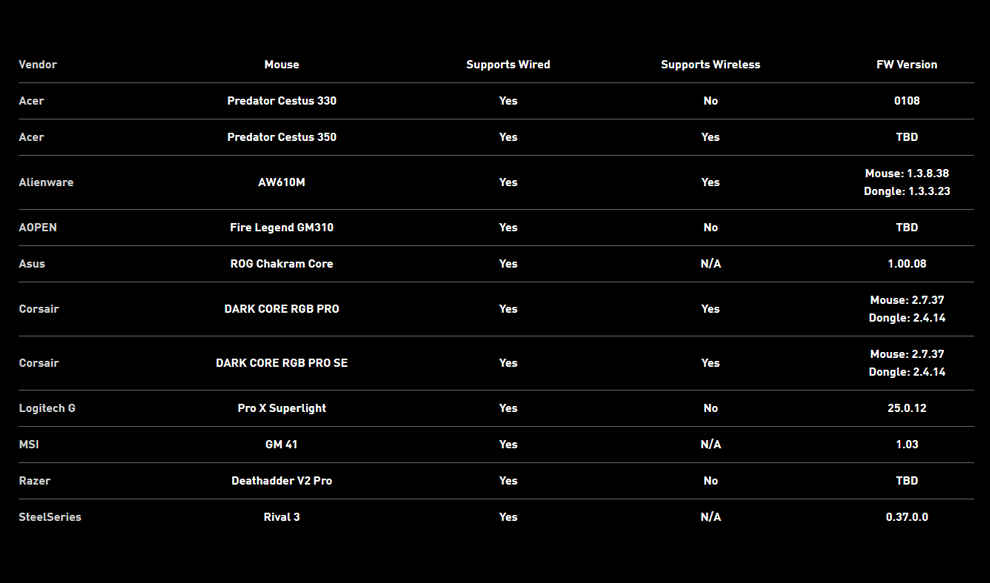
You can get any mouse which has a latency of less than 20 milliseconds which should work fine. However, NVIDIA has tested certain mice from a wide variety of manufacturers to provide recommendations. These work best with NVIDIA Reflex.
This list primarily features recently released mice from popular manufacturers and as NVIDIA tests more peripherals, they will be added to the official listing. Remember to check the same on the NVIDIA web site.
2. Get a gaming monitors that supports NVIDIA Reflex
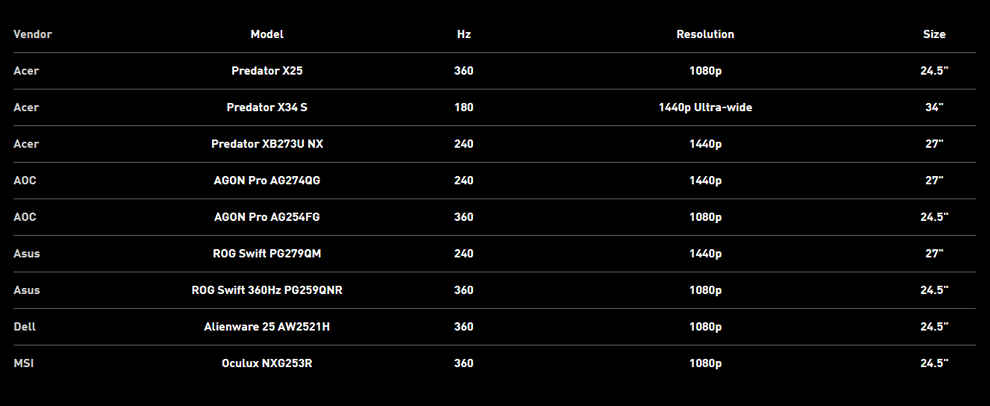
NVIDIA Reflex works with a wide assortment of gaming monitors from multiple manufacturers. NVIDIA has worked with several manufacturers to integrate the NVIDIA Reflex Latency Analyser into these displays. It is part of a particular hardware that is necessary for NVIDIA Reflex to communicate with the gaming mouse connected to the display and then relay the same to your graphics cards. This is a form of active measurement that produces accurate results. Here is the list of monitors that currently support NVIDIA Reflex.
As stated previously, these monitors have been tested by NVIDIA and have integrated the NVIDIA Reflex Latency Analyser tool. As more manufacturers adopt the technology, the list will expand.
3. Enable NVIDIA Reflex Latency Analyzer
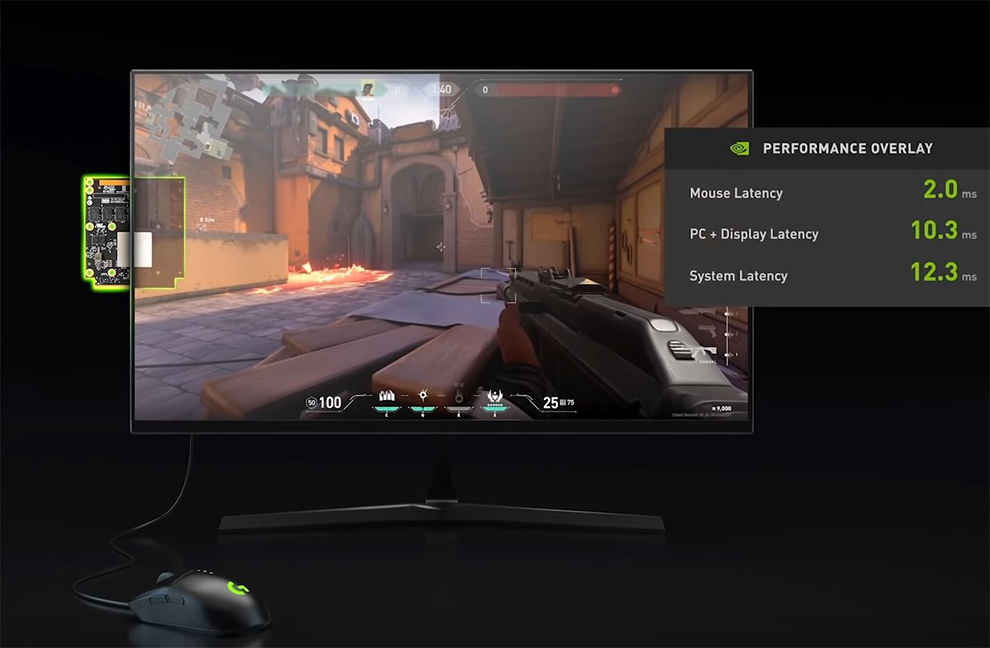
Once you’ve connected a compatible monitor to your PC, connected the compatible mouse to your monitor and connected the monitor’s USB passthrough cable to your PC, you’re set to use NVIDIA Reflex Latency Analyzer. Fire up a game that supports the feature such as Fortnite, Mordhau or Warface and then enable the Performance Overlay by pressing the shortcut key ‘Alt+R’. If the overlay is set to ‘Latency’, you will see the end-to-end system latency and see how much each and every hardware that’s part of the video pipeline is contributing to the overall delay.
This sponsored article is part of a 3-part series on NVIDIA Reflex. You can read the other articles here and here.

