
Welcome to the fifth article in the “Build Your Own PC” series, powered by AMD Ryzen and Radeon. In this article, we’re going to be installing Windows 10 and all the drivers for your PC. We’ll look at the typical installation scenario that you’re going to face after building your PC for the first time and we’ll take you through all the steps needed to set up your machine properly.
Creating the Installation Media Disk
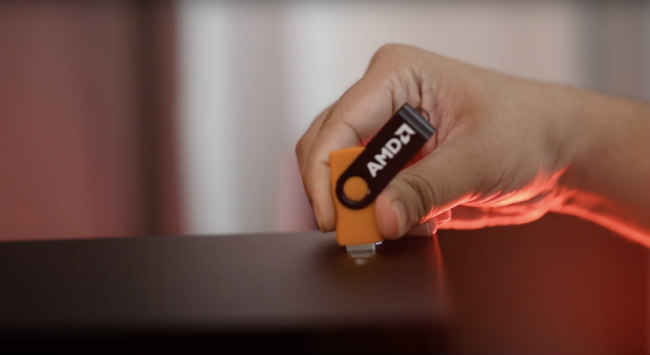
We’ll be installing Windows 10 using a bootable USB drive. In order to prepare a USB drive with the installation media you need an existing PC with Windows or Linux running on it. You can always make a bootable USB drive at your friend’s or neighbour’s place if you don’t have a second PC lying around.
You will need an 8GB USB flash drive for this process. Plug your USB flash drive into your friend’s computer and google for Windows Media Creation Tool. You’ll end up on the Microsoft Web Page that allows you to download the tool. Scroll to the section that reads “Create Windows 10 installation media” and click on the “Download tool now” button. You will initiate the download of the latest version of the tool. Run the tool and it’ll connect to the internet to get the latest details from Microsoft’s servers. You’ll be presented with the License Agreement first, read through it if you wish to and then Accept the Agreement.
The next screen will give you a choice between upgrading the current PC to the latest Windows 10 version or you can create an installation media. Choose the latter option and click next. On the next page, you will be given the choice to select the language, edition and architecture of the installation file. We tend to go with English (US) of the Windows 10 Edition for the 64-bit Architecture. Click next.
On the next screen you will be presented with the option of either preparing a USB drive or downloading the ISO separately. Ensure you have the USB Flash drive connected and then select the USB Flash drive option in the Windows 10 Media Creation Tool window. Click on Next.
This screen allows you to select the USB Flash drive on which the Installation Media will be set up. Please note that the contents of this USB Flash drive will be deleted when you proceed to the next screen so please choose the correct USB drive. If you have any other USB drives connected, it’s better to detach them before moving to the next screen. Click Next.
The tool will now download the latest Windows 10 setup from Microsoft’s servers and copy it to your USB flash drive. It will also make the USB drive bootable which is necessary for you to install Windows using the Flash Drive. Once the process is completed, you can remove the flash drive and plug it into your newly assembled desktop PC.
Windows 10 Installation

We’re assuming that your PC boots into BIOS just fine after you’ve followed the steps from the previous article. All current gen motherboards will have the appropriate options selected by default in the BIOS. But it’s always a good thing to go check these aspects anyway. Enter your BIOS by tapping on the DELETE key immediately after switching on your PC.
Once in the BIOS, head to the Storage section to see that all your SATA / NVMe slots are set to use AHCI. The other thing to check is Boot Priority i.e. the sequence in which your computer boots through the different storage options on your PC. This means every single SSD, hard drive and network will be checked to see where the operating system lies and it will boot the OS which is the highest on the list of boot priority. By default, the SSD and Hard drives are given first priority and then comes the USB drives and then come the network drives. If everything seems normal up till now. You can exit BIOS after saving all your settings by pressing F10.
Your PC will boot once or twice and then hunt for the operating system. Since there is none installed, it will move to the USB drive with the Windows 10 installation media since that’s the only bootable drive connected to your PC at the moment. This will automatically initiate the Windows 10 setup. If nothing happens, reboot your PC and tap on the “select boot drive” or “boot menu” shortcut key. This varies from manufacturer to manufacturer and for MSI it is F11. You should refer to the motherboard manual to figure out the boot menu shortcut key for your system. It is usually, F11, F6 or F2. Once you enter the boot menu, select “UEFI: USB XXXX” option. There will be two USB options, always pick the UEFI one.
Things have become monumentally simpler over the last decade and installing an OS is an extremely simple process now.
The Windows 10 setup has now begun and you’re facing the first screen of Windows installation. Click on Install now to proceed.
The next screen will ask you to enter the Windows 10 product key, if you have purchased a product key, now is the time to enter it. If not, you can always perform this step after Windows 10 is installed. Click on “I don’t have a product key” for now.
The next screen allows you to pick the Windows 10 Version. The versions with N at the end have some software removed for legal reasons. There are basically 3 major versions – Home, Education and Pro. The pricing for these is different with Home being cheap and Pro being the most expensive of the lot, so when you purchase a key later on, remember what you picked. Click next.
In the next window, select “Custom: Install Windows Only”. Since you don’t have Windows installed already, the upgrade option is moot.
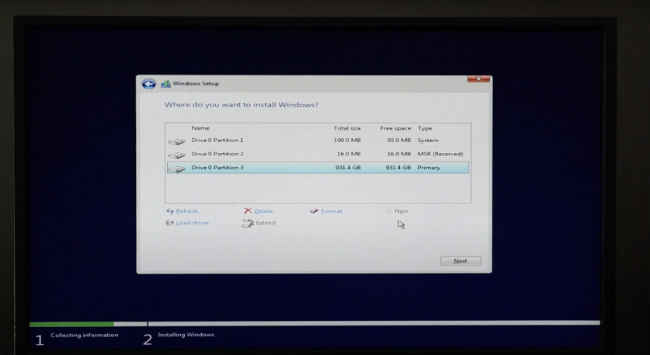
In the next window, you will be presented with all the disk drives that can be used for Windows 10 installation. You want to install Windows on the fastest drive you have connected, so it’ll be the NVMe SSD, followed by SATA SSD and last would be a hard drive. The storage drives are arranged in sequence with labels that read Drive 0, Drive 1, Drive 2 and so on. Identify the fastest drive based on the capacity. Select it and tap on “New”. Since your hard drives are new and have never been used in a PC, you will have to create a new partition using the “New” option. Ideally, you should just see just one entry “Drive 0 Unallocated Space” or two, if you have two storage drives connected. Enter the capacity and proceed. For the OS, we recommend using about 240 GB or so. If your SSD is 240/250/256 GB, then use all of it. If you find any existing partitions on your storage drive, then delete those and create a new partition using the “New” option.
Once you have created a new partition, select it and proceed. Windows will create a few additional partitions for recovery purposes, let these remain and pick the largest of these partitions and proceed. Windows will now start the setup and start copying all the files. Your PC will automatically reboot after this process is done and setup will continue after the PC reboots.
You DO NOT have to select the boot menu option again since Windows will take care of it. Your PC is now booting from your SSD or Hard drive since all the necessary files have been copies to your SSD or Hard drive.
The next screen will be the “Basics” window which starts with selecting the Region in which you are based. Pick India.
Next is your keyboard layout. Pick US since most keyboards sold in India follow the US layout. You can add additional keyboard layouts when you press next. We’ll skip this step.
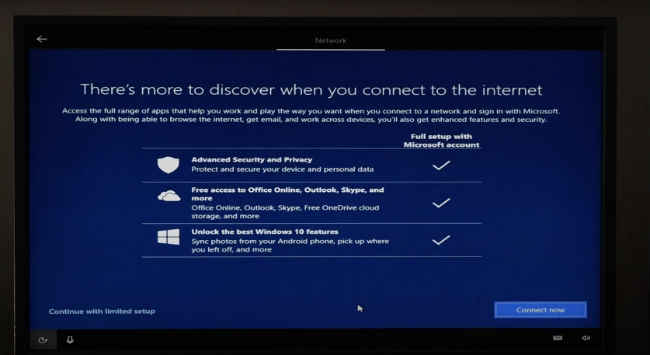
Next is the Network screen. If you have an Ethernet cable plugged in, your setup process will skip this screen, if you rely on Wi-Fi, you can choose to connect to the Wi-Fi access point at this juncture. We prefer to not do this during the setup process since Windows tries to download additional files during the setup and if your network speed is slow, it will cause your setup to go on for a really long time.
After the network screen comes the account Screen. Enter the name of the person or organisation that will be using your new PC and click on next. You can add a password on this screen or proceed to the next step.
The next screen is Cortana, you can allow Cortana to collect your personal information to provide more personalised experience or you can go with the vanilla option. We prefer to keep to not get a personalised experience, so we tend to select No, but you can choose Yes if that’s what you would prefer..
The next screen is also about your privacy. We prefer to disable all the options. Click on next.
Your OS setup will take a few more minutes and reboot. You have now finished installing Windows 10 on your PC.
Connect to your Network
Now that Windows 10 is all properly installed, you can plug in your ethernet cable to get access to the Internet or connect to Wi-Fi if your motherboard has that option. Please note, if you connect the PC to the internet at this stage, it will automatically start downloading drivers from Microsoft’s servers.
Most hardware vendors work with Microsoft to seed their drivers automatically via the Windows Update service. You can even trigger Windows Update by Clicking on the Start menu and typing Windows Update, and selecting the service.
Check for updates and Windows will download the latest security updates and drivers for your PC. Often the drivers stored on Microsoft’s servers might not be the latest. In order to get the latest, please refer to the motherboard’s support page. On the motherboard’s support page, select the OS as Windows 10 64bit and it will show all the drivers available for your PC. Download the Chipset, Network, VGA and Audio drivers.
The VGA drivers are only needed if you are using an AMD APU. If you’re using a discrete graphics card then get the drivers from your graphics card manufacturer’s website.
Install the drivers in the following sequence. First the Chipset or System drivers, followed by the LAN drivers and then you can go with the Audio, VGA and Storage drivers. Windows will automatically install the LAN, Audio and Storage drivers during the setup so you’re only upgrading those to the latest drivers. If at any stage, if any of the driver setups ask to reboot the system, please do so before proceeding to the installation of the next driver. Some drivers are only partially installed before the restart and the restart process completes the installation. It’s best to let one thing completely install before moving to the next driver.
The last thing you should do is to check the device manager to see if everything is installed or not. Click on the start menu and type out Device Manager and open it. In the Device Manager we’ll scroll through the enter list of hardware connected to see if there are any “Yellow Exclamation marks”. These indicate any devices that aren’t installed. You’ll usually find these under “Other Devices” and they’ll be labelled “Unknown device”. If there are none, you’re good to go! Your PC is properly set up.
Conclusion
Congratulations, you’ve installed Windows and all the required drivers. Your PC is now properly set up. This concludes the fifth article in a 7-part series on how you can build your own desktop PC. If you’ve faced any issues along the way, the next two videos should help you fix them. Remember to tag us in your PC build posts on Instagram and Twitter. Check out the links below to view the rest of the articles in our ‘Built Your Own PC’ series.
1. Build Your Own PC: The PC built for your needs
2. Build Your Own PC: Which CPU, GPU, Motherboard, etc should you buy
3. Build Your Own PC: How to get the best deals on computer parts
4. Build Your Own PC: How to assemble a PC
5. Build Your Own PC: How to install Windows 10 and setup your PC (You are here)
6. Build Your Own PC: Testing for cooling and performance
7. Build Your Own PC: Common mistakes while building a PC
[Sponsored Post]
Sponsored
This is a sponsored post, written by Digit's custom content team. View Full Profile


